Yesterday I attended an Open House at the Boalsburg Heritage Museum. This is truly a hidden treasure in our small community. I’ve known about it for years but had not managed to make the time to explore the building and grounds.
At least 40 years ago, when I was teaching elementary school in Boalsburg, one of my colleagues was actively involved in helping her young classes learn about the history of the local area. These youngest students would learn to read using stories about the “olden days” in Boalsburg. She was instrumental in developing curriculum materials and organizing field trips to see the artifacts to learn how folks lived in the Boalsburg area back in the late 1800’s. Ruth Corter’s advocacy stimulated community interest in collecting and preserving tools, household items and stories in a museum that could be enjoyed by all residents of the area. Her work inspired us all!

In 1983, the Sarah Sweet house was purchased by Mr. and Mrs. Thomas Aikens who presented the property to the newly formed Museum Association as a gift. The property of the Sarah Sweet House, currently the site of the Boalsburg Heritage Museum includes the house itself along with the Light House, the 2008 rebuild of the Bank Barn, and the Summer Kitchen. You can read more details about how the house and property became the Boalsburg Heritage Museum as their website, https://boalsburgheritagemuseum.org.
I’d like to share a few special displays that I found in my exploration of the museum.
How wonderful to see this tribute to Ruth Corter (1907-1997) presented in 1996:

If you’d like to know more about Ruth, you can see her obituary at https://www.findagrave.com/memorial/86721164/ruth-h-corter. She was a most inspiring educator!
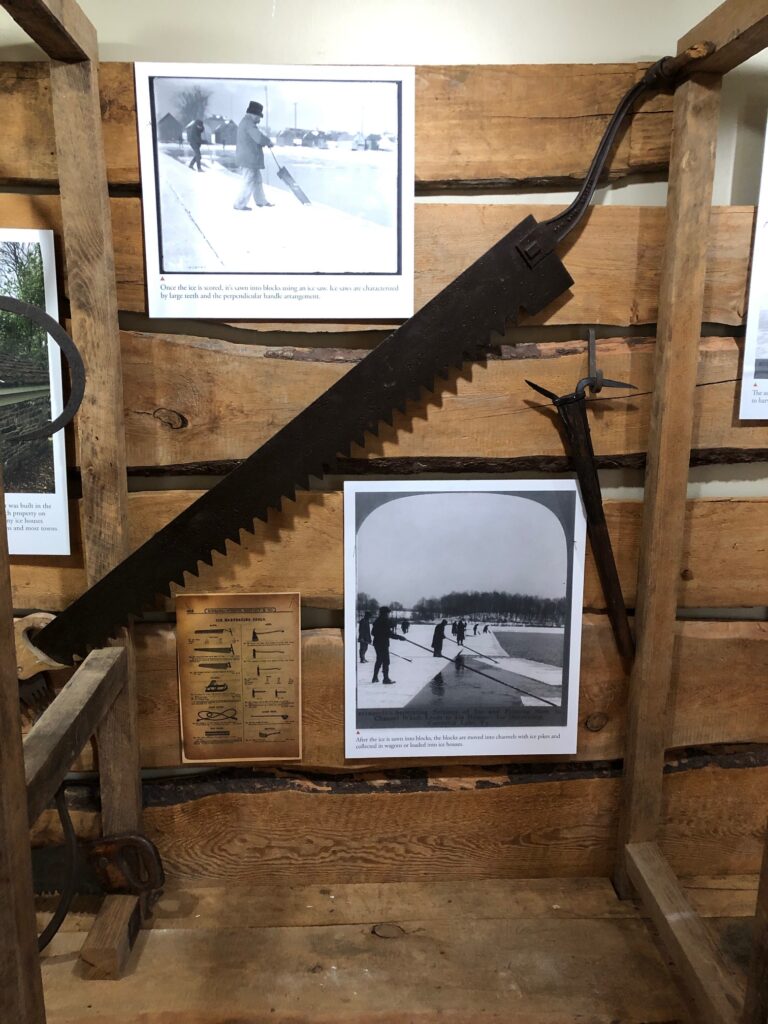
The first room in the Museum had information about how ice was collected and stored before electric refrigerators were common. The displays about the process and the giant tools used to cut and collect the ice were very interesting.
I love the display of the ice box with instructions to the housewife:


Many musical instruments were showcased, from brass instruments from the Boalsburg Brass Band (around 1861-1865) to the Parlor organ:


Who knew Dr. Richard Ishler (our family doctor) and his wife donated this Parlor organ!


One of the upstairs bedrooms was set up as a one-room school. I found this interesting, since both of my parents and my grandfather taught in one-room schools. Mother shared many stories about being a “city-girl” trying to adapt to a “rural school” setting, with keeping the stove fire going and handling all the grades in one room. Some of her students were bigger than she was!


And of course, what child in 1900 wouldn’t want to play with this doll house!


I took the time to see the “Summer Kitchen” in a separate outbuilding near the back of the house. I could imagine all the bread and stews that were cooked in that kitchen!
On a nice day this summer, I’ll explore more of the outbuildings. For this tour, the drizzling cold rain limited my tromping around.
Please check the Museum’s website for more information. They are an integral part of our yearly Memorial Day activities and offer a wonderful look into our past.
Please comment or email me directly at marykisner@comcast.net.