Christmas Favors Wrap Up

Thought it was time to wrap up my story about making Christmas favors for two groups of special folks. The first is the lovely group of about 14 women in the Ladies Auxiliary to the Boalsburg Fire Company. We will have our Christmas dinner next week at a local restaurant. The second group is from the State College High School class of 1964. Our group varies from month to month depending upon who is in town…often six to twelve folks. Next week we will have lunch at a local restaurant.

Obviously, many of these folks read my blog, so if you will be attending those events next week…shhh…please be ‘surprised’ when I hand out your favors. (smile)

I wrote about my preparations to make the Christmas favors two weeks ago (you can read about it at https://marykisner.com/planning-ahead-to-make-christmas-favors/) Now I’d like to share the finished products.

I decided to aim for 30 gift bags total to make sure I had enough. Each gift bag would have a small mesh bag of 3 small soaps, an eye pillow filled with flax seeds, a small bag of green and red M&Ms and a battery-operated votive candle. Just enough to take a relaxing break over the holidays! This was not an expensive gift bag…what I’m really giving is my time to make the soaps and eye pillows to some special folks. If nothing else, the items can be used up or re-gifted to someone else!

The Small Soaps

The first item that triggered my thinking for these gift bags was my extra Goats Milk Melt & Pour soap. The small soaps make great guest soaps and are easy to make. Most of the time is used waiting…waiting for the soap to melt and waiting for the soap to harden in the molds. Yes it’s a little tedious wrapping each tiny soap with plastic wrap, but it’s a necessary step. FYI…Melt & Pour soap is hydroscopic…and will eventually absorb moisture from the air and soften. Therefore, each tiny soap needed to be protected. (Regular hand-made soap bars made from scratch need to be open to the air to harden over a few weeks.)

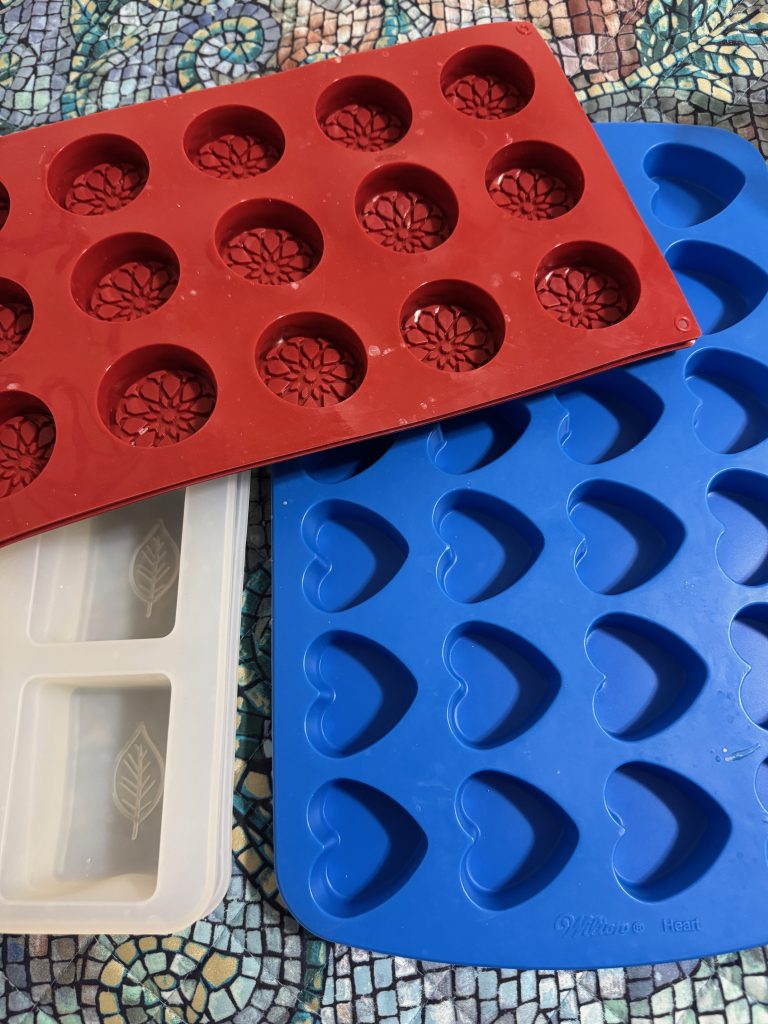
The Melt & Pour soap just needed to be chopped up, melted over boiling water and poured into molds. The small molds worked well, but I had to make 90 individual soaps. That took a full day to melt the soap, pour it into molds, wait for it to harden and then pop out the soaps and wrap them individually in plastic wrap. Then I started over when the molds were free.

Here are the soaps ready for the gift bags:

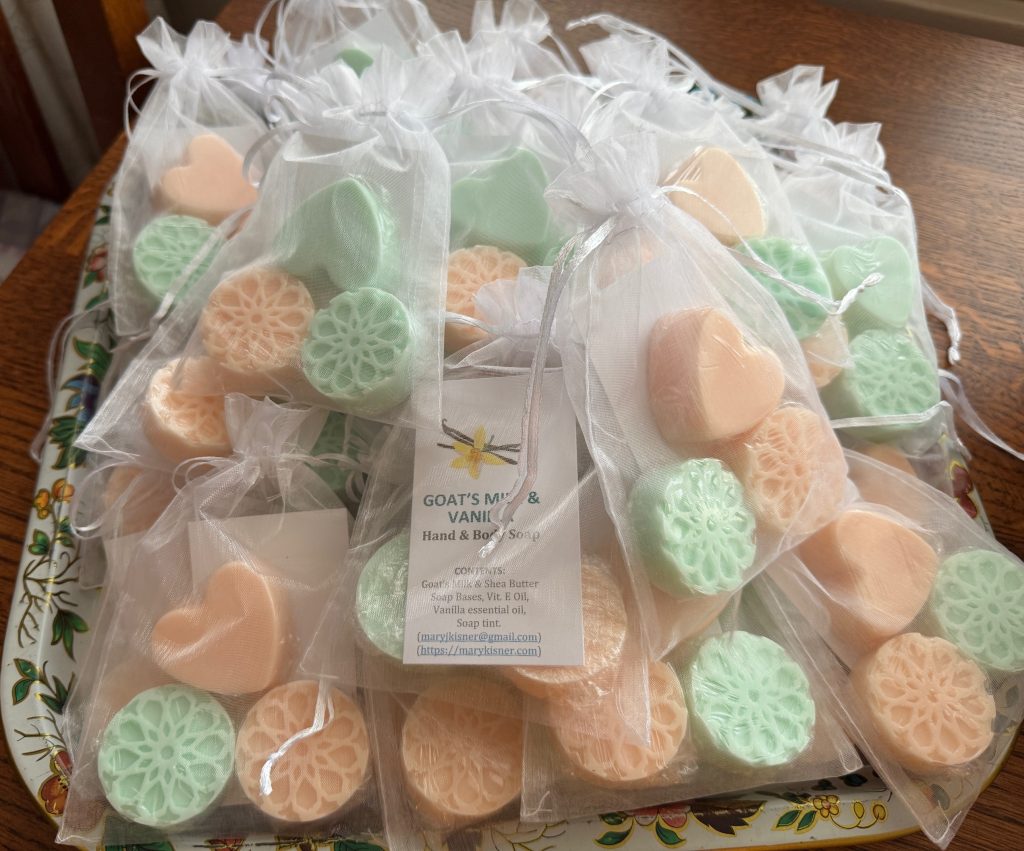
When I was all finished, I had this pile of soaps left over. They may find their way to other gifts or Christmas stockings!

The Eye Pillows

The flaxseed-filled pillows can be heated in the microwave or put in the freezer. Very handy for tired eyes. I found cotton fabric at Walmart, but I had to order flannel from Amazon.

You can read about how to make the pillows at https://marykisner.com/making-a-hot-or-cold-eye-pillow-for-headaches-or-toothaches/

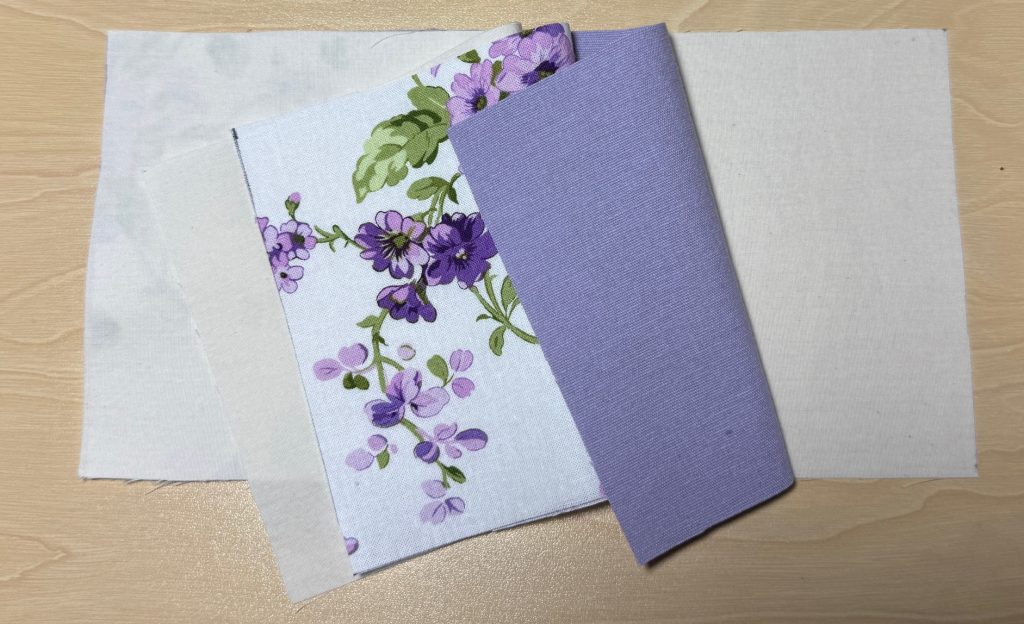
First, I cut out 30 sets of pillows…one front, one back and two muslin pieces for lining. The flax seeds have sharp points on each end and would poke right through the flannel without the lining.

The four pieces stacked like this:

I stitched around the rectangle leaving an opening on one end.

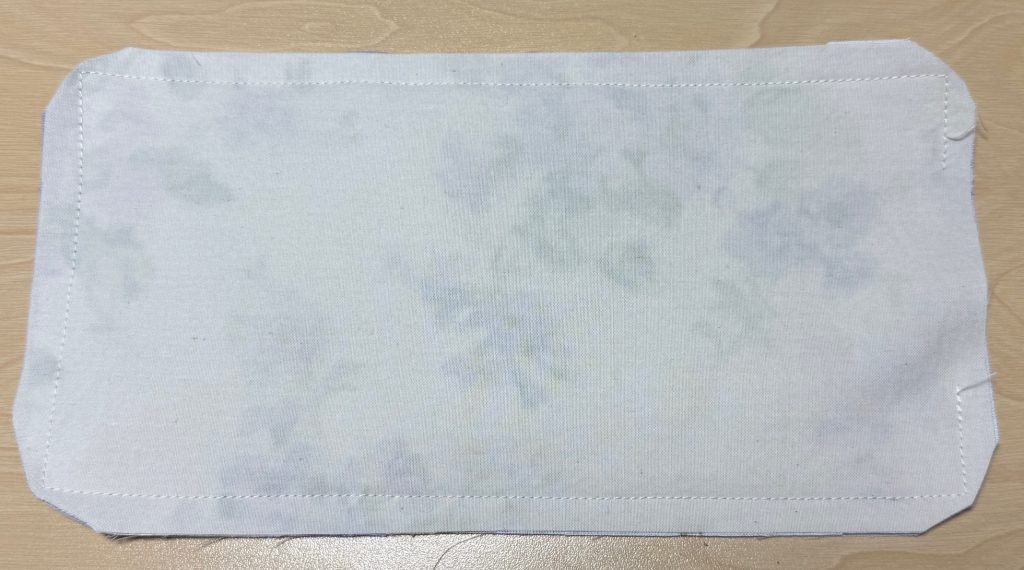
Turn the pillow right side out.

Top stitch all the way around the pillow…leaving the small opening. I used a funnel and a 1/4 cup measure to pour in the required 1 cup of flax seeds. Then, after shifting all the flax seed to the far end, I quickly sewed the opening closed.

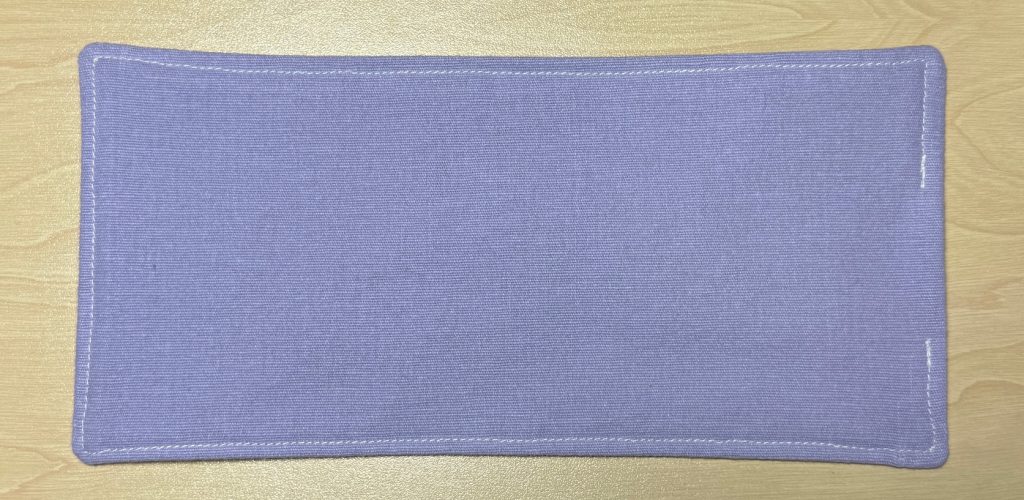
I also wanted to keep each pillow clean in the gift bag, so I put each one in a gallon zip bag. That would help it stay nice between use, and would keep it clean if used as a cold pack when placed in the freezer.

The process to make 30 pillows took more than several days to complete. Thank goodness for Hallmark Movies to keep me entertained!

The Battery-operated Votive Candles

I’ve had this box of votive candles for several years. I used a few to put inside some clay candle holders I made out of polymer clay. So much for that project! I made a few and decided I didn’t need more than three…thus, there sat a box of candles on my shelf! (I did make sure they would still work before I put them in the gift bags!)
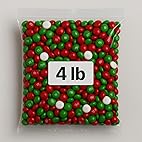
Red and Green M&Ms

I’m sure the M&Ms were not necessary but they just seemed like the perfect touch! This 4 lb. bag of M&Ms just made 30 tiny bags…one for each gift bag!

Time to fill the bags!

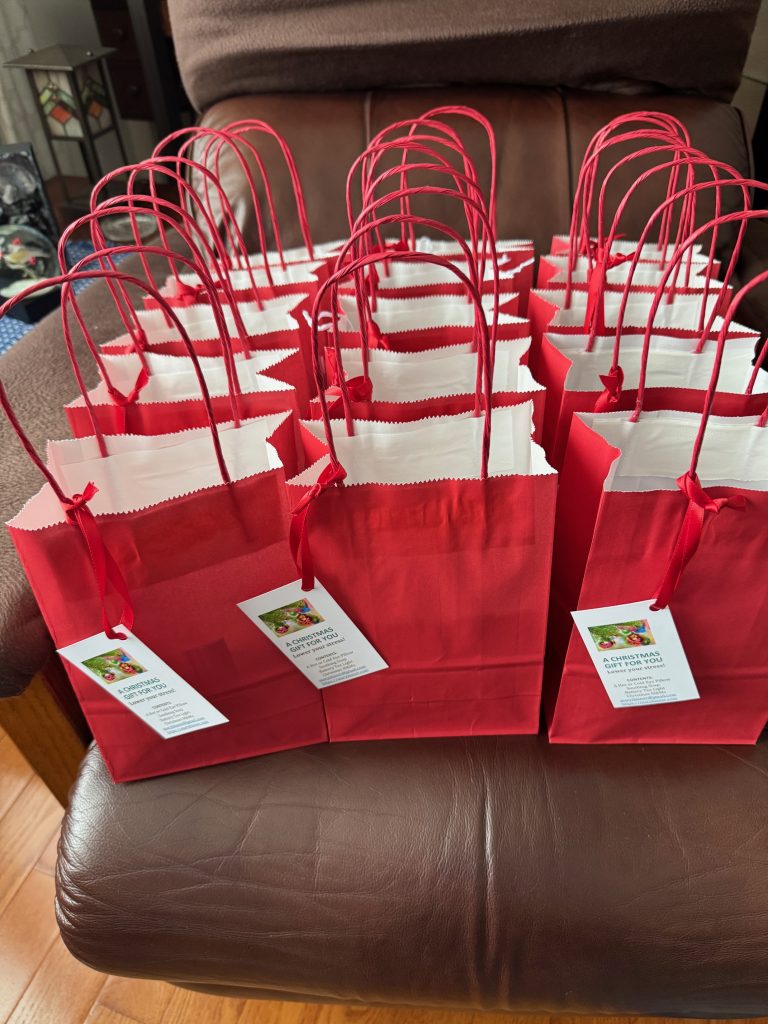
I think this display will count as my Christmas decorating for the season! Enjoy!

Please email me directly if you have comments or questions: maryjkisner@gmail.com

Blog Update July 28, 2025

It appears that a link is not working in WordPress that shows my blog entries in some consecutive order. The Welcome page seems to load just fine, but when I try to go to the menu and select “Blog” it says “Oops, can’t find that!” Grrr. However, you’ll notice the list of the most recent 10 posts I’ve written is on the right.

If you have subscribed to my blog, you will be taken to the correct entry. If you come to my website through Facebook, I always provide the correct link to the article I just wrote. If you come to the Welcome page you’ll see a list of the most recent 10 posts I’ve written.

I have also updated the PDF that is a complete list of everything I’ve written with hotlinks to each article. That can be downloaded from the Welcome Page and also below. Over the last four and a half years, I’ve posted 434 articles. It might seem tedious to search, but I didn’t think I’d have so much to write about! Now, I just need to get out the manual and figure out what happened to the link to the “Blog” button! In the meantime, check out the list of the last 10 posts and the PDF below. If any link doesn’t work, it’s probably a typing error. Let me know…THAT I know how to fix! Enjoy!

Blog Update June 2, 2025

Hello Readers!

It appears the automatic spammers have found my website. What started as a few inconvenient “comments” that made no sense or were written in another language has exploded into 25 to 50 “comments” every day relating to old posts or no specific posts. Occasionally, I hear from one of you about a specific post, so I have to be careful to check the expanding list so I don’t miss your comments! From this point forward, I have turned OFF the comment feature on any future posts.

However, I do love to hear from you…it reminds that maybe someone is actually reading the posts or trying to make something similar. It is encouraging! I usually post a partial story on Facebook with a link to my website and some of you just comment there. I enjoy that also!

So…if you want to comment on anything I’ve posted, please just send me an email directly and I’ll see it right away…maryjkisner@gmail.com. Thanks!

How to Make Gravy Like My Mother

My mother was the queen of depression-era cooking. Her meals weren’t fancy but they were frugal. She was married in 1935 and raised two kids during lean times while my dad was in college and finances were very tight. By the time I was born in 1946 our family was preparing to leave dad’s teaching job in New Jersey and move to State College and Penn State.

The lean times were finally in the past but my mother never let go of her efficient recipes and could make a meal out of a few leftovers. To this day, my favorite dish was her casserole that had some meat chunks, leftover vegetables and gravy topped with biscuits.

The Paul Bixby family around 1950

Somehow, I never watched how she made the gravy and I spent many years of my married life trying to duplicate those casseroles. I usually ended up with vegetable soup but could never seem to figure out how to make the broth into gravy. I often gave up and opened a jar of pre-made gravy or used a dry packet to make a cup of gravy.

A few years ago, I finally looked up on the internet how to make gravy and I’ve enjoyed being able to produce a nice gravy with juice left from cooking a roast in the crock pot or roasting chicken in the oven. Last week, I made a delicious chicken vegetable soup and wanted to convert it to my mother’s familiar casserole. I’d like to share the simple recipe with you.

How to Make Gravy

Ingredients:

2 tablespoons butter (or coconut oil, vegetable oil, olive oil, margarine or bacon fat)

1/4 cup all-purpose flour (or 2 tablespoons cornstarch)

2 cups chicken, beef, turkey or vegetable broth (or pan drippings…strained to remove gristle or fat)

Instructions:

  1. In a medium-size saucepan, melt butter (or other fat) over medium high heat.
  2. Whisk in flour (or cornstarch) until well combined and no white specks remain. Cook 2 minutes.
  3. Slowly pour in broth and whisk well.
  4. Bring to a simmer and heat until thickened to desired consistency, about 2 minutes, whisking constantly.

Making Gravy Out of Soup Broth

I started with a big bowl of my homemade chicken vegetable soup.

I pulled out my strainer and dumped the soup in to strain out the vegetables.

The recipe above is based on 2 cups of broth. You can see I had 3 cups of soup broth. So, I just increased the measurements of the fat and flour to make sure it would thicken properly.

I like to use coconut oil and all-purpose flour to make this gravy.

I measured out 3 tablespoons of coconut oil and melted it in the pan.

Then I added about 2/3 cup of all-purpose flour and stirred them together until all the flour was absorbed by the coconut oil.

Then, I added the soup broth to the oil/flour mixture and whisked until it was all combined. On medium heat, I stirred until it came to a boil, turned the heat down and stirred until it thickened…about a minute or two.

Finally, I added the gravy back to the vegetable soup and had the base for a chicken vegetable casserole!

Now for the biscuits! Of course, I had to try Bisquick like my mother used. She reminded me back then that in her high school Home Economics class she had memorized the ingredients to make biscuits from scratch and had usually done so. By the time I was born, she was thrilled to use Bisquick…such a time saver!

Luckily, I could use coconut milk (or almond milk) to make the biscuits. Of course, with the arthritis in my right hand, I had Bert mix up the biscuits. I just formed them into biscuit shapes and put them on a cookie sheet.

My mother would have spooned the raw biscuits on top of the gravy and vegetables and baked the casserole in the oven. I broke up a biscuit and spooned the hot gravy and vegetables on top of the biscuit. Worked for me!

Save this recipe and make your own gravy anytime! Enjoy!