Blog

Remembering Our First Date

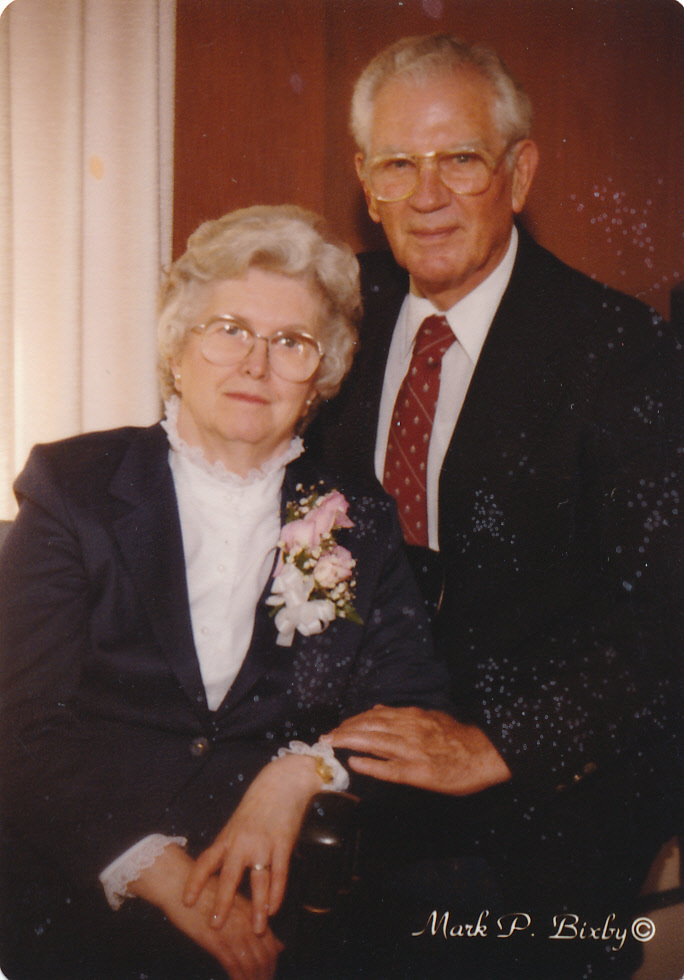
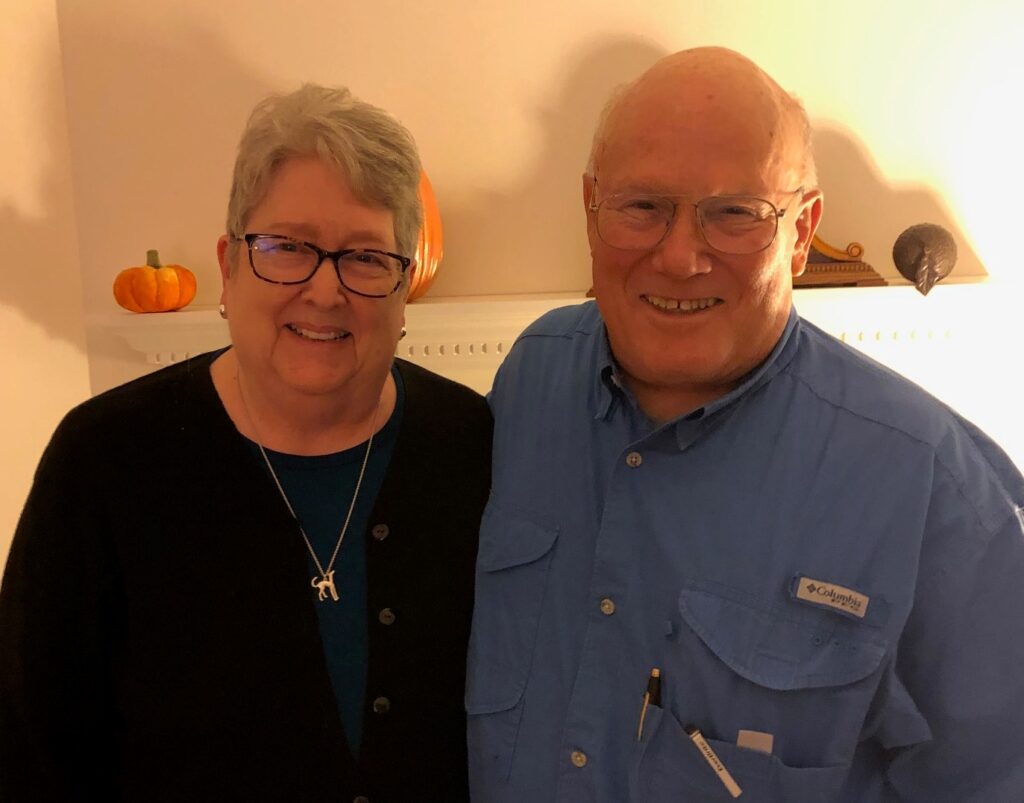
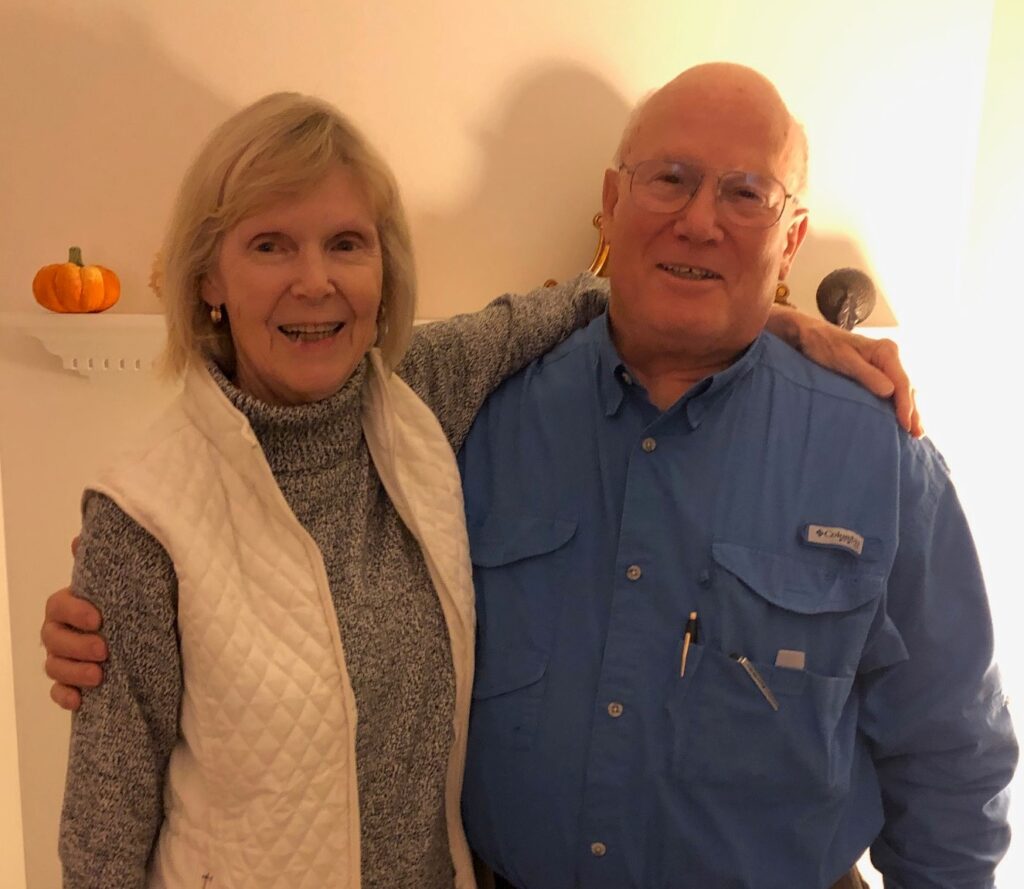
It seems so long ago, 58 years, yet I’m reminded of our first date every year by the headlines back then…

(Original Caption) New York, New York: Headlines announcing Kennedy’s assassination from three New York newspapers, the Times, the Daily News, and the Herald Tribune. November 23, 1963.

I was eagerly anticipating our first date. We were supposed to go to a fall dance at the High School. We hardly knew each other…had just met in English class our Senior Year, even though we had been in the same schools since 7th grade. Our paths had not crossed in any class before.

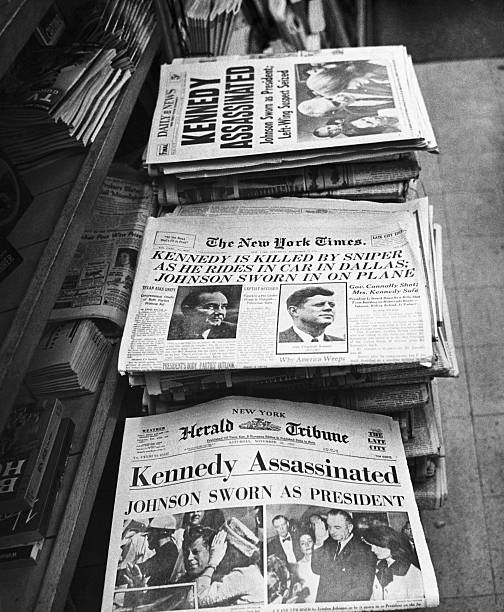
We were in our afternoon classes when the PA announcements came on that President Kennedy had been shot. We all listened in stunned silence. Over the next few hours, we were bombarded with all the speculations from the news media, our teachers and our classmates. The details would unfold over the days and weeks to follow.

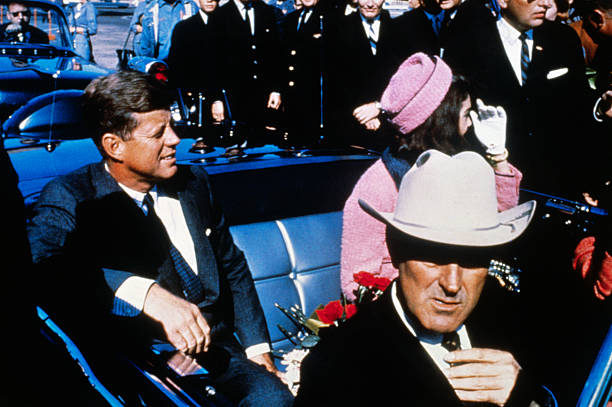
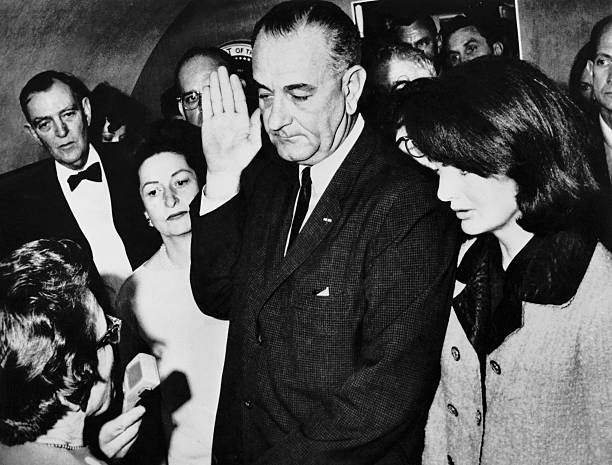
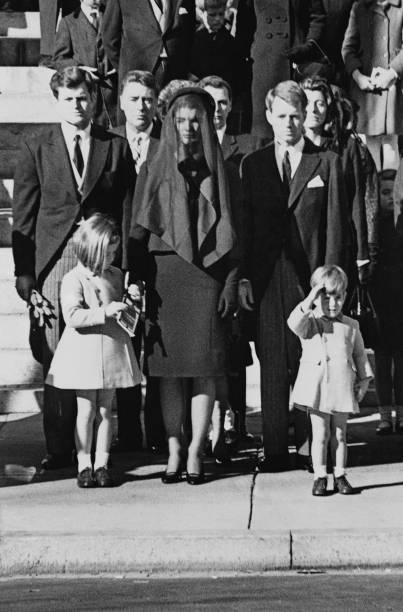
Many of the pictures in the news are still familiar to me today:

President John Kennedy rides in a motorcade from the Dallas airport into the city with his wife Jacqueline and Texas Governor John Connally.
Lyndon B. Johnson, during his inauguration immediately after John F. Kennedy’s assassination, with Jackie Kennedy by his side.
Members of the Kennedy family at the funeral of assassinated president John F. Kennedy at Washington DC. From left: Senator Edward Kennedy, Caroline Kennedy, (aged 6), Jackie Kennedy (1929 – 1994), Attorney General Robert Kennedy and John Kennedy (1960 – 1999) (aged 3). (Photo by Keystone/Getty Images)

By the time I got home from school, the world had changed. I think we were all in shock. All I could think about was what a relief it would be to go to a dance to feel somewhat normal again…if only for a few hours.

Of course, we had not gotten the memo that the dance was cancelled! So, I got dressed up, Bert came over to pick me up and we went to the school. Oh no! The sign on the door gave us a reality check! We headed back home to just go for a walk around my neighborhood and talk. We hardly knew each other so it was an awkward time.

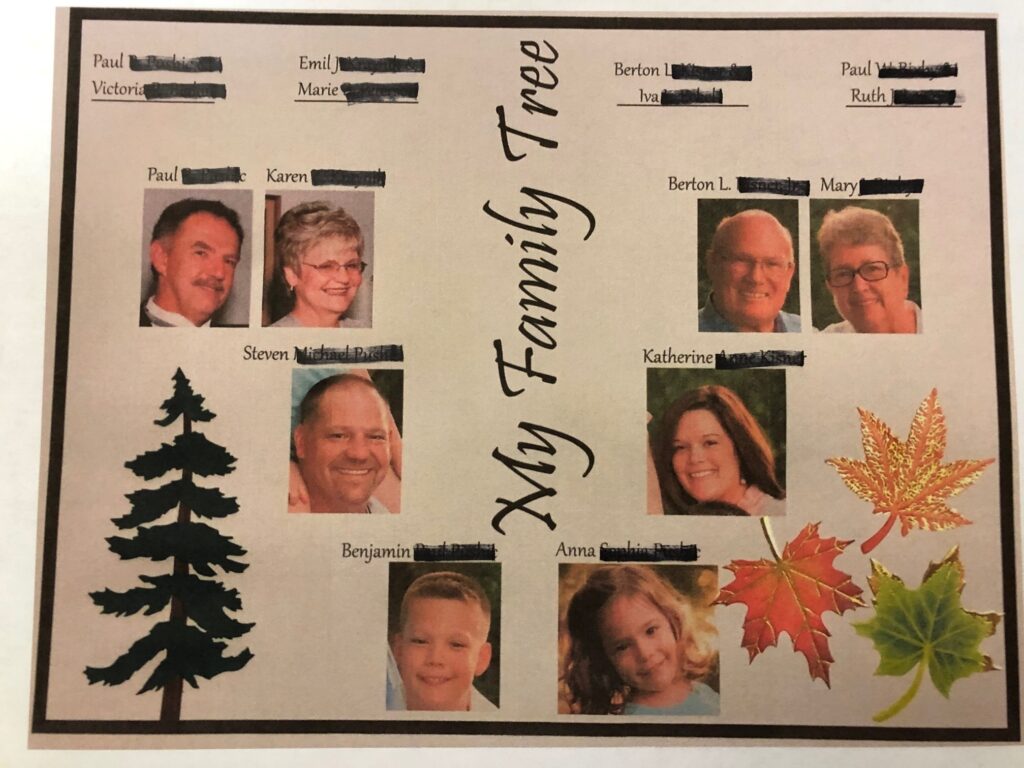
It was also a memorable beginning to our relationship that I will be reminded of every year. I guess it stuck, because 58 years later we’re still hanging in there!

This year we’ve been married 54 years!

Do you have memories of that day back in 1963? I’d love to hear about them! My email address is marykisner@comcast.net.

Aloe Vera Gift Soaps

Getting ready for Christmas when you’re a crafter often begins by Thanksgiving or even earlier. If you go to a store like Michael’s Craft store or JoAnn’s Fabric Store you will see Christmas projects and supplies available shortly after Halloween. They know when we start thinking about gifts we want to make and how long it will take to make them. We really are shopping for fabric, thread, craft supplies, etc. months before the holiday.

This year I wanted to give a few folks a bar of my Healing Aloe Vera Soap. I also needed a gift for an exchange, where I wouldn’t know the recipient. I’m sure you’ve been asked to “bring a wrapped gift that costs less than $10” for a gift exchange at some point in the past. Why not figure out a gift that I would be happy receiving? I decided to use some of this soap recipe to make some small gift soaps and found a clear container to hold them at Wal-Mart.

In this post, I’d like to share what I made, along with the Aloe Vera soap recipe. If you want a review of exactly how the soap is made, please see my previous posting that goes through step-by-step of how to melt the soap and add extra ingredients (see https://marykisner.com/a-healing-aloe-vera-soap/).

Here is my current recipe:

I usually make two batches at a time…in two 4-cup heat-safe glass measuring cups. I set each on a pan of water on the stove. Because we have hard water, I add about 1/4 cup of white vinegar so the boiling water doesn’t leave behind a layer of sediment to the insides of the pan and the outsides of the measuring cups.

I start with the melt-and-pour soaps of Aloe Vera and Shea Butter Soap Bases. That simplifies the process so I don’t have to deal with lye to make the soap.

Here are the soap bases, ready to cut into cubes:

And then…all the rest of the ingredients:

See the article referenced above that takes you through the specifics of adding each of these ingredients. Please note…I used only one drop of the soap tint. The melted soap is sort of light green already, so that one drop just evens out the color. I like the light green color that makes me think of the Aloe Vera plant. Any more than that and it looks artificial.

Each batch of melted soap bade six regular-size bars and about 9-11 little heart soaps. I filled the hearts up just halfway to make a smaller soap. Then I sprayed the tops of the soaps with alcohol to disperse the bubbles that sometimes form on the top.

This made a nice batch of soap. Each one was wrapped in a piece of plastic wrap. Melt-and-pour soap tends to attract moisture, so I recommend keeping them wrapped until ready to use.

I think this will be a nice surprise gift at our gift exchange…with a little ribbon!

I always include an ingredient list for the things I make in case folks are allergic to specific things.

One project done for Christmas! I’d love to hear about the gifts you’ve made! Leave a comment or mail me directly if you’d like to share! marykisner@comcast.net.

Plan B When the Sewing Machine Needs a Check-Up

Nothing is more frustrating than to be in the middle of a huge project and have an equipment malfunction! I’m trying to crank out as many greyhound coats as I can now that I have a huge pile of fleece to work with.

This time of year is a great time to be at my sewing machine because all the Hallmark Christmas Movies are on…on three different channels! Some of the movies I have seen before but the background music is usually Christmas themes so I can sew like crazy and not be too distracted.

Until my machine stops working properly. After I cleaned out the fleece fuzz, checked that the machine is threaded correctly, checked the needle for any issues, checked the tension, etc. and still…the thread broke, the bobbin jammed and I’m out of business. Grrrr!!

After a quick phone call to the local repair shop (Frye’s Sweeper & Sewing in State College) I was able to lift the machine out of the table case and set it in the back seat of the car…secured with the seat belt, of course…and headed off to the shop.

So…I’m out of the fleece dog coat business for a week or so. However, I still have some other sewing to do that isn’t fleece. Time to bring out the smaller portable that I use if I need to sew away from home. Works great…just can’t handle fleece.

I have to close up the table and work on top, but this 3/4 size Janome will work fine with regular cotton fabric. So, for the next week, I’ll be working on other projects…probably making more Christmas ornaments for gifts.

Hopefully, my workhorse machine will be all fixed up soon so I can continue with the dog coats. I know the dogs will appreciate them!

Always have a Plan B! Enjoy!

If you have any questions, contact me directly at marykisner@comcast.net.

Building a Simple Family Tree

Family trees and genealogy are fascinating to me. I seem to have become the “holder of the family info” for the Paul Bixby family, which includes my parents (Paul and Ruth), their 3 children, 9 grandchildren, 17 great grandchildren and numerous great-great grandchildren. Thank goodness for Family Tree Maker software!

Paul and Ruth Bixby 1935
Paul and Ruth Bixby 1985

I do remember how confused I was as a young child trying to understand how all my aunts and uncles were associated with my parents. My Dad had 4 sisters and my Mom had a brother and a sister. Each had their own families, so I had a hard time keeping my cousins straight. What I really needed was a simple family tree diagram to show me these relationships. (Obviously, as a young child I could have used an illustrated diagram!)

I’d like to share some simple Family Trees I made for my grandchildren a few years ago. I thought it might help them picture their immediate relatives and how they are related. Maybe one day, one of those grandchildren will be interested in exploring the rest of the family tree.

I had already collected the basic facts for these simple family trees. In my software, it looks like this:

This is a basic format and hopefully someday, Ben will appreciate the details. However, I wanted this first tree to include photographs he could relate to and show simple relationships.

So, first I made sure I had photographs of his grandparents. I could not get photographs of all of his great grandparents, so I just included their names. This was done on an 8 1/2″ x 11″ sheet of paper; the photos were scanned and placed into a Word document. Then the pine tree and leaves were stickers I pasted in by hand. I took a picture of the finished “Tree” before I put it in a frame for each grandchild.

Here was Ben and Anna’s first family tree:

And of course, Ted’s children had a tree with different people. Here’s the tree for Aislinn and Annika:

I hope I’ve set these simple diagrams up so if they move to a computer-generated family tree, they will see the similarity of the layout. If nothing else, it prompted me to get my computer program updated with the correct spelling of all the folks four generations back.

So, consider simplifying your family tree with the information and photos you have and make a picture for the younger generation. It may spark someone’s interest in learning more about genealogy! Enjoy!

Please comment or email me directly at marykisner@comcast.net.

Last Garden Update November 12, 2021

Sad as it is, our gardens in November look very similar to how they looked in the early spring (see https://marykisner.com/homestead-tour/). Of course, we had snow on the ground then, but who knows…it could snow this weekend!

Bert has almost everything tidied up except the partial row of carrots that we will probably dig up next week. Here’s how things look now:

The Dogwood trees are done and I imagine the first snow will bring down the leaves.
The whole row of dogwood trees look pretty sad…but notice how green the grass still is! Bert will mow one more time before putting the mowers away.
The Lemongrass is no longer green thanks to the frosts…we’re not sure whether to just cut it off or leave it until spring.
For some reason the chamomile stays green most of the winter. I did cut it back a few weeks ago, but it is still growing!
I cut the Lemon Balm back a few weeks ago, almost down to ground level, but it is determined to stay green a little longer.
The bright green carrots on the left will be dug up this next week. The Lavender will probably not come back next year, but we’re going to leave it alone and see what happens in the spring.
The rest of the garden will have a good rest until spring.
And my dear Echinacea will drop all those seed soon. Hopefully we’ll have a nice full patch of flowers next year.
The Butternut trees dropped their leaves quite quickly after the first frost.
And of course, Bert has removed the rain barrels for the winter and connected the spouting back up on the shop. If you want to see how he hooks them up, see https://marykisner.com/setting-up-the-rain-barrels/.

So, the next posting about the garden will be next spring. Maybe I’ll have to share snow pictures for all you folks in California, Texas and Florida…just to remind you what you’re missing! Enjoy!

Please comment or email me directly at marykisner@comcast.net.

Low-Key Birthday Celebration

We headed south on Friday to visit Bert’s sister and her husband. They live in Greencastle, Pennsylvania…right near the PA/Maryland border. It was a beautiful day, not a cloud in the sky. A great day to celebrate my birthday (of course, anything past 39 doesn’t count!). We thought we might see beautiful fall color, however it seems this year the leaves sort of turned muted colors of yellow and gold and then turned brown and dropped.

The only really red splash of color was an occasional Burning Bush. It seemed unnatural with everything else so drab.

I took this picture the day before…so of course there were clouds in the sky!

We had a good visit with Bert’s sister, Joanne, and her husband Mark.

Hard to believe we’re 75 years old! But I’ll always be 9 months younger than Bert!
Ahhh…Siblings!

Then we ventured out to have dinner at The Grille at the Runways, which is part of the Rider Jet Center at the Hagerstown Airport. This restaurant is part of the complex for private flights and offered quite a view of the runway used by these private planes.

Of course, any photos I tried to capture from their website would not come through, but here’s the description of the Center:

Rider Jet Center is Western Maryland’s newest and finest full service Fixed Base Operator (FBO). Based at Hagerstown Regional Airport (KHGR) in Hagerstown, MD, Rider Jet Center offers only the highest level of aviation service to all aircraft, pilots and passengers. Rider Jet Center is a perfect location to remotely base your Washington / Baltimore corporate flight department. With over 40,000 sq. ft. of heated hangar space and 10,000 sq. ft of office space, Rider Jet Center is capable of storing aircraft as large as a Gulfstream or a Global Express and accommodating the necessary staff to support them. We are conveniently located in the northwest corner of Hagerstown Regional Airport on the west apron. Our terminal and hangars are capable of servicing business and private travelers’ needs while visiting the Hagerstown area.

I wanted to share this description because during dinner we were captivated by the view out the huge windows in the restaurant. Here are some pictures of the planes and sunset we saw:

We sat at a table beside the pilots of the Civil Air Patrol plane you see above. Other than that, it seemed the rest of the patrons of the restaurant were ordinary local people from the surrounding community…like us!

Outside the restaurant was a gift shop and displays of airplane models. We were told this private airstrip welcomes celebrities like Jay Leno, and others. We did not see any famous people!

Here are some of the displays in the lobby:

So, we had a great visit, enjoyed a beautiful drive down and back, and had a great dinner. This was a pretty low-key celebration for my birthday, but after all these years it was just perfect!

Please comment or email me directly if you have questions at marykisner@comcast.net.

When Does a Chicken Need a Coat?

A few years ago I had a request to make a coat for a chicken. Who knew they would ever need one!

Apparently, hens can get damaged feathers and broken skin from mating males or even from other hens pecking on them…you’ve heard of the “pecking order,” right? I had no idea, but I guess folks that raise chickens see the need for these now and then.

A chicken “saddle” or “hen apron” are all names used for the same thing. It’s a little “apron looking” little piece of material that is used to put on your hens’ backs to protect their feathers. It protects their feathers, allowing them time to grow back. The soft elastic wraps around their wings.

Turns out a friend had some free-range chickens and they were picking on one in particular. Her tail feathers were being pecked out and the poor thing wouldn’t come out of the corner to eat. Hmmm…first a little research was in order. Amazingly, Pinterest had several patterns to make these little “coats.”

The pattern was pretty simple, but of course I didn’t have a chicken to measure so I made one first and had the owner try it on the chicken. Then I adjusted the elastic and general shape until it was right for that chicken.

My first try was a double layer of flannel (see above). The second one was made of denim so it could withstand the pecking better.

It protected the chicken at risk and eventually the tail feathers grew back and the chicken finally risked coming out of the corner to eat dinner. I guess it helps break the habits of aggressive chickens.

I ended up making 3 or 4 coats, including a few that were barely half this size for a very small breed of chicken.

This was an interesting adventure into making unusual “coats” for chickens!

In my research, I found coats are often made for sheep to keep their wool clean until they are sheared. This is really helpful if the wool is going to be spun into yarn…much easier to process the fibers if they start out clean. Of course, it’s also common to provide coats for warmth to goats and horses, but luckily, I haven’t been asked to make those yet! I think I’ll stick with greyhound coats! Enjoy!

Please comment or email me directly at marykisner@comcast.net.

Cozy Coats for Greyhounds

Today began a marathon to crank out some cozy coats for the greyhounds. All of a sudden, Nittany Greyhounds has a full house and adoptions are happening fast. My work with Nittany Greyhounds started years ago, when I was asked to make some coats for the greyhounds. The dogs arrive in Pennsylvania from around the country…and recently, even from Ireland! The group wanted to be able to offer a coat to new adopters but at that time finding a source for coats that fit the unique shape of the dogs was difficult, expensive or didn’t fit well anyway. So, I took on the challenge to make a coat that fit. Thus began my work volunteering with Nittany Greyhounds. Now, years later, we have a coat pattern that works! Let the shopping begin!

Toni and I spent a productive hour at JoAnn Fabrics to find a stack of cozy fleece.

At one point over the years we tried to make some of the small coats to look cute for the females, but because some of the females needed large coats and some of the males needed small coats, there was always a mismatch between the number of dogs and the number of coats in the right size. It was much more efficient to make coats in neutral prints and colors in both small and large sizes.

This coat would only work for a small female, if the owner didn’t mind frills!

At the beginning the coats had a shorter turtle neck…called a snood. (Not sure where that name came from.)

Over the years the “snood” kept getting longer to accommodate their long necks and sensitive ears. Now this “snood” can be pulled up over their ears for warmth if needed.

Since many of the dogs wear coats inside and out, we had to do some testing to see how the coat worked when they laid down. This coat looked good when the dog was standing, but scrunched up when he laid in his bed:

I had to change my fabric to all fleece AND I had to expand the pattern across the chest area.

You can see how my pattern has had to change over the years. This iteration has worked for a while so it’s probably time to lay the pattern on some new grid paper and cut out a new one!

Can’t you see a greyhound in this coat running across the snow this winter!

Time to get to work! Enjoy!

Please comment or email me directly at maryjkisner@gmail.com.

DIY Perfume

If you have purchased any perfumes recently, you’ll know even a small bottle can sometimes be expensive. With all the essential oils I have around, it seems I could create a simple perfume that would satisfy me. Of course, it would be too easy to just look up the perfume I use, and like, and find a list of the scents or ingredients involved! I don’t think so. I guess those ingredients are classified as “trade secrets.”

Even trying to recognize the scents in my favorite perfume is beyond the talents of my nose! I bought a few books about how perfumes are developed and did discover quite a lot of discussion about top notes, middle notes and base notes. I can smell my essential oils one at a time and sort of see how they got classified, but in a mixture I’m at a loss.

Luckily, there are many simplified explanations and recipes online that demonstrate how certain scents work together. Recipes I can follow! One online site had recipes for three ways to make perfumes…an oil mixture in a roller ball; a solid mixture with scents added to an oil/beeswax combination; and a spray with an alcohol base with scents added.

This site can be found at https://simplepurebeauty.com/. You can find many more recipes by just searching for “make your own perfume.”

So today, I thought I’d try to make a roll-on perfume and a solid perfume. I’ll leave the spray for another time.

DIY Roll-on Perfume

I started with this recipe:

First, I got out an empty roller ball bottle. It came with a tool that’s pretty slick to get the ball out of the bottle and a tiny funnel.

That little half-circle slides right under the base of the ball and with a twist the ball comes right out. The tool came in the box with the roller balls.

This is the recipe I used:

First, I added the drops of essential oil to the bottle.
These are the three essential oils I used.

Once the essential oils are in the bottle, I just filled it the rest of the way with grapeseed oil (you could use almond oil, jojoba oil, or olive oil).

The best part about this recipe…it made just one bottle! If I don’t like it, I can wash it out and use the bottle again.

DIY Solid Perfume

Here’s the recipe I started with.

I adjusted the recipe to make a little more…big mistake! I now have enough perfume to last me quite a while. This is my adjusted recipe:

This process was much more familiar to me, since many of my lotion bars and salves are made the same way.

I started with the grapeseed oil and beeswax:

I melted them in a glass measuring cup in a pan of boiling water.

When it was all melted, I stirred in the 5 essential oils (see the recipe above) and poured it into small containers. I labeled the small containers:

At the end of all this, I had two similar smelling perfumes. Now we’ll see if I like applying the perfume with a roller ball or my finger…and which scent lasts longer. Then we’ll see if I’m ready to try a spray! Enjoy!

Please comment or email me directly at marykisner@comcast.net.

Benefits of Subscribing to my Blog

Thank you to all my readers! Many of you come to my site because you follow my Facebook page. Soon, I would like to stop using Facebook to share links to my Blog…too many ads! Since I don’t post something every day, I’d like to encourage you to “subscribe” to my blog. That means when I do post, my computer sends your computer an email telling you that I’ve posted. You can subscribe by entering your email address at the bottom of the Welcome page. I will never use your email address for anything else, but you don’t have to wonder if I’ve posted.

Benefit 1

To thank you for signing up I’d like to send you a PDF listing of all 100 articles with hot links to each. I realize on the Welcome page there is a drop-down menu of the categories of the articles I’ve written so far. Frankly, I find it a clumsy way to find an article, even for me, and I know what I’ve written! If you have already subscribed, I’ll send out the PDF to you right away! Here is what it looks like:

Benefit 2

Once you’ve received the list, if you would like a PDF of a specific article, send me an email (marykisner@comcast.net) and I’ll email it out to you. Feel free to share the tutorials with others…who knows, you may find ways to adapt them for your own use.

If you have suggestions for projects you think I should try, send me an email anytime! (marykisner@comcast.net)

Enjoy!