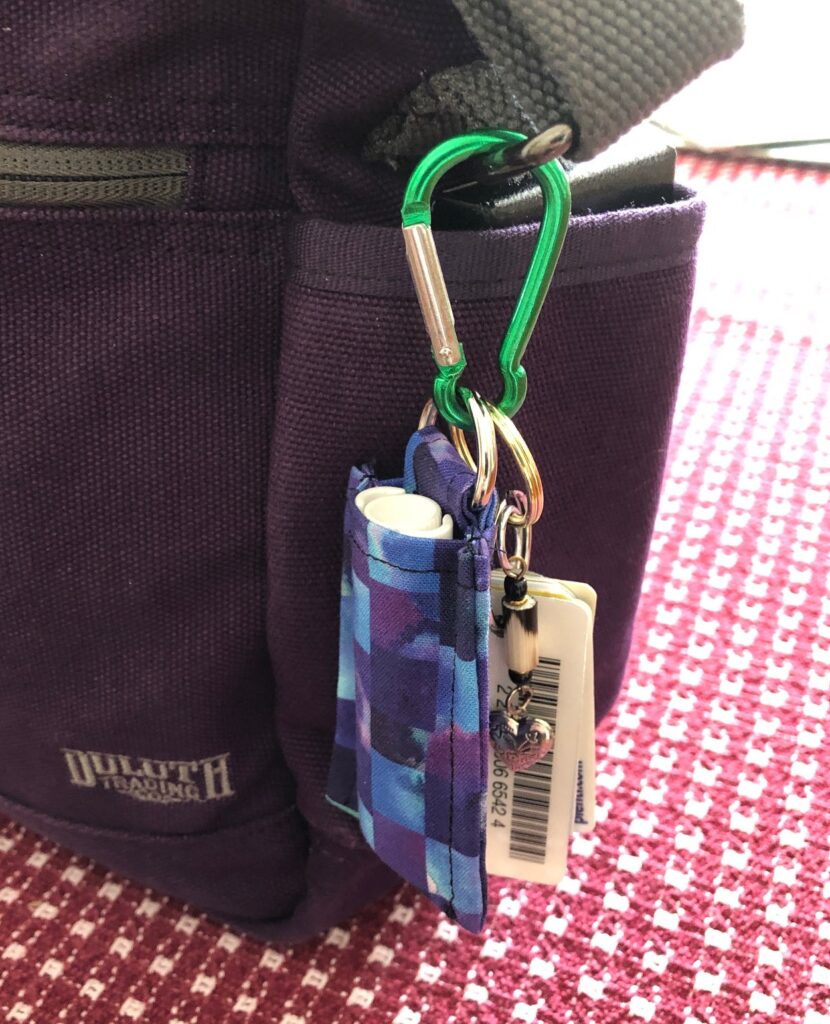
Now that I have a handful of lip balms to give away, I like to also hand someone the holder to put it in. I carry mine on my purse so I never have to dig for it. My grandkids have fastened them to their backpacks!
I first went to WalMart and Pinterest to get ideas. I bought a few to take apart. I basically experimented to find ways to end up with all the seams turned to the inside and still be possible with my sewing machine. After taking a few apart, I sketched out my pattern.
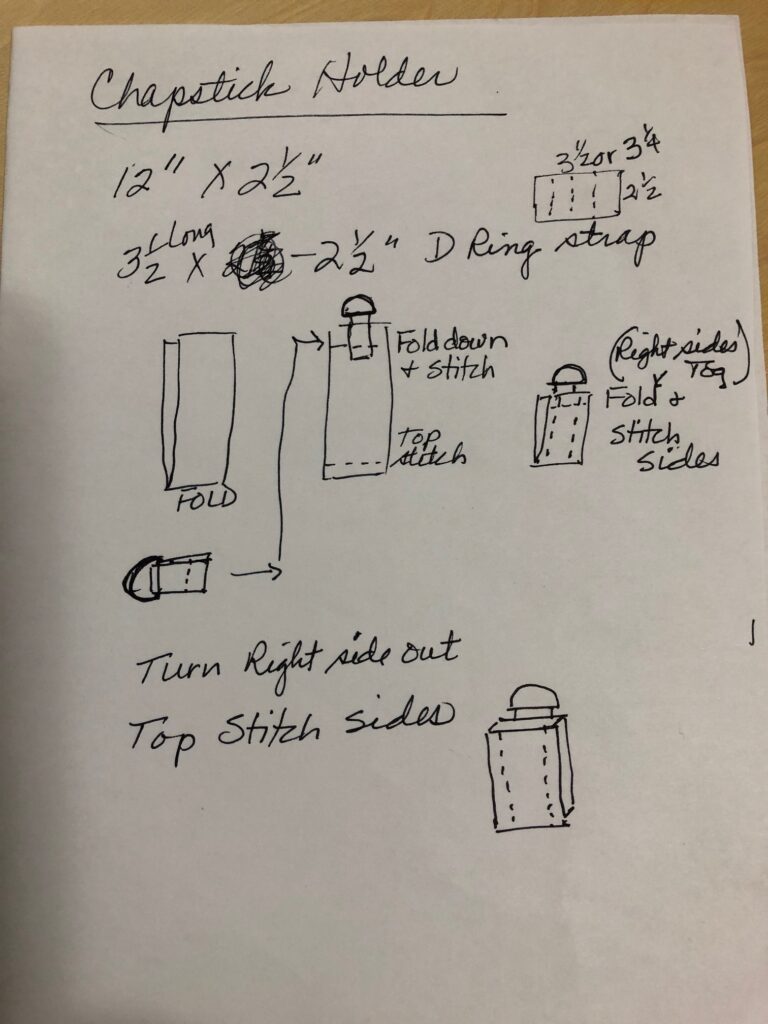
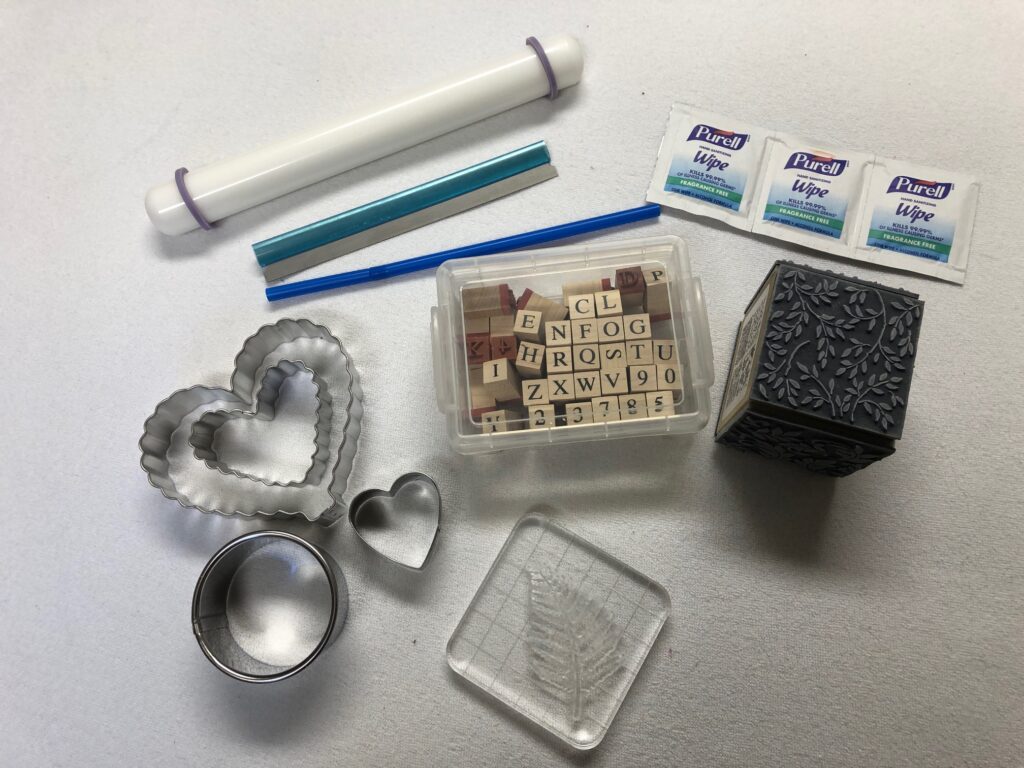
You might think I have a special pattern to make this holder. Ha! Let me show you what I use:
As I made a few samples I refined the process. So, here are the steps with pictures:
Step 1: Your materials
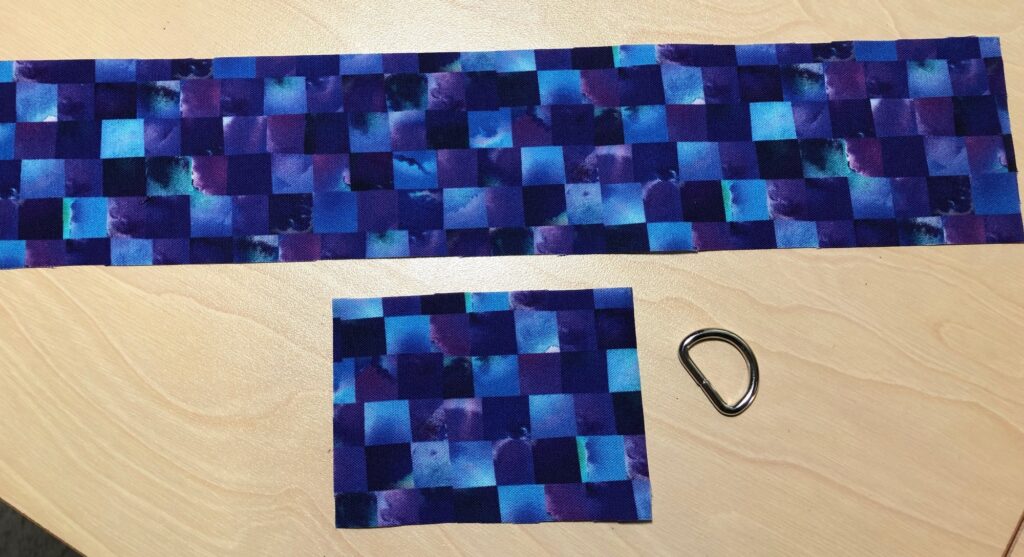
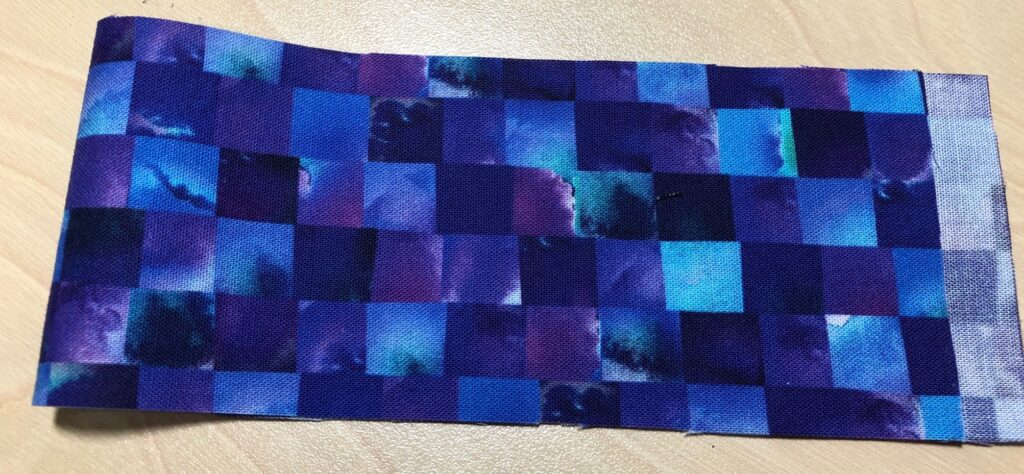
A piece of fabric 2 1/2″ by 12″; a piece of fabric 2 1/2″ by 3 1/2″; a 1/2″ D-ring
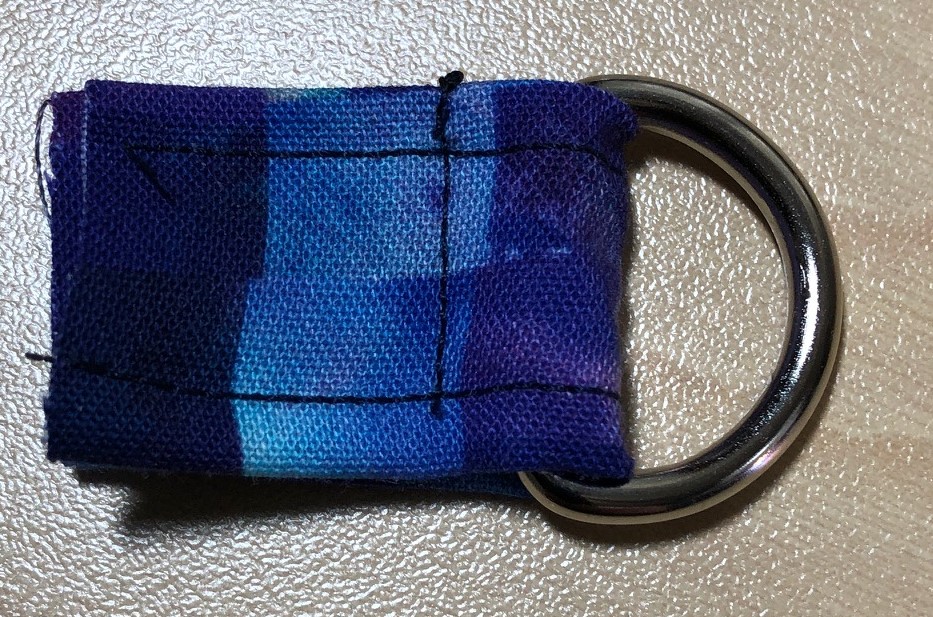
Step 2: Make the D-ring attachment
Using the 2 1/2″ by 3 1/2″ piece of fabric, fold the two ends to the center, then fold the piece in half. Top stitch the edges together.
Step 3: Attach the D-ring
Insert the tab through the D-ring and fold in half. Stitch close to the D-ring (I had to use my zipper foot to get close enough).
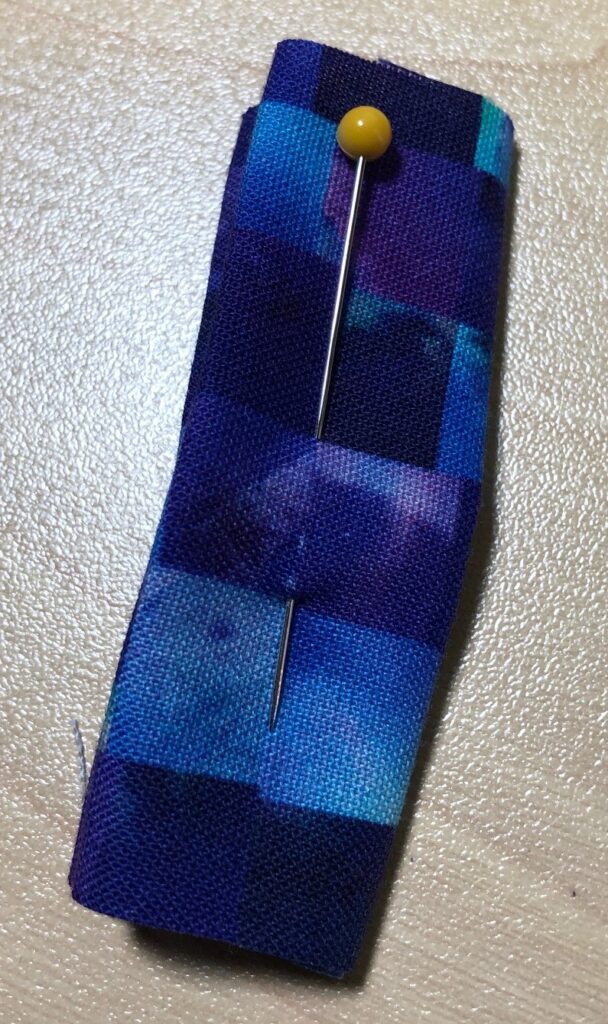
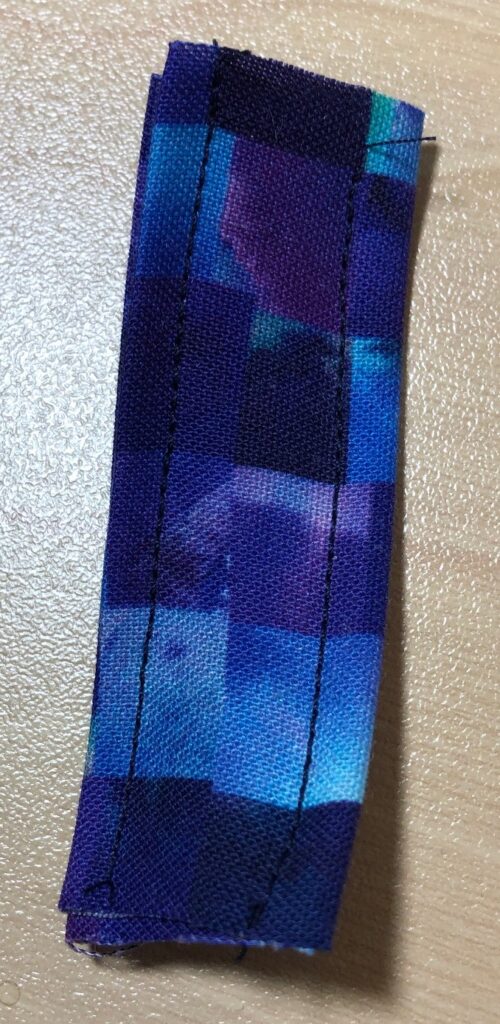
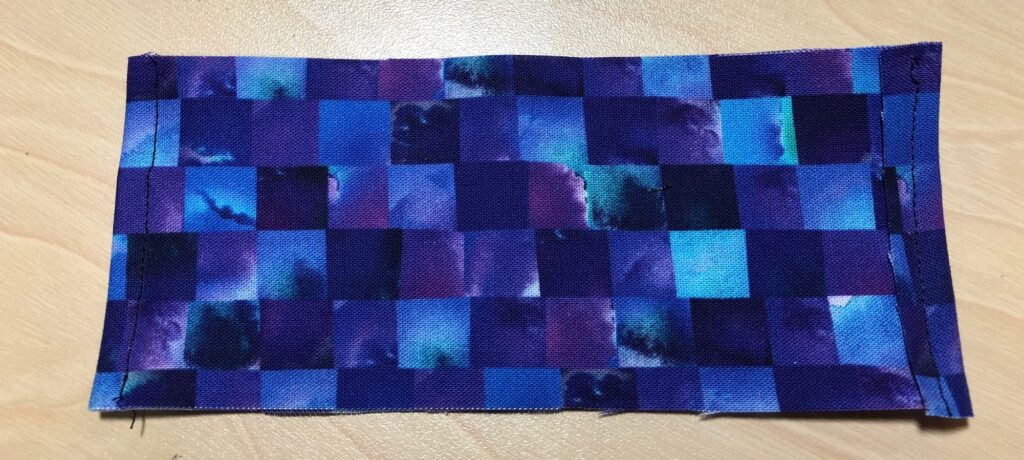
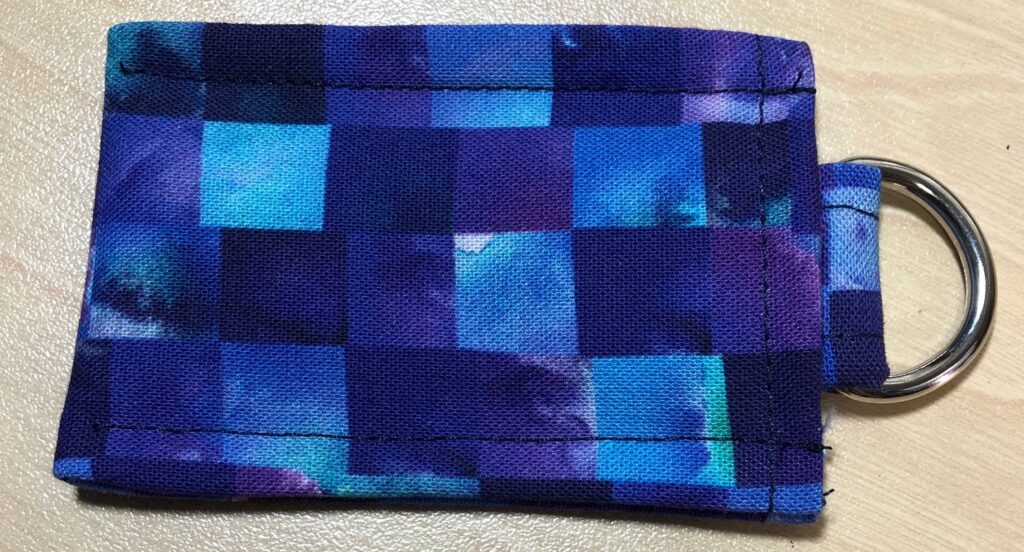
Step 4: Fold the 2 1/2″ by 12″ piece almost in half, leaving 1/4″ to fold over. Stitch the edge folded over and top stitch along the other folded edge.
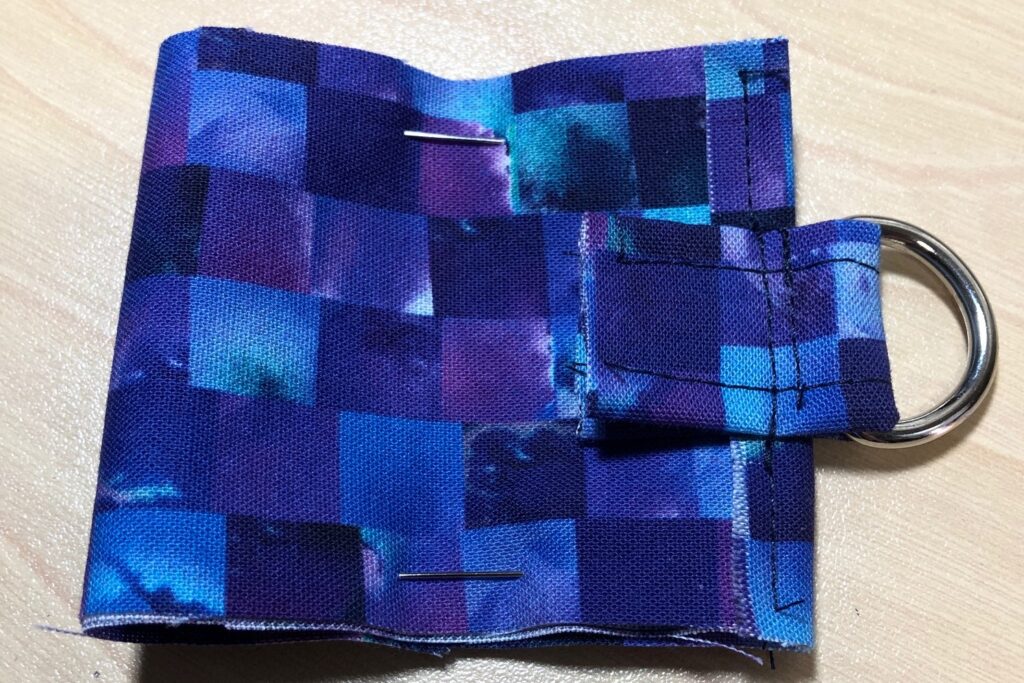
Step 5: Attach the D-ring tab to the folded edge (on the right, above), stitching close to the D-ring. This is the inside of the holder.
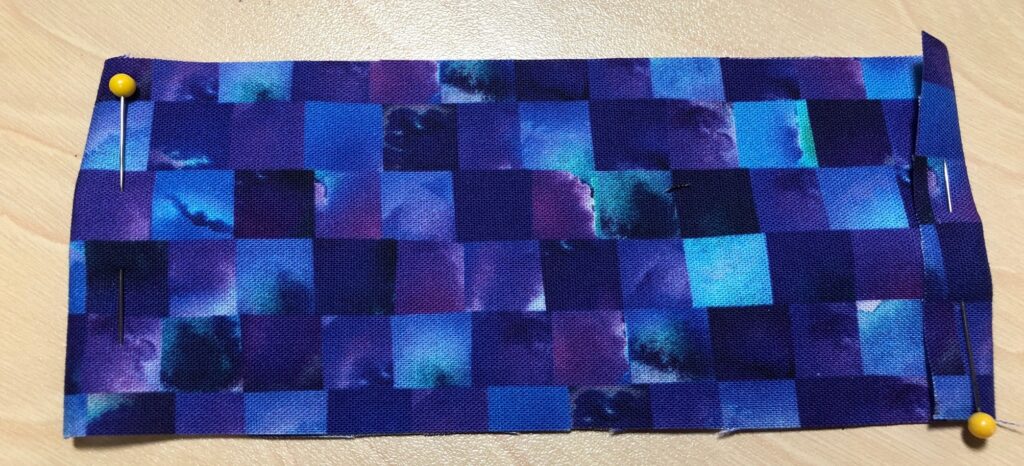
Step 6: Fold the holder in half, right sides together. Stitch the sides with a 1/4″ to 3/8″ seam.
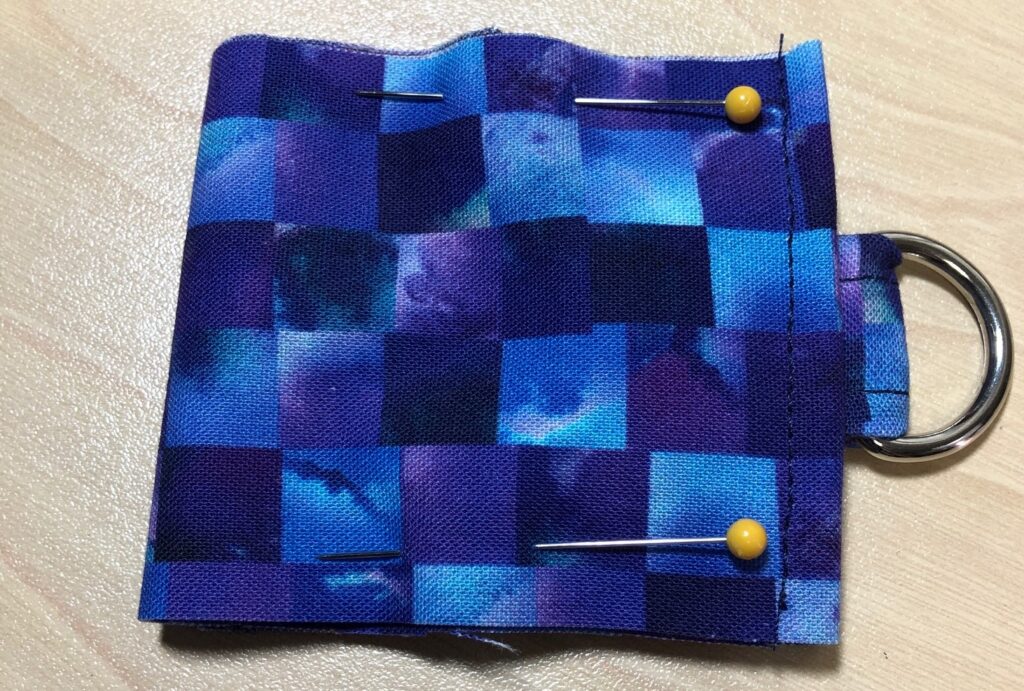
Step 7: Turn the holder right side out. I use a stick that came with my stuffing to help poke out the corners.
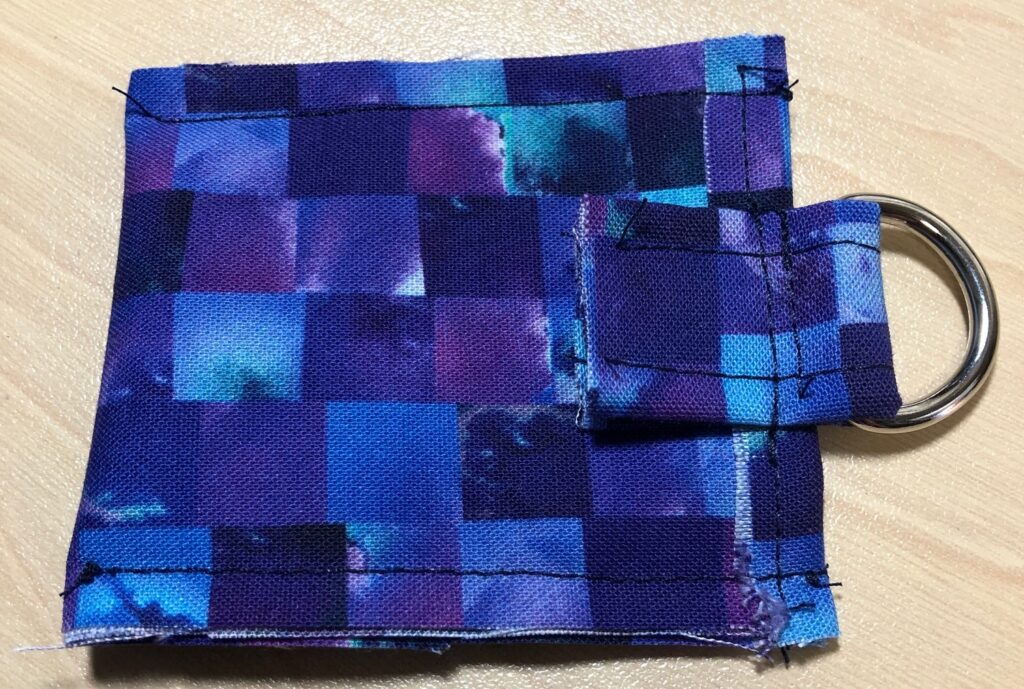
Step 8: Top stitch the sides with a 1/4″ to 3/8″ seam. (Depends on how big your lip balm is. Some lipsticks are larger around so the smaller seam is necessary).
I use a carabiner clip to attach my holder to my purse, and I include one with each holder I give away.
This works great to fasten my holder and all my grocery tags to the outside of my purse so I don’t have to hunt for them!
This same holder pattern could be enlarged to handle an essential oil roller ball or a small flashlight. Experiment!! Have fun! If you have questions, leave a comment or send me an email directly at marykisner@comcast.net. Enjoy!
Yesterday I went on the hunt…for flowers! I had seen many tulips and daffodils in yards around us. We do not have any bulbs planted (mostly because underground critters and bunnies have eaten them before we could enjoy them)! So, I thought I’d explore the Pennsylvania Military Museum grounds to see if any spring flowers were sprouting. I did find a huge tree that is showing signs of life.
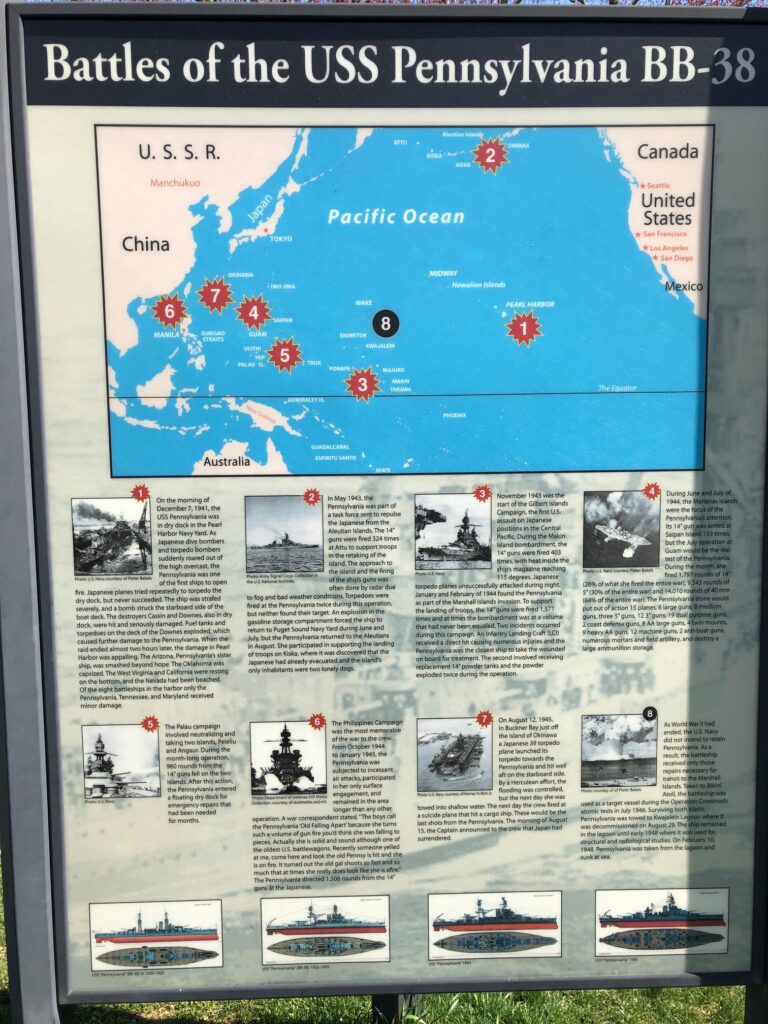
So, I decided to keep exploring. Right in front of my car were the two giant cannons that came from the ship the USS Pennsylvania BB-38. The signs nearby explained the activities of the ship in battle during WWII and how Boalsburg came to acquire the cannons for display.
I decided to continue my tour, with my thoughts focused on all our service members who have served and are now serving away from home on this Easter weekend.
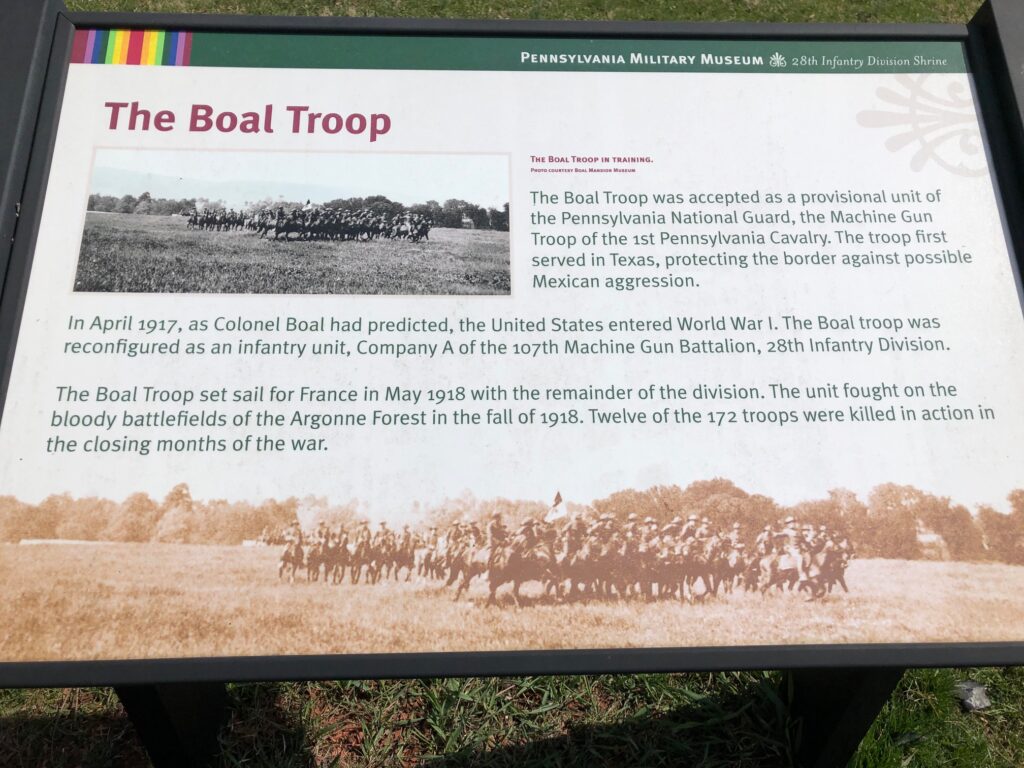
The Museum grounds are an impressive green space, with various memorials to many groups of the 28th Division Infantry. The Museum itself is closed at the moment and hopes to reopen by Fall, 2021 for tours. The grounds serve as a place for visitors to walk and reflect.
Beautiful day; beautiful weather; wonderful time to reflect this Easter weekend.
However, no flowers…anywhere!
Saved by the grocery store! I brought home two pots of daffodils! I should be able to plant the bulbs this fall and we’ll see if we can have them sprout next spring…before they get eaten!
In the last post, I shared a kit that makes just one lip balm at a time. Great to know how to do it but I’d much prefer to spend almost the same amount of time and a few more ingredients to end up with more than one of something!
If I’m going to spend the day making bread, I’d sure rather have 6 loaves than just 3. I think it’s because I like to share a loaf with my neighbors! Same issue with lip balm, lotion bars and soap! Of course, that means I end up with stuff to share all the time. So be careful if you stop by, I might hand you a lip balm, a nifty bar of soap or a loaf of bread!
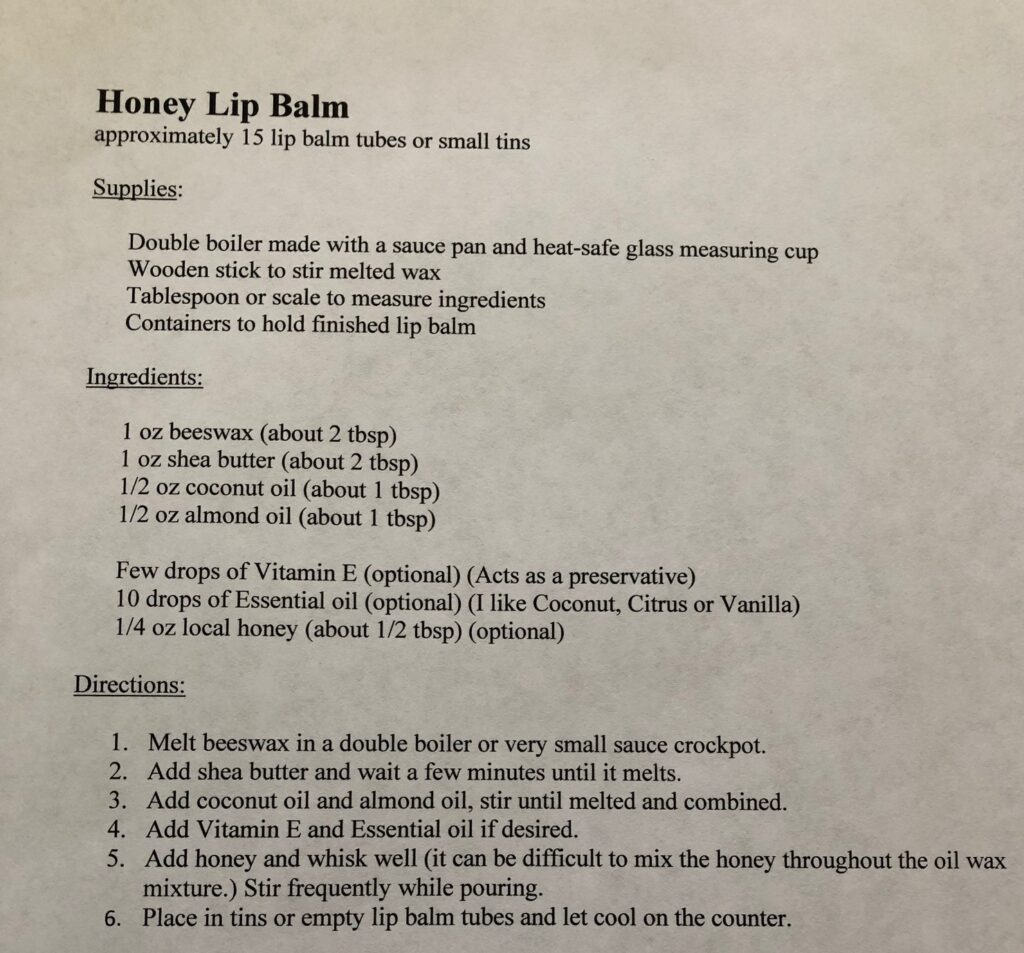
So, here’s the recipe to make a regular batch of Honey Lip Balm:
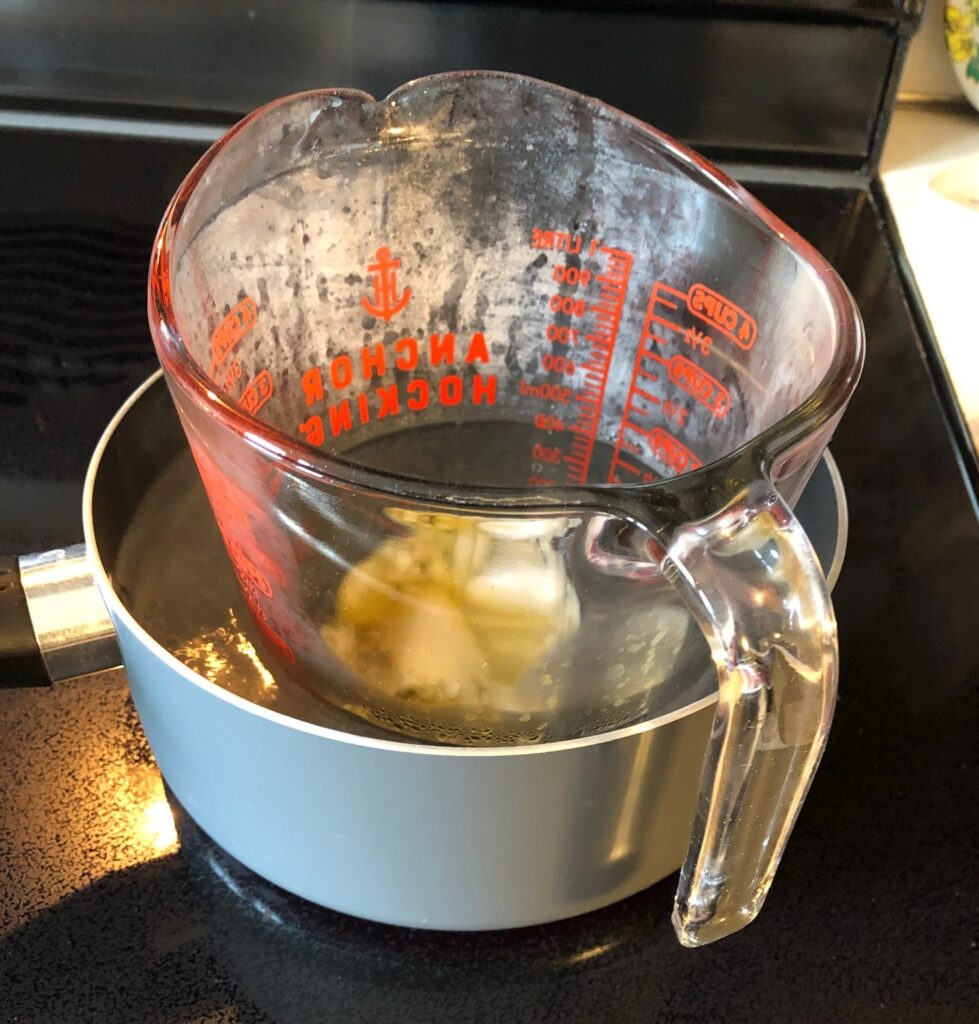
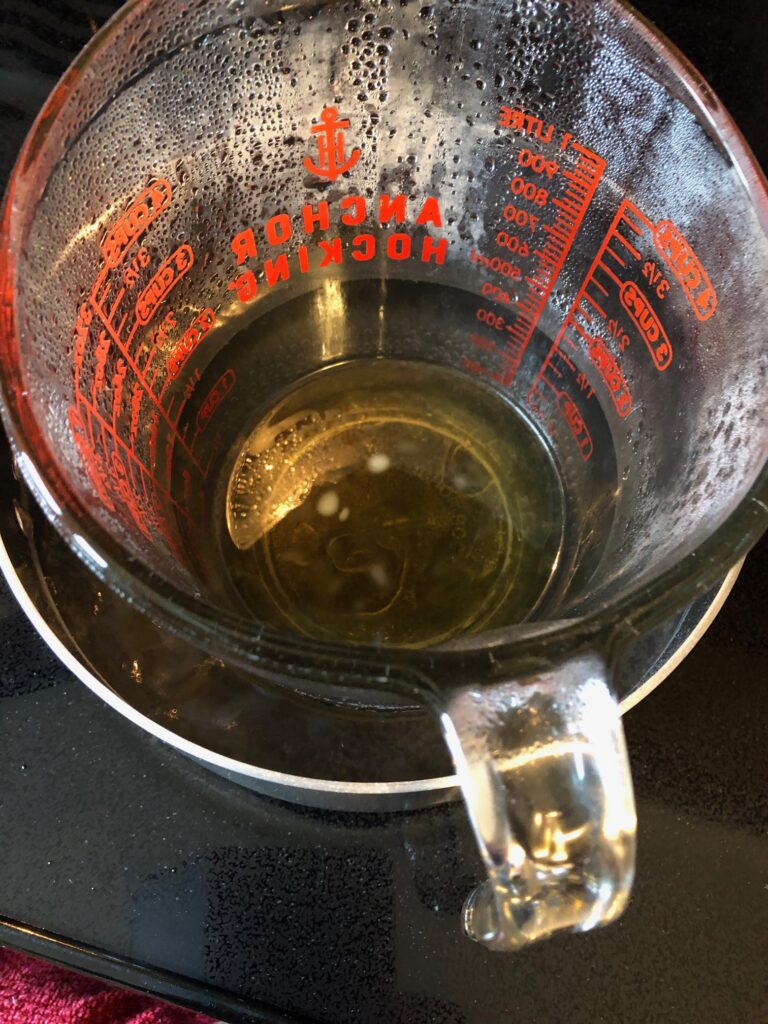
You will need a double boiler made with a sauce pan and a heat-safe measuring cup. This will melt the wax but keep it from getting too hot.
Some folks use the microwave, a few seconds at a time. It drives me nuts to open and close the door of the microwave every 10-20 seconds for several minutes and I can’t monitor the wax to make sure it doesn’t get too hot.
Sorry, no pictures of the wooden stick and the measuring spoon!
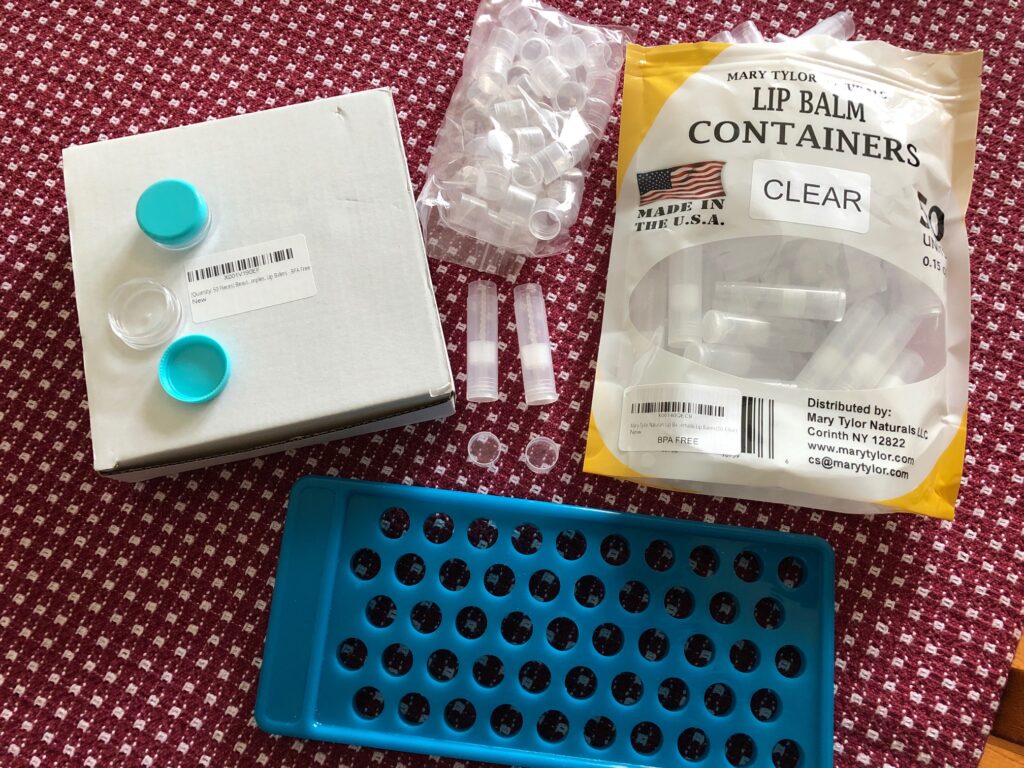
Before you start, decide what kind of container you want to put the finished melted lip balm into.
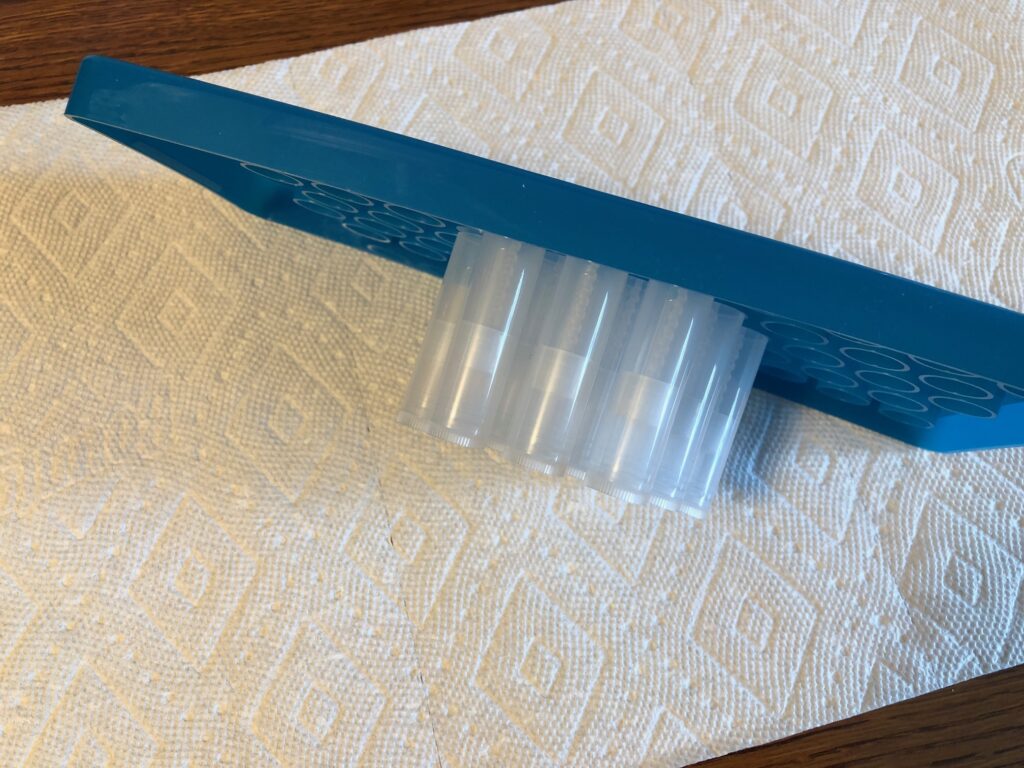
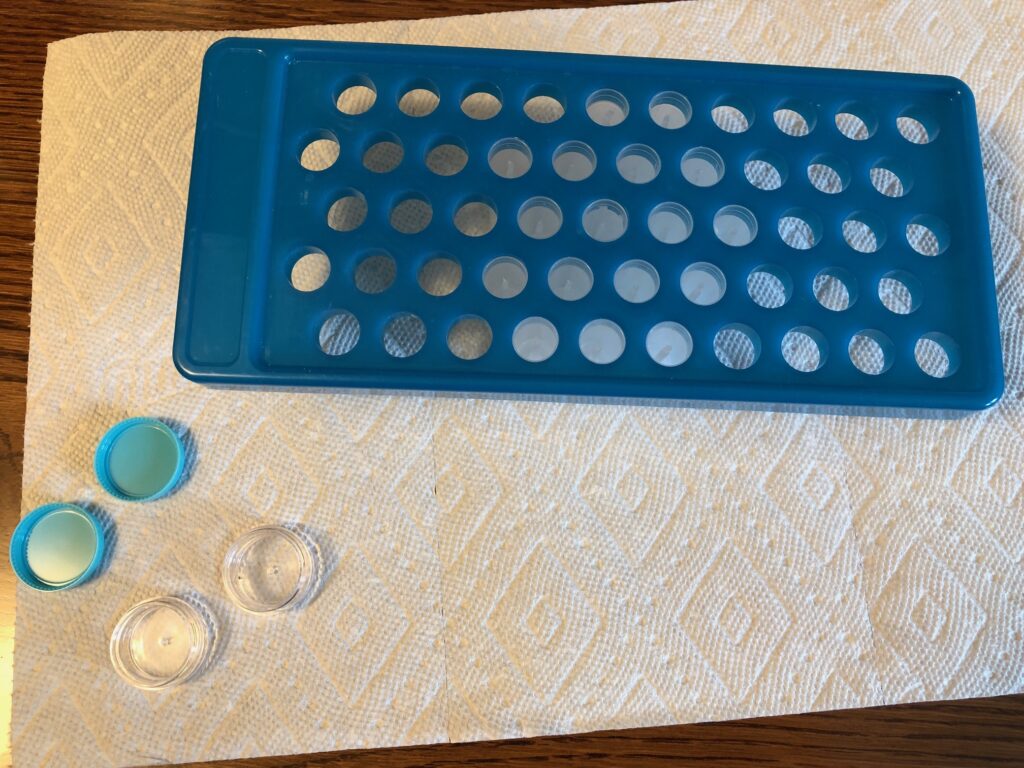
I purchased regular holders and I also have very small plastic containers. All can be purchased on Amazon. If you decide to use regular holders, make sure you also get the rack to hold them upright so you can pour directly into them.
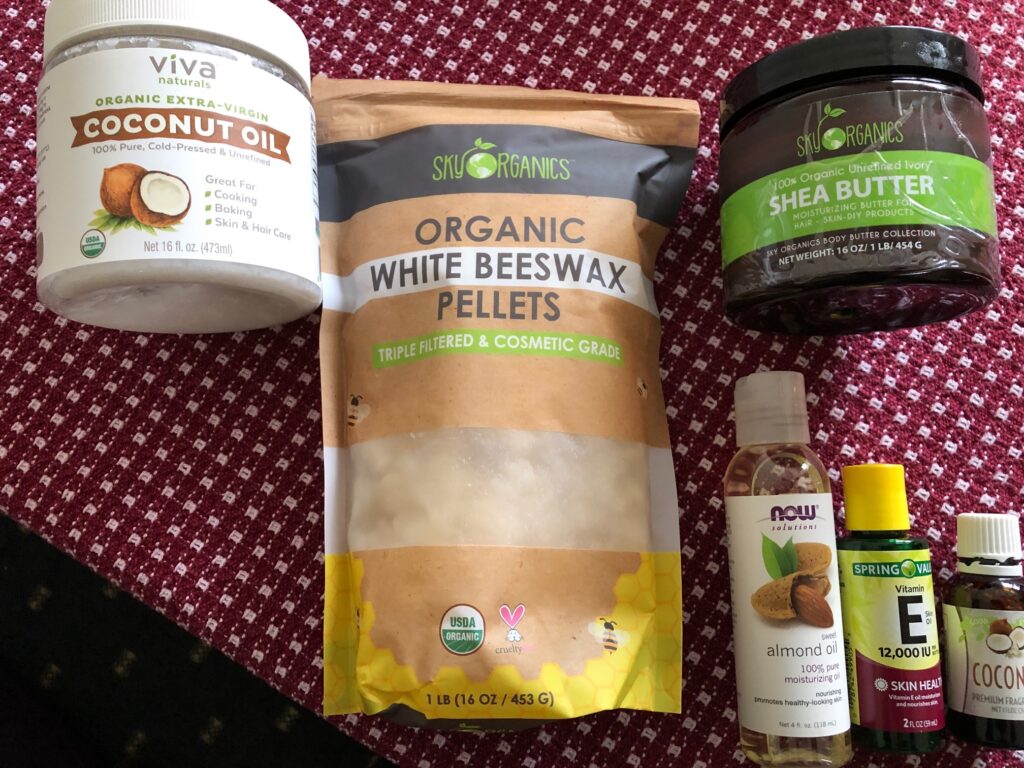
Next, assemble your ingredients. I use white beeswax pellets, coconut oil, shea butter and oil. In this project I chose Almond oil.
Optional ingredients include: Vitamin E serves as a preservative; the Coconut essential oil gives it some flavor (you could choose citrus or vanilla); and a tiny bit of honey is always nice. All three of these ingredients are optional.
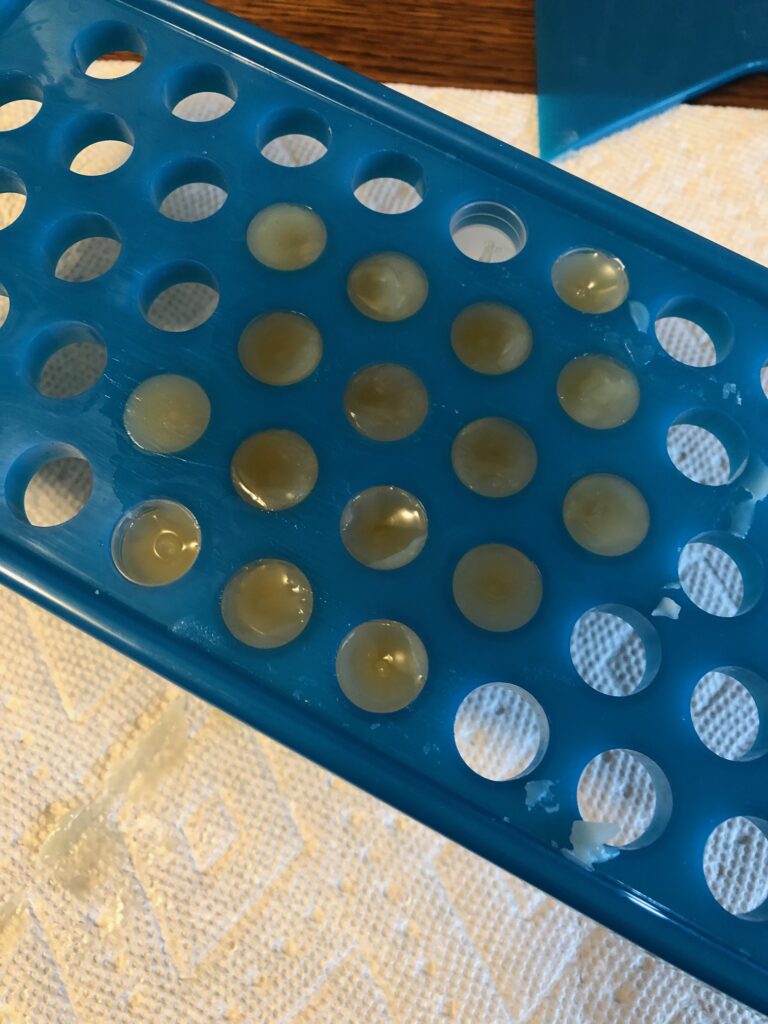
Before starting to melt the ingredients, attach the lip balm tubes to the holder, starting in the center so when the holder is flipped upright they are stable without having to be held. Open any small containers.
Measure the beeswax, coconut oil, shea butter and almond oil into the glass cup.
Place the cup into the sauce pan with several inches of water and bring the water to a gentle boil. Use the wooden stick to stir as needed.
When completely melted, turn off the burner.
Add the Vitamin oil and the Essential oil if desired. Stir well,
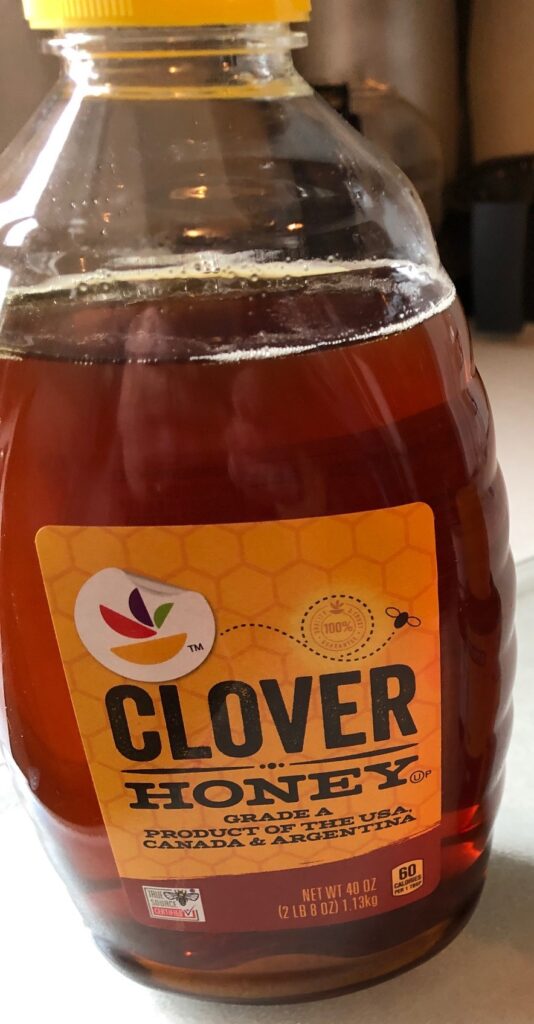
Add the honey. Mix thoroughly.
As you pour the wax into the holders, stop every now and then and stir again. The honey does not stay mixed easily.
While things are cooling, carefully wipe the wax out of your glass cup.
DO NOT POUR WARM WAX DOWN THE DRAIN. IT WILL CLOG YOUR DRAIN AS IT COOLS!
Once you have wiped out as much as you can, it is safe to put the cup in the dishwasher.
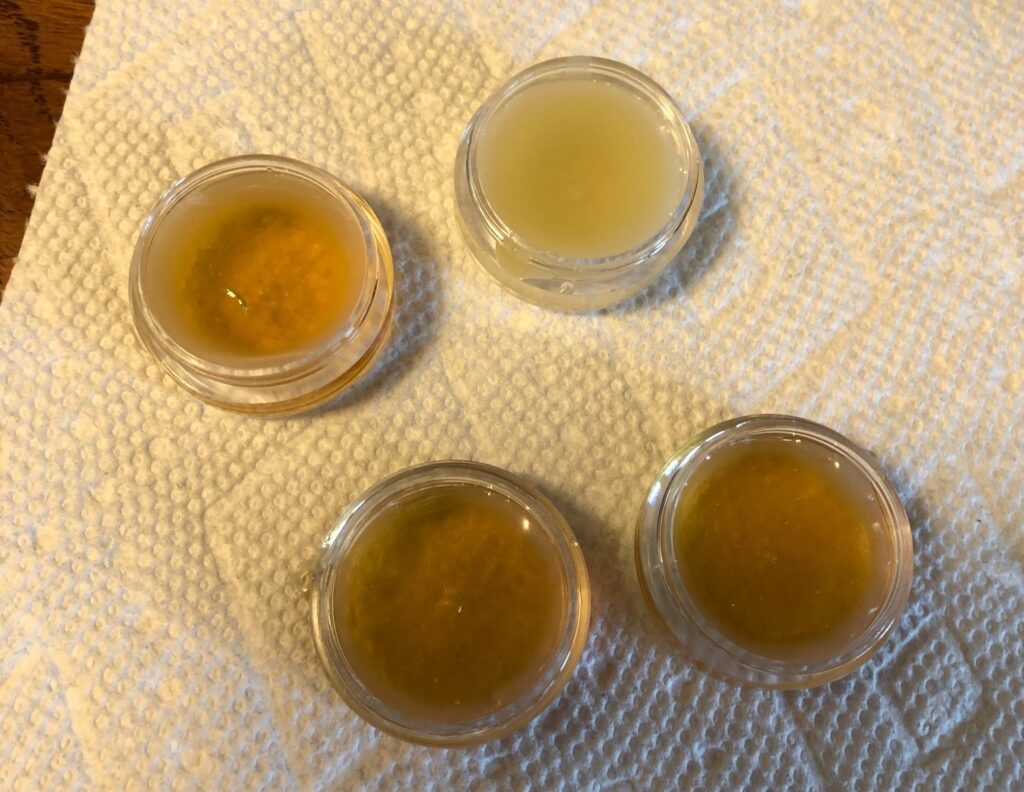
You can see I did not stir the mixture before pouring these last 4 containers. The honey settled to the bottom of the mixture.
Let the holders cool for at least an hour. Use a paper towel to wipe off any drips around the holders.
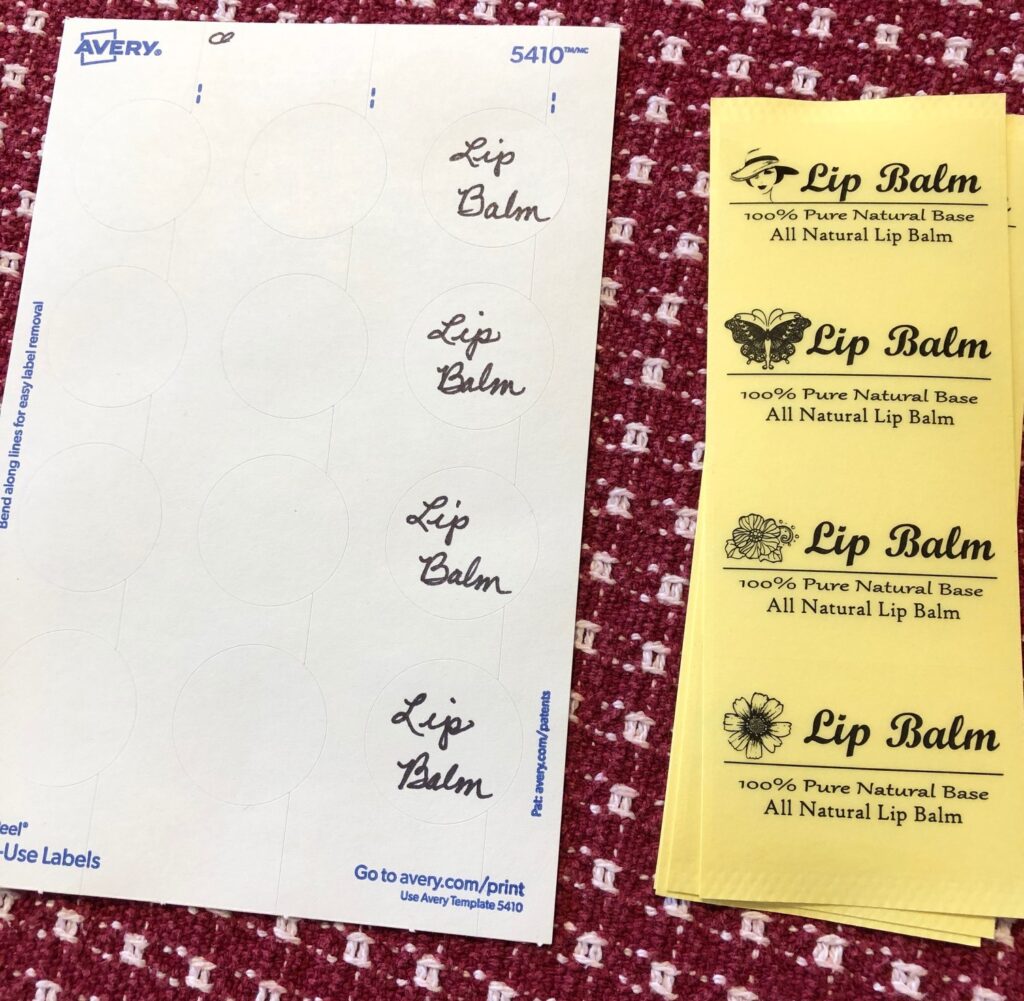
The Lip Balm holders come with labels (or they are sold near the holders). Regular circular labels work well on the small round containers.
After I make a batch of any body product, I make a card to go with it listing the ingredients. Many folks are sensitive to certain ingredients and I don’t want anyone to have a bad reaction to something I make.
NOTE: If you decide to make things like this to sell at craft fairs, PLEASE do the research about legal requirements for labeling your products.
As always, if you have questions, leave a comment or email me directly at marykisner@comcast.net. Enjoy!
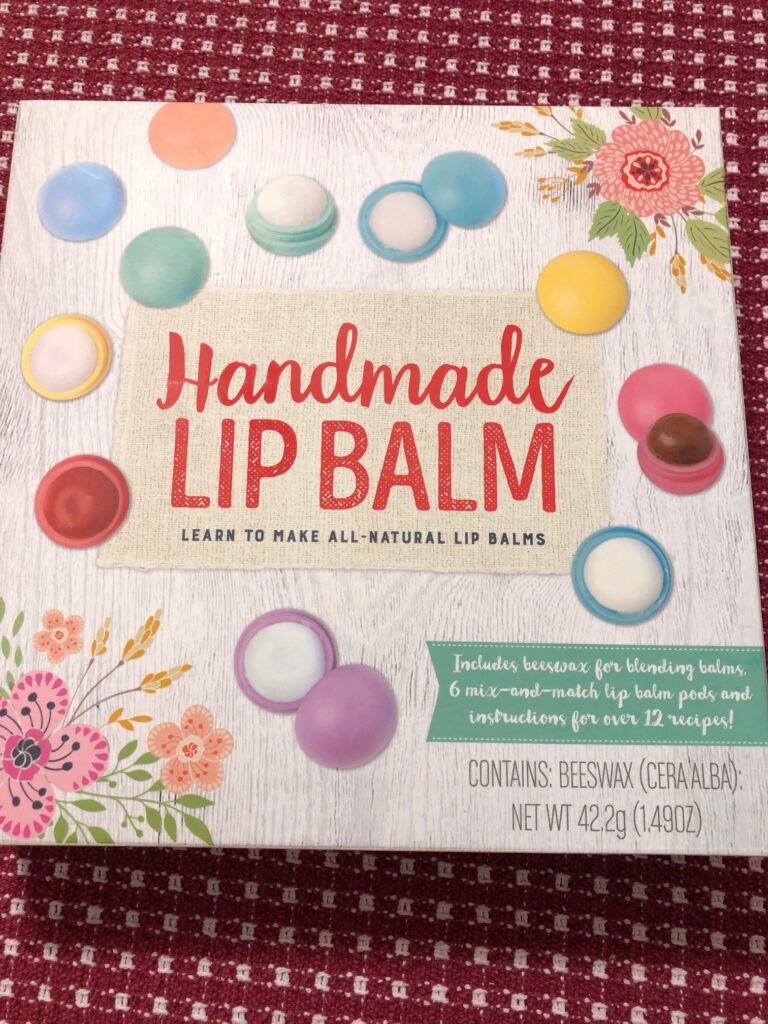
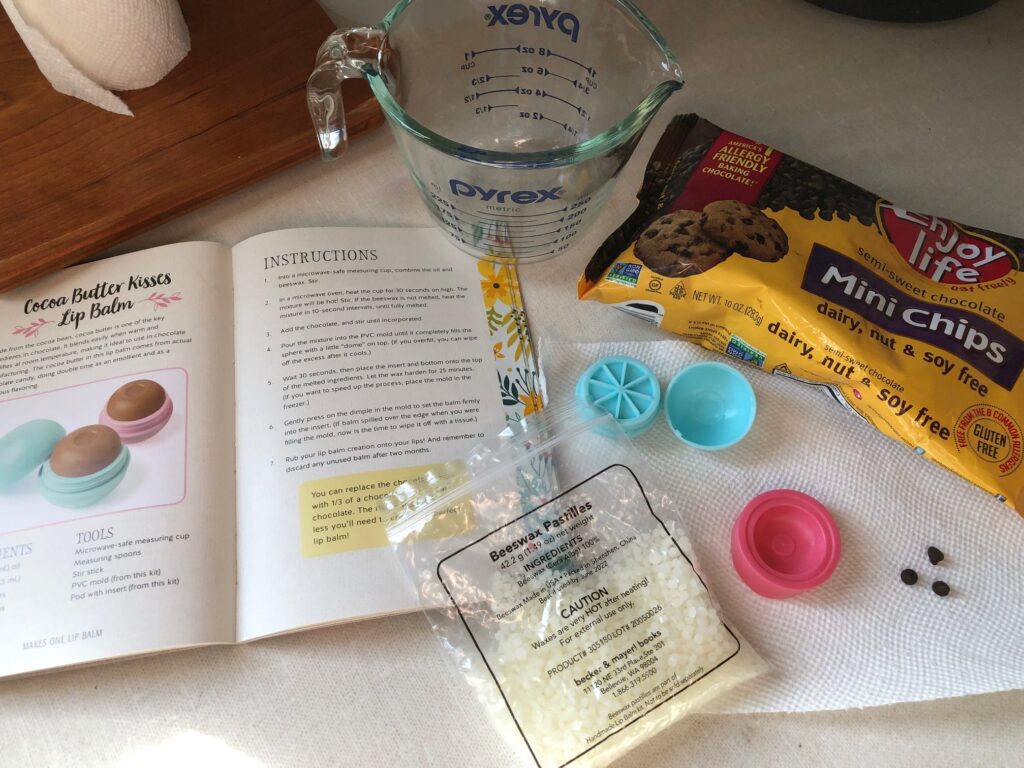
I headed to the bookstore yesterday…just for entertainment purposes you know! Right inside the door were assorted craft books and kits that looked interesting. This kit caught my eye:
Now, I already make lip balm (details in the next post), but I thought this kit might be good to try with my granddaughters when they come to visit. I could not find any information on the box about appropriate age level for the kit, but if nothing else I thought maybe I could reuse the tiny containers. The kit cost $14.99.
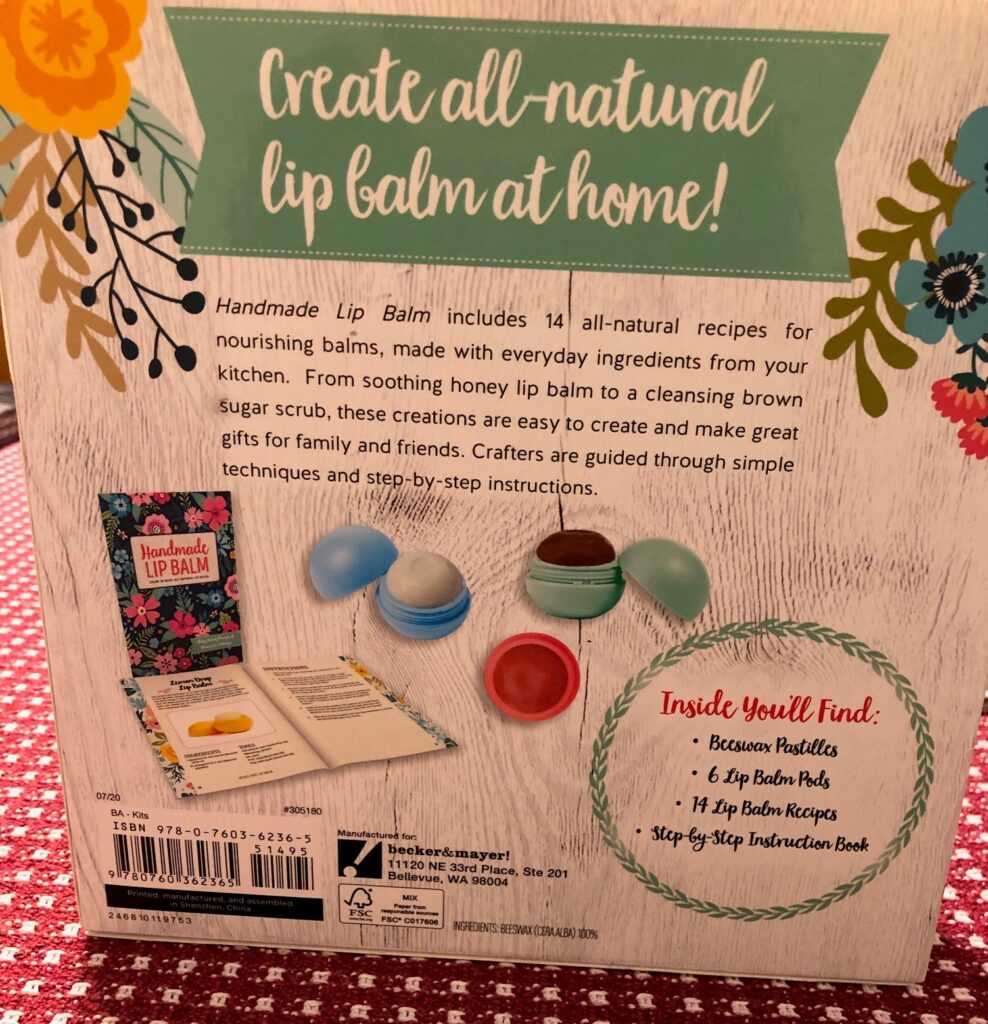
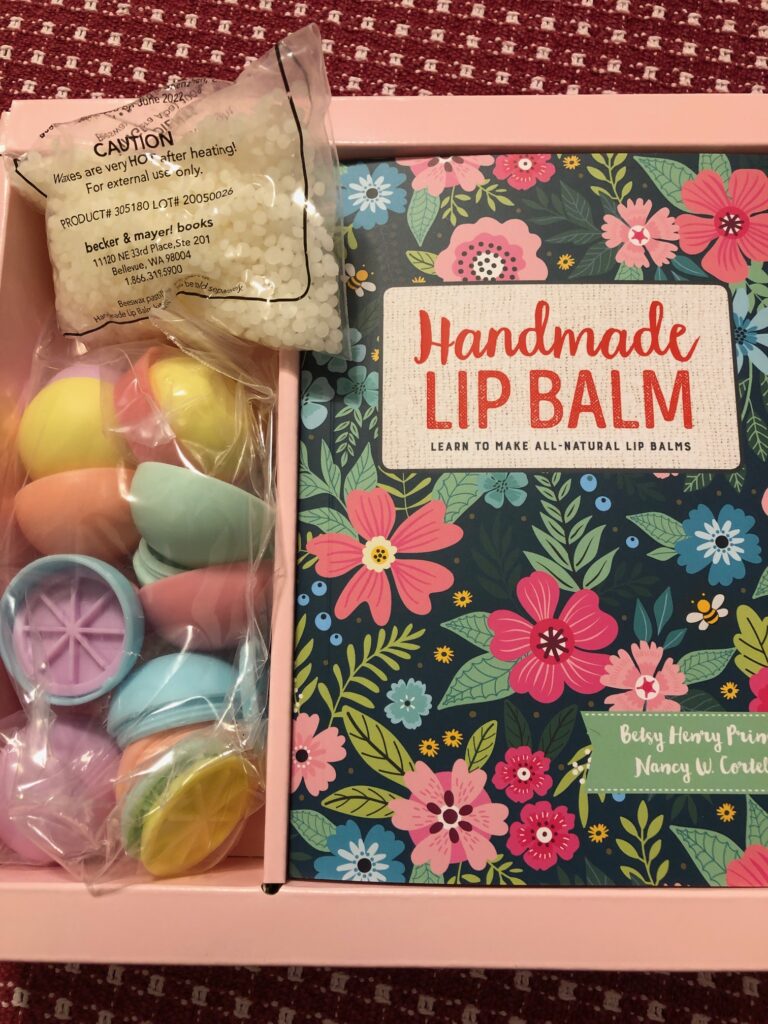
Inside, this is what I found:
A VERY tiny bag of VERY tiny beeswax pellets, 6 tiny egg shell-like plastic pieces, and an instruction manual.
The recipes also called for oil of your choice, a glass measuring cup, a stirring stick…which were not included, of course. There were 10 or so recipes with a list of other ingredients that could be added to the mix for flavor and coloring, like chocolate chips or essential oil. Seemed like a lot of extra supplies and work to make just one lip balm at a time.
I leafed through the manual and was instantly frustrated by the tiny type (must be old age!)
This is a 5″ x 7″ booklet.
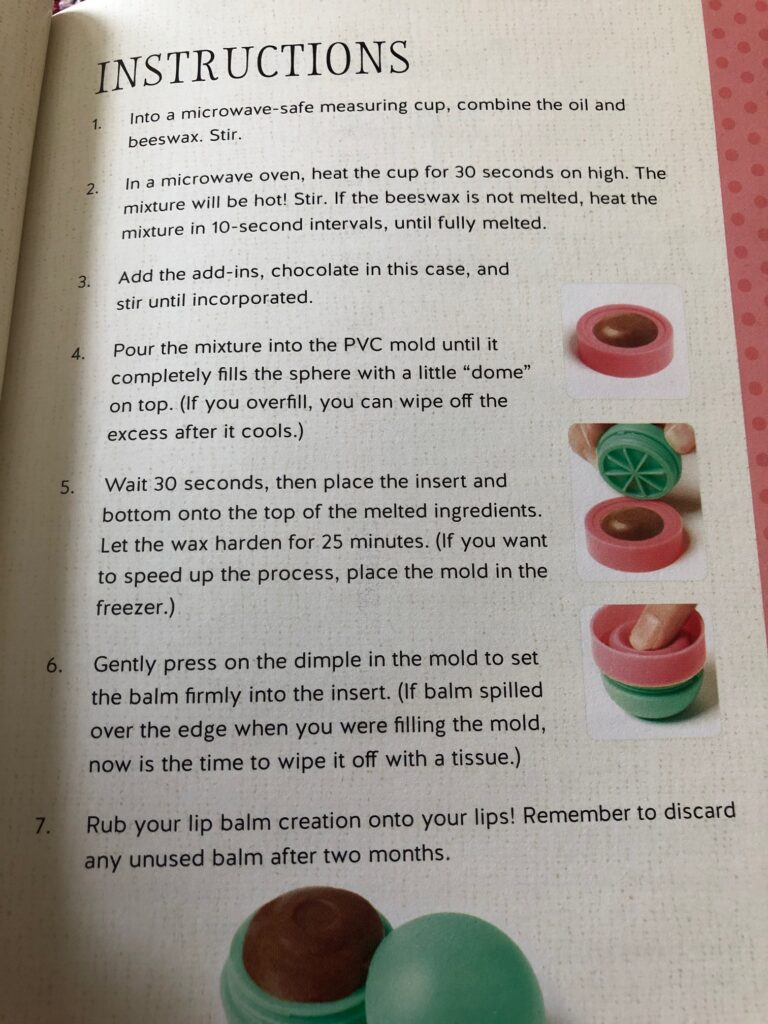
The measurements were in teaspoons and there was only one PVC mold. So basically, you melt enough ingredients to make 1 lip balm at a time with a wait/cooling time of at least 30 minutes.
So, I assembled the supplies and ingredients:
The only chocolate chips I had were vegan, but I assumed they would melt properly. I decided to use Almond oil for this experiment (forgot to take a picture of the oil and wooden stick!)
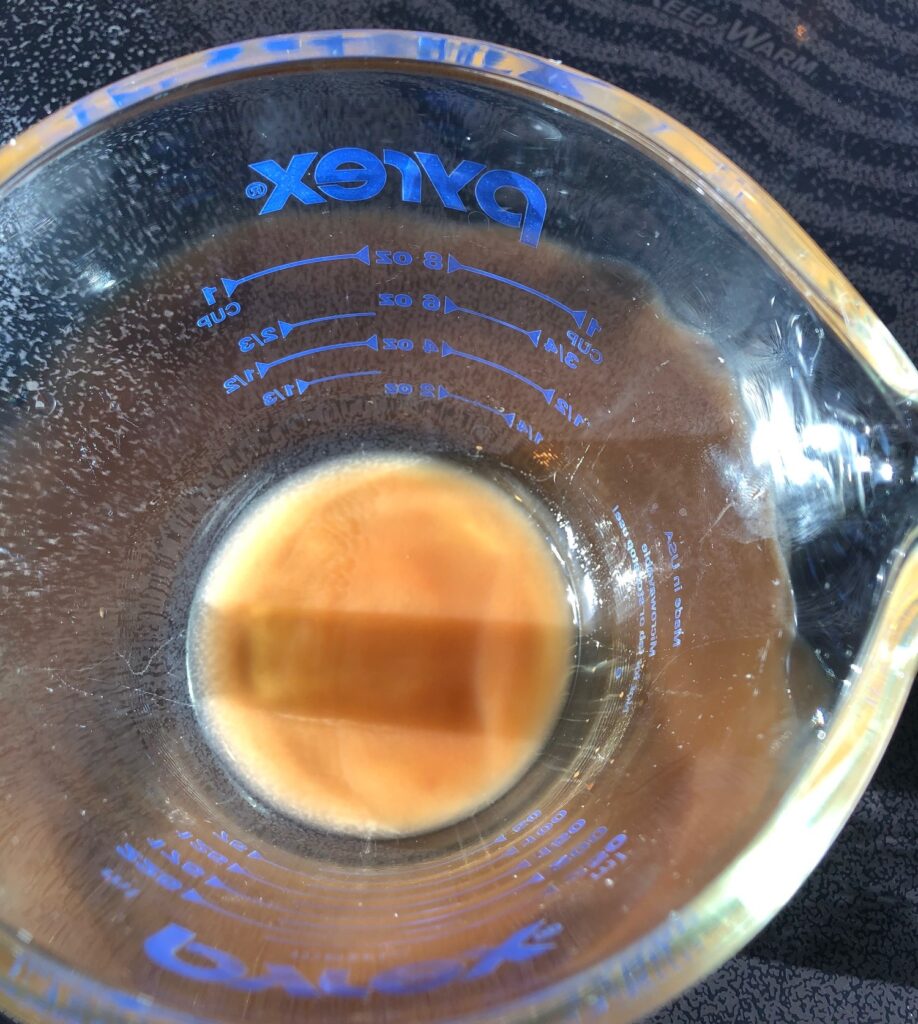
In my 1-cup glass measuring cup I put:
1 tsp. almond oil and 1/2 tsp. beeswax pellets.
I put the cup in the microwave, first for 30 seconds, and then 10 seconds at a time until melted. The glass gets hot…have a hot pad handy!
I added 3 tiny chocolate chips and stirred them in until melted.
I poured the mixture into the PVC mold.
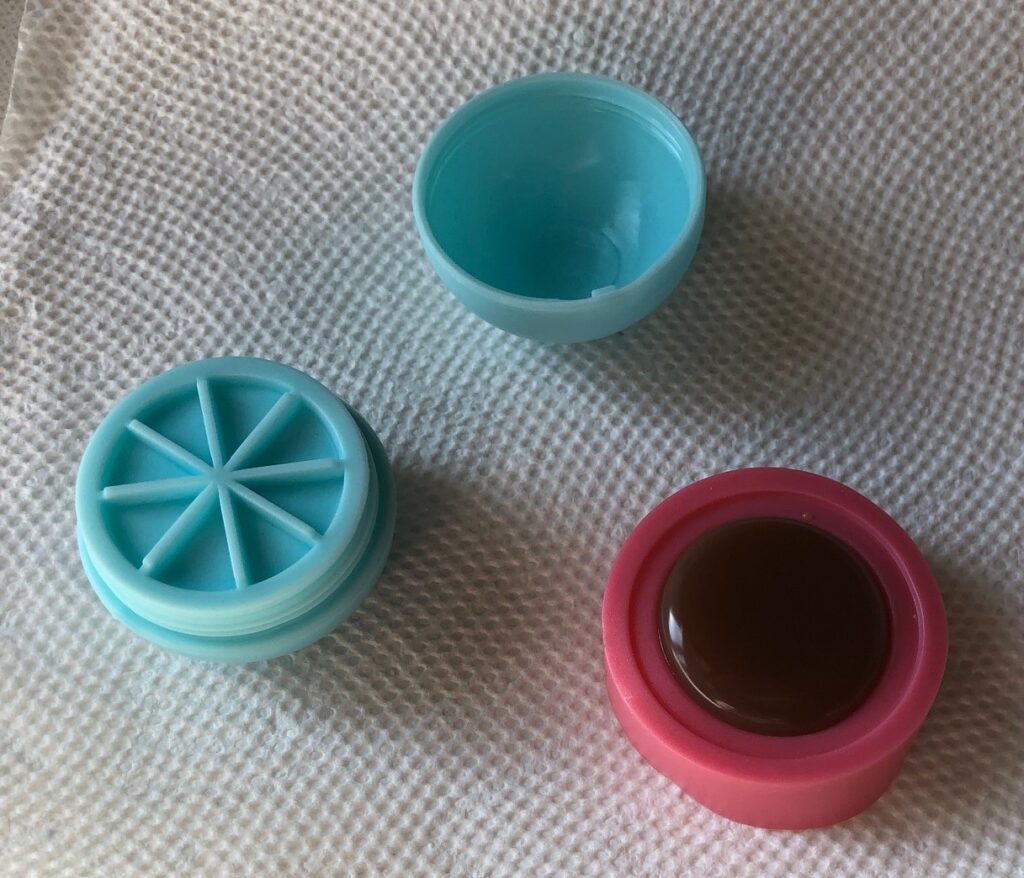
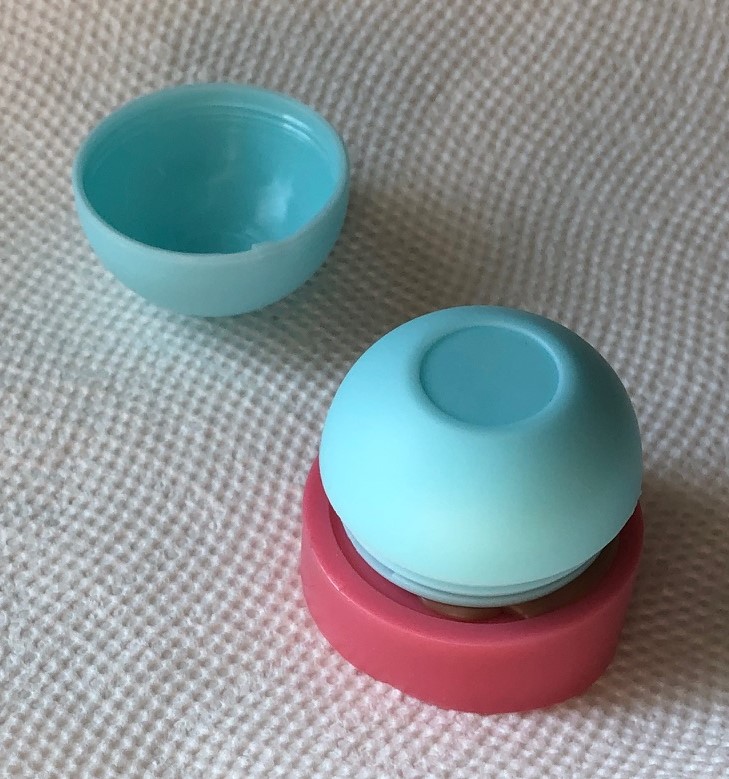
After 30 seconds I placed the bottom section of the holder with the grid insert over the mold and pressed gently.
After 30 minutes, I flipped the mold over and pressed out the beeswax lip balm.
I used a toothpick to scrape off the extra wax around the side of the lip balm.
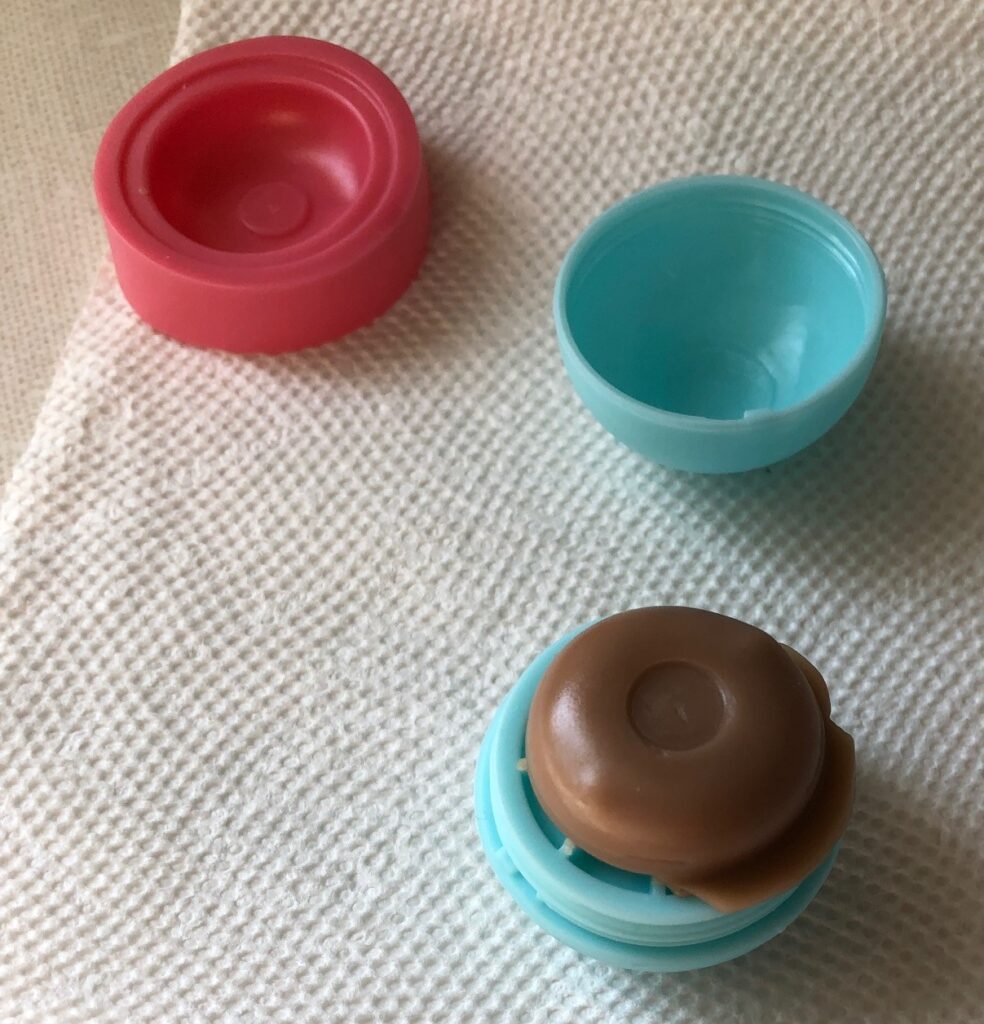
TA DA! My very own chocolate lip balm! Seemed like a lot of work to end up with just one! The plastic egg shell pieces don’t quite screw together tightly so I’m not sure I’d carry this in my pocket where it might warm up and melt a little!
Because of the hot wax and oil, I would recommend supervising the production and clean-up of these lip balms.
(Remember to wipe out the warm glass cup well with paper towels before trying to wash it. If the wax goes down a drain it WILL clog the drain as it cools!)
After making this single serving lip balm, I went ahead and made a batch of my own lip balm (check the next post!) Much more satisfying (to me) to have something to show for my time and efforts! Here’s one batch of my lip balm:
Every spring, when I’m planning the garden, I reach for this reference book to see if there is some new root vegetable I might like to try. Every fall, I pull it out again when I discover unusual root vegetables at the Farmer’s Market. You might find it an interesting book also!
This book, ROOTS: The Definitive Compendium with more than 225 recipes (2012) by Diane Morgan, has been on my shelf for several years and each time I look through it I find something new.
Granted, many of these vegetables will not grow in central Pennsylvania, but even the most common vegetables have varieties I’ve never seen before. Who knows, maybe I’ll discover one that would be interesting and delicious! Many unusual vegetables, often imported from other countries, can even be found in your local grocery store.
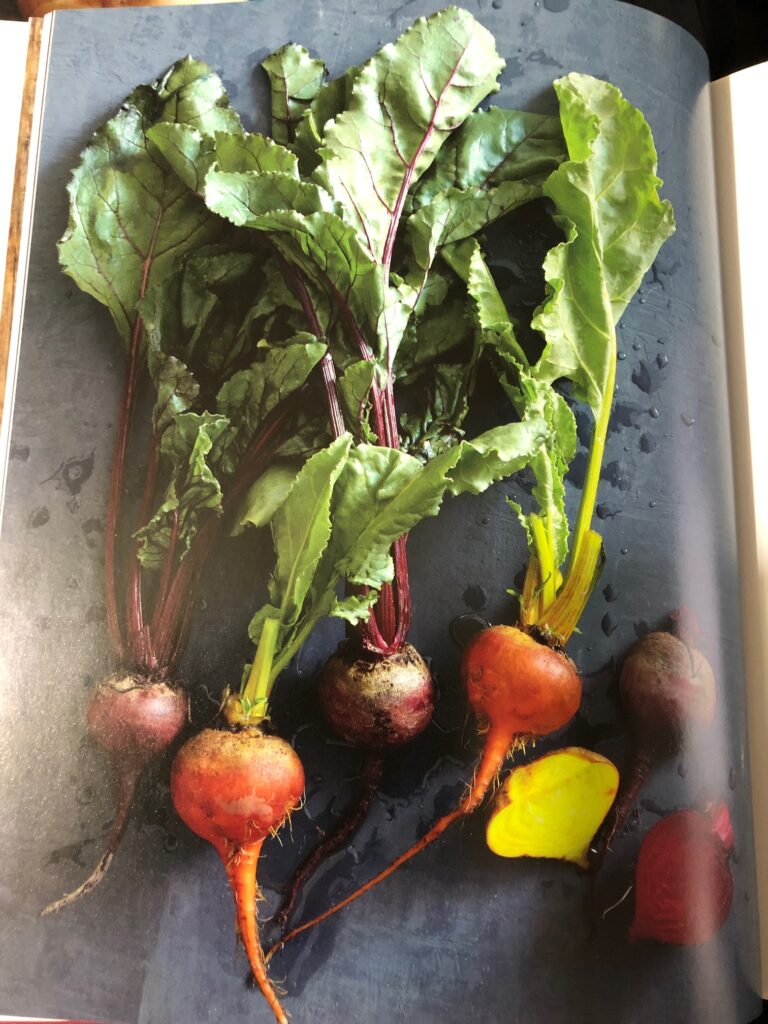
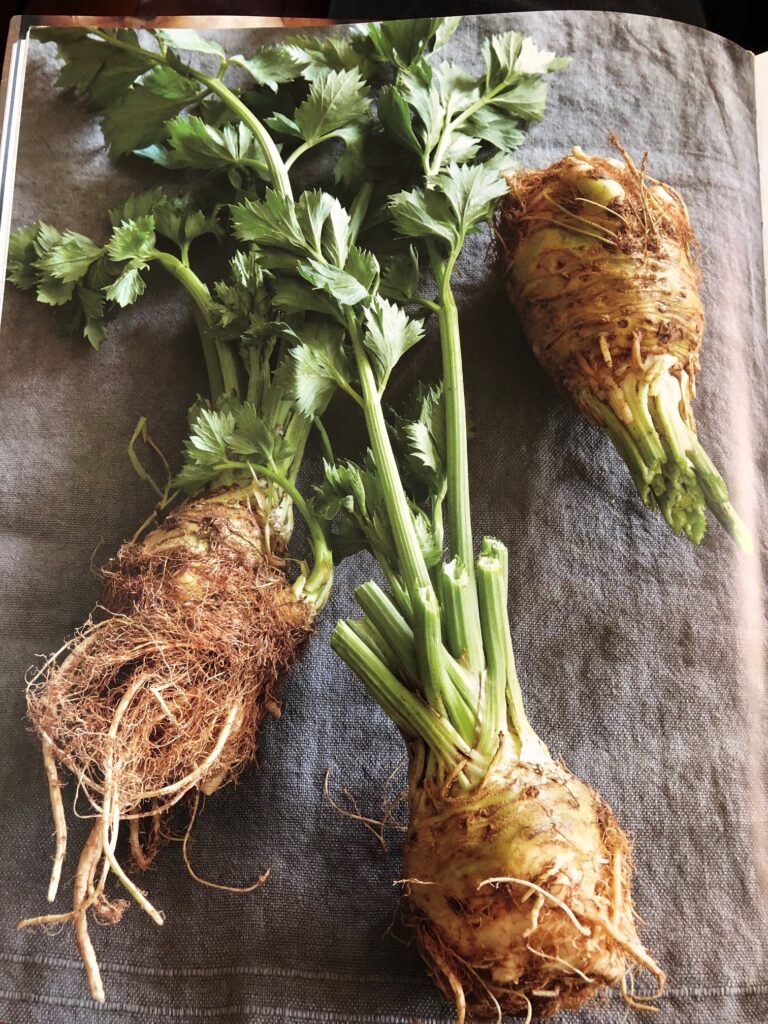
BEET, CARROT, CELERY ROOT
If nothing else, the photographs in this book are outstanding. Each section is devoted to one root vegetable, like the BEET, the CARROT or CELERY ROOT. At the beginning is a photograph showing several varieties of the vegetable along with an explanation of its history and where it is natively grown; a list of the many varieties available; nutritional information; how to store it and how to prepare it. Following this information are 8-12 recipes using the vegetable.
BEETCARROTCELERY ROOT
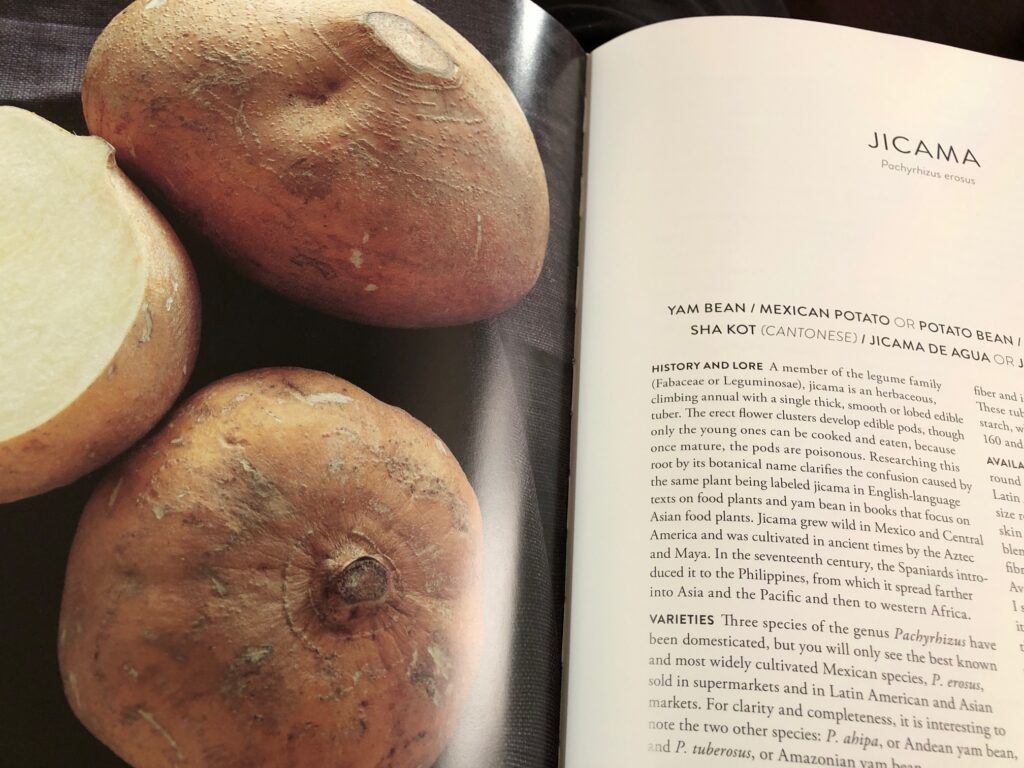
JICAMA
One vegetable I was excited to read about was JICAMA. I first had this vegetable as a kid when my family spent a year in the Philippines. (I was 9 years old…so this was 1955-56). It was a quite a treat to a kid who was missing familiar foods. It was crunchy and mildly sweet like an apple. When it showed up in our local grocery store a few years ago as a novelty item I wasn’t sure it was what I remembered, until I tasted it! Wonderful memory! Now I see it in almost every grocery store…often imported from Mexico. This book has seven recipes that incorporate Jicama…but chilled and peeled and sliced is still the best!
JICAMA
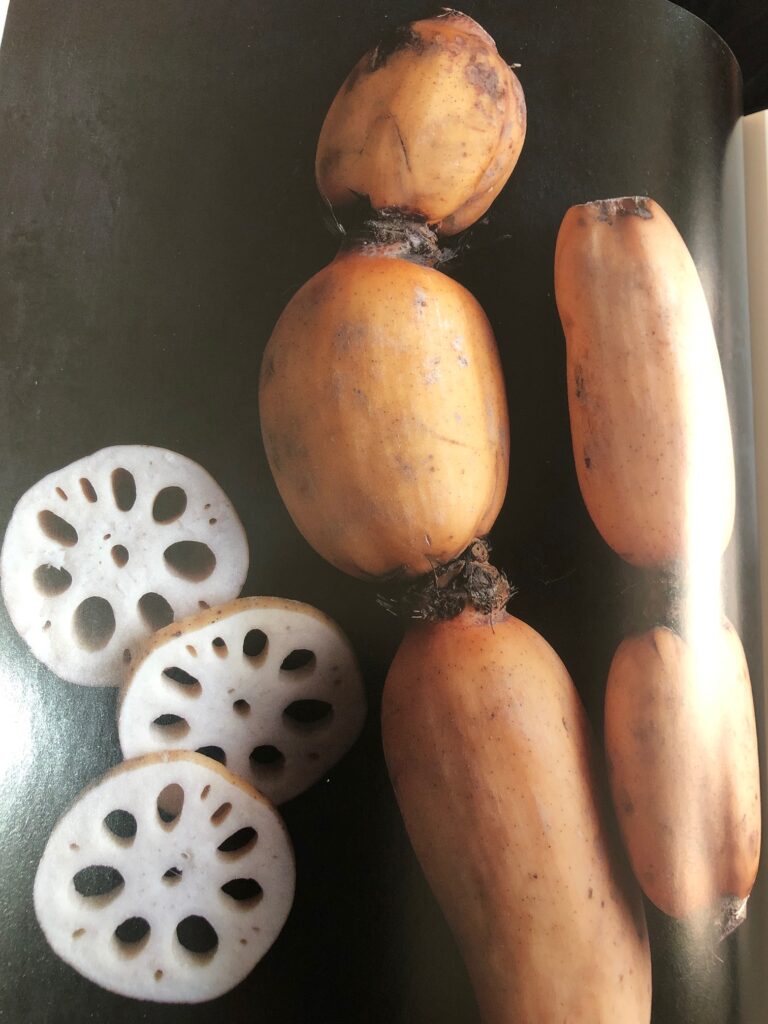
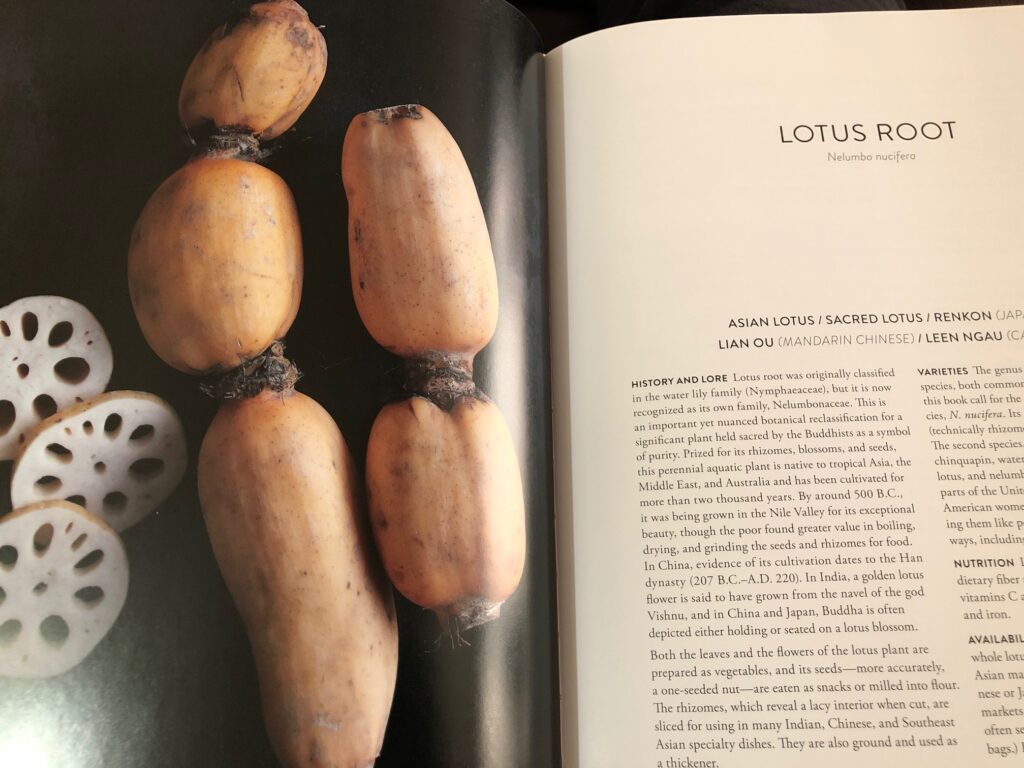
LOTUS ROOT
This time through the book, I took time to read about LOTUS ROOT. It is native to tropical Asia, the Middle East and Australia and has been cultivated for more than two thousand years. However, while it might be found in Asian markets, I’ve never seen it before. Apparently, it can also be canned or pre-sliced in vacuum-sealed bags and is usually imported from China or Japan. If you live on the West Coast you might see it more often than I might. Very interesting!
LOTUS ROOTEven a recipe to use Lotus Root, in case I ever find it in the store!
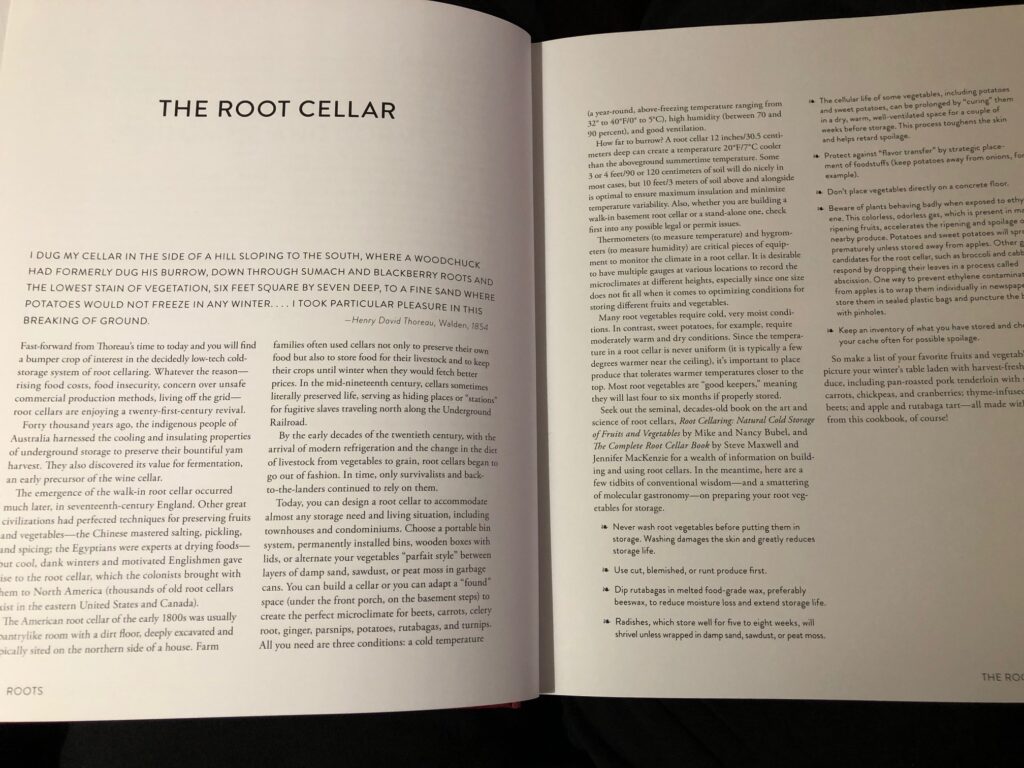
How to set up a Root Cellar
This book also has a two-page spread about how to set up a root cellar. These were often found on rural farms as a low-tech way to preserve root vegetables. I you’ve ever tried to save your winter squash, pumpkins or even carrots for a few months without canning or freezing them, a root cellar can provide the right conditions to keep them usable for several months.
Some root vegetables can even be left in the garden long past fall frosts. This last year, we left a whole row of carrots in the garden, dug them up as we needed them, and discovered they stayed quite nice for months.
As I said, the photographs in this book are outstanding. Who knew vegetables could be so interesting and colorful!
So, if you’d like an interesting colorful and useful book on your shelf, try ROOTS! You may discover a new vegetable or recipe along the way!
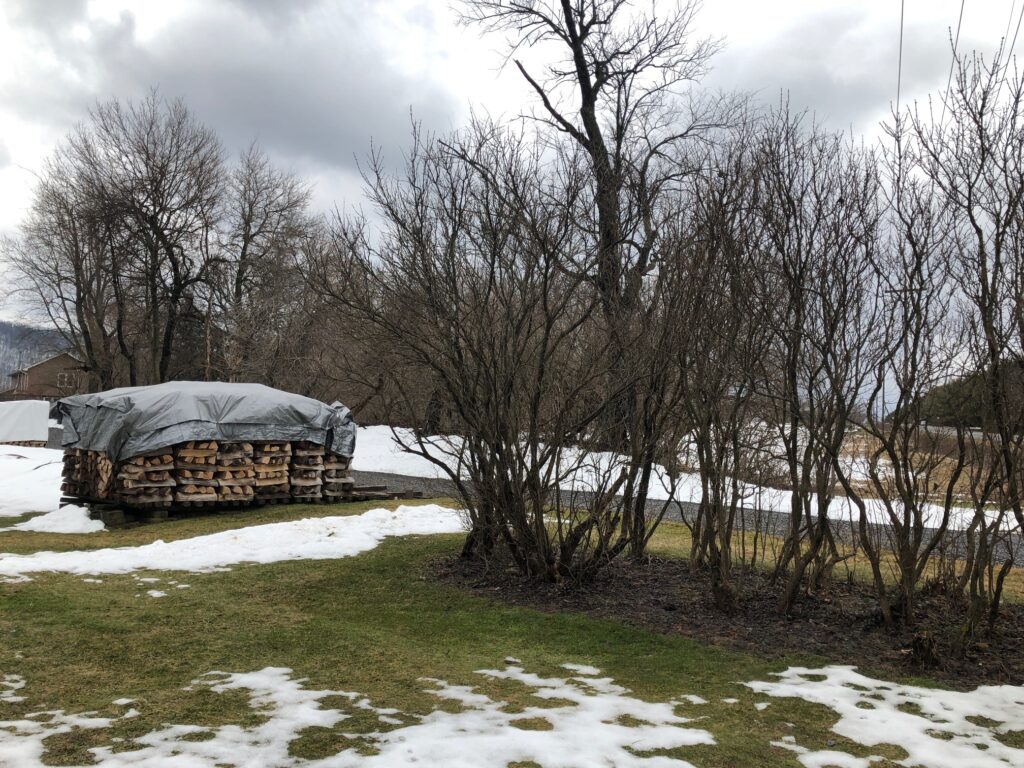
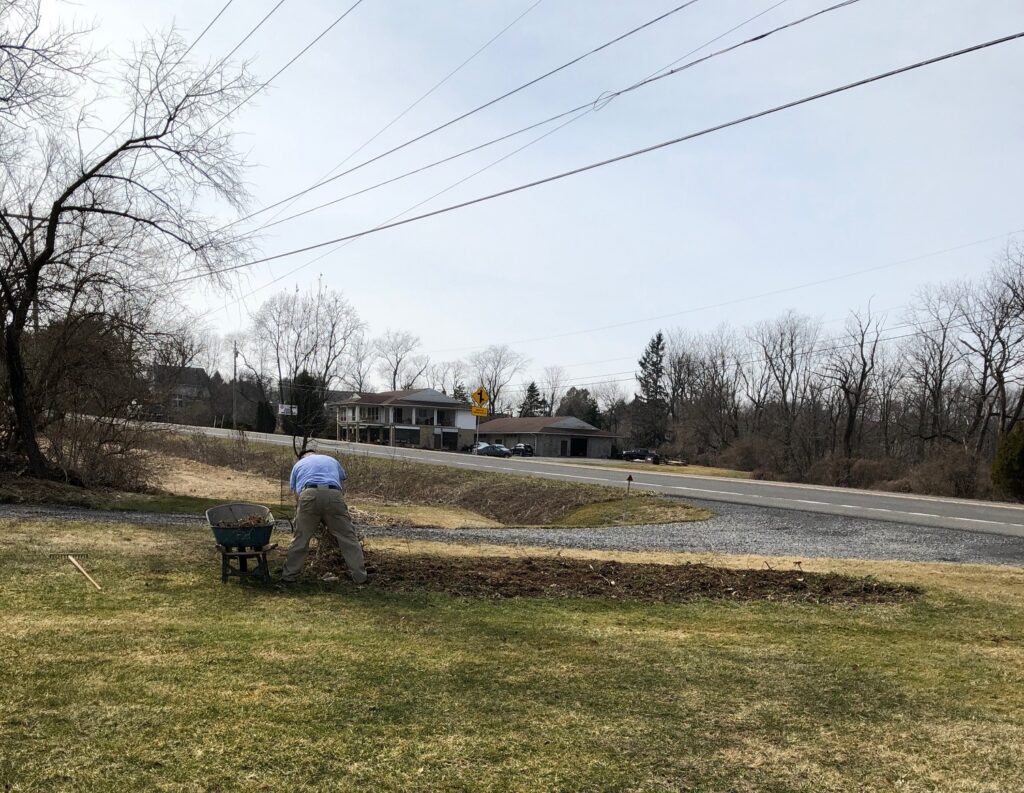
Nothing like a few sunny days in March to get us in the mood to do SOMETHING in the yard. Bert was compelled to dig in the dirt, so it was time to take care of the sad lilac bushes. They have been there for over 40 years and hardly flowered anymore. In the tour of the grounds I posted on March 1, I had a photo of those poor bushes.
After digging and chopping some of the roots, Bert pulled out the bushes one at a time with the help of the truck and some chains. This gave us quite a view of the John Deere business up the road! The rototiller dug up more roots until Bert thought he could dig the holes for six Arborvitae bushes. It looks so much nicer! Of course, we may be long gone by the time they actually block the view up the road!
Check out the John Deere business up the road!I think Bert got these bushes at Lowe’s for about $40 each.
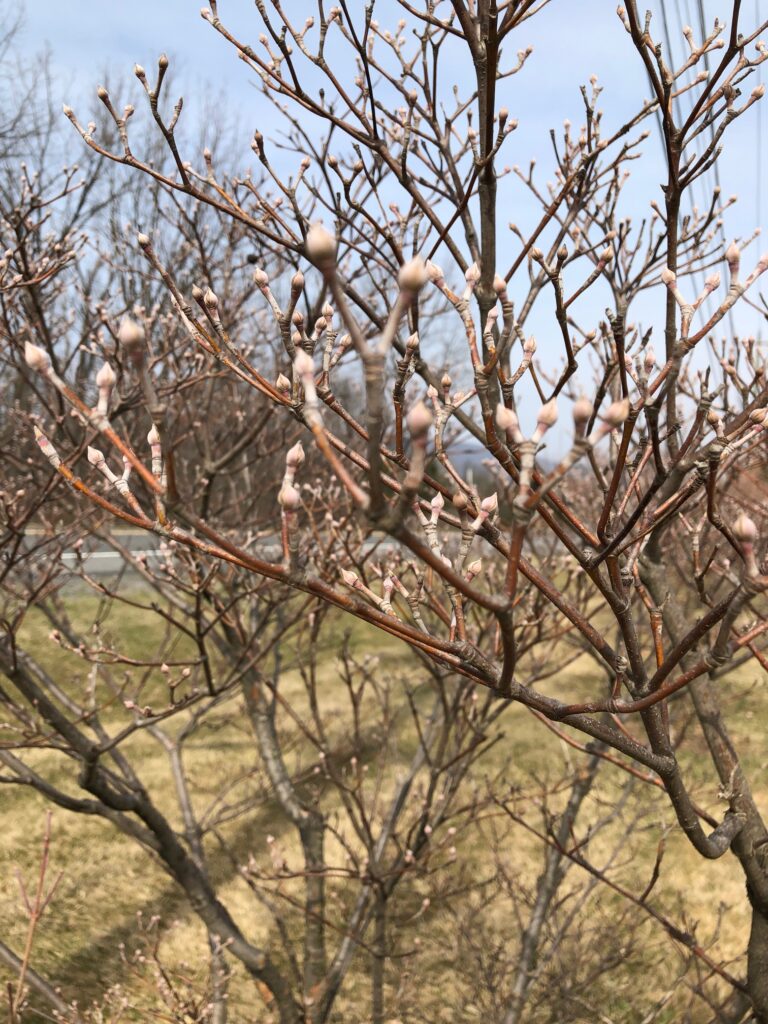
I like to check on the buds of the Dogwood trees along the front of the property. They still look pretty dormant, but the buds give me hope!
Dogwood buds are thinking about Spring…I hope!
Rain is expected today and temperatures are still too cool to do much more outside for a few weeks. Bert couldn’t help himself and found the seeds for the garden. He tries to start some of them around this time so by mid-May things are ready to go in the garden. In the past we have pushed the start date to early March, and that’s just too early. The risk of a late spring frost is pretty high until the third week of May around here. Last year we put our tomatoes in the ground around mid-May and of course, we had one final frost that killed them all in one night! Very frustrating! So hopefully the extra week delay will help.
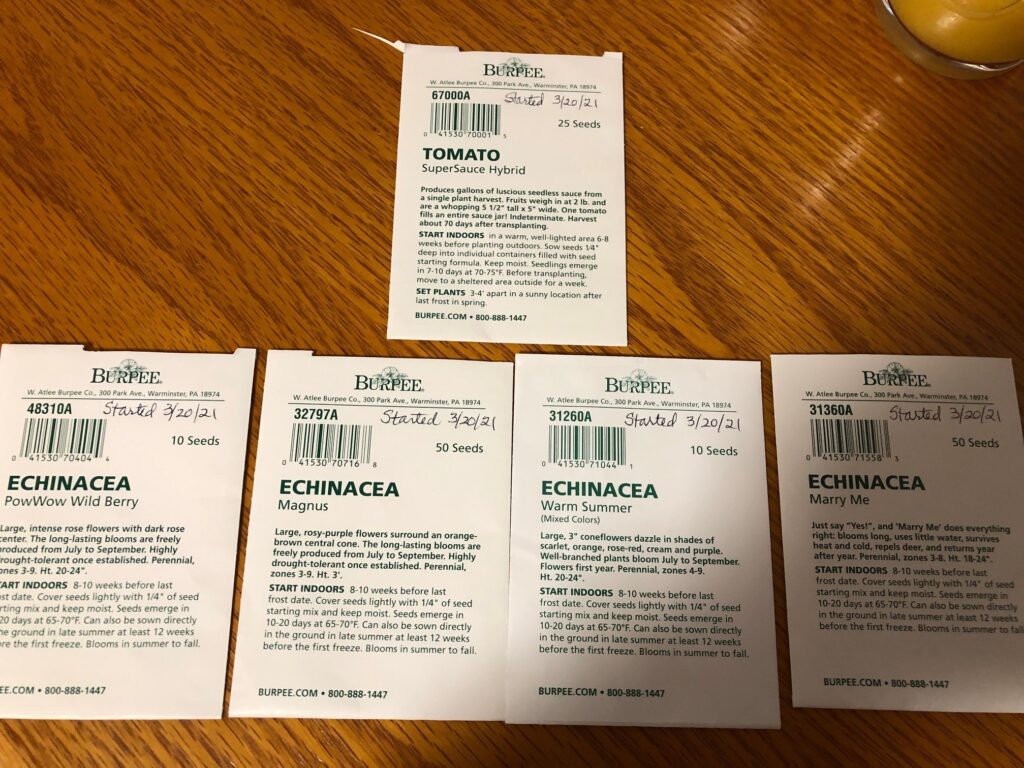
Bert started our Super Sauce Tomatoes and the four different Echinacea seeds. We’re hoping that section of the garden will just reseed itself each year and we’ll have nice flowers for the bees!
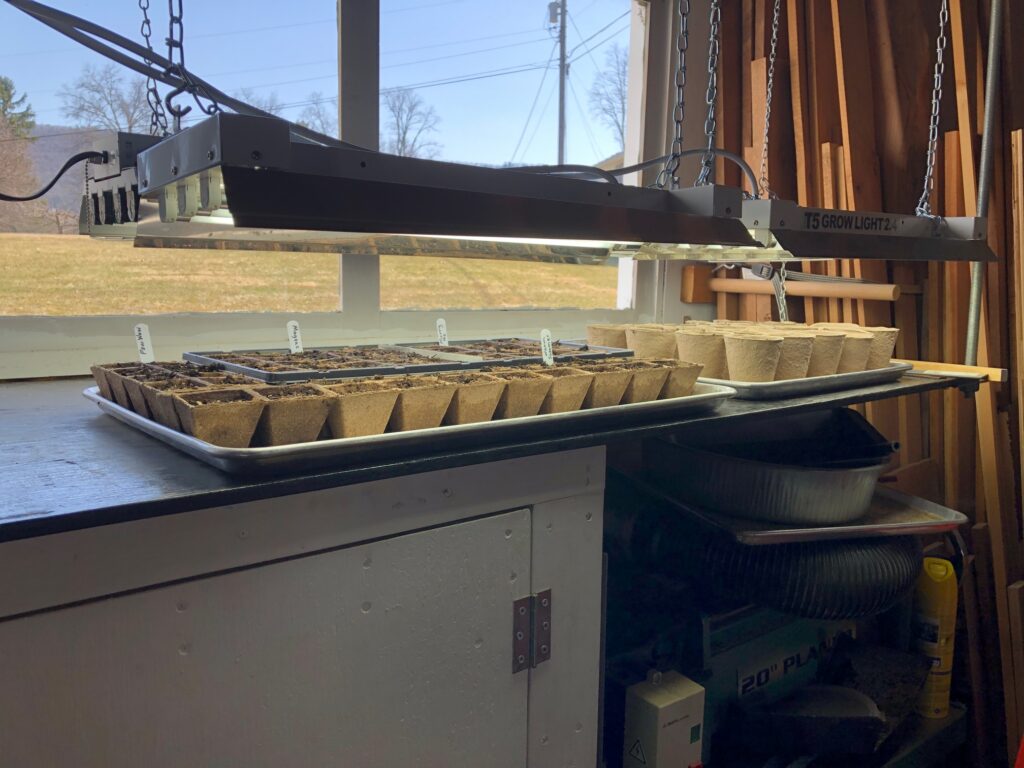
We start the seeds in the shop under grow lights and that works well. The cucumber seeds will not get started for another month and the beans, carrots and beets will be planted directly in the garden about mid-May. I’ll add some herb plants from a local greenhouse as we get closer to May.
New seeds under grow lights in the shop.Echinacea seeds.Tomato seeds.
More later as Mother Nature wakes up. After the last year we’ve had, Spring is such a hopeful time!
I’ve been interested in trying to make rolled beeswax candles for quite a while. So why use beeswax instead of petroleum-based paraffin? According to Chris Dalziel, in her book, The Beeswax Workshop,
“Paraffin candles are shown to negatively affect indoor air quality because of the chemical by-products in their soot. Beeswax candles burn cleanly, without soot. Beeswax emits negative ions when it burns. Negative ions clean the air of odors and bacteria. Falling water, like waterfalls, rain and snow also give off negative ions. that smell after a spring rain is the negative ions doing their job. In a similar way, beeswax candles clean the indoor air.” (pp. 18-19)
I’ve been using beeswax in my various skin care products for several years. It’s an essential part of my lip balm and lotion bar recipes. Usually, I buy beeswax in the form of pellets that can be measured out easily.
I do know that beeswax is not difficult to melt but the clean-up is a little tougher than cleaning up from my soap projects. Warm beeswax must be wiped out carefully from any container I use. It can’t be be washed away easily and it WILL clog up drains when it cools.
I’ve always been interested in trying the rolled beeswax sheets to make candles, so that’s where I’ll start. Much less worry than trying to dispose of melted wax. I thought I’d try a small batch of birthday candles first to see if I could actually do it!
Supplies needed
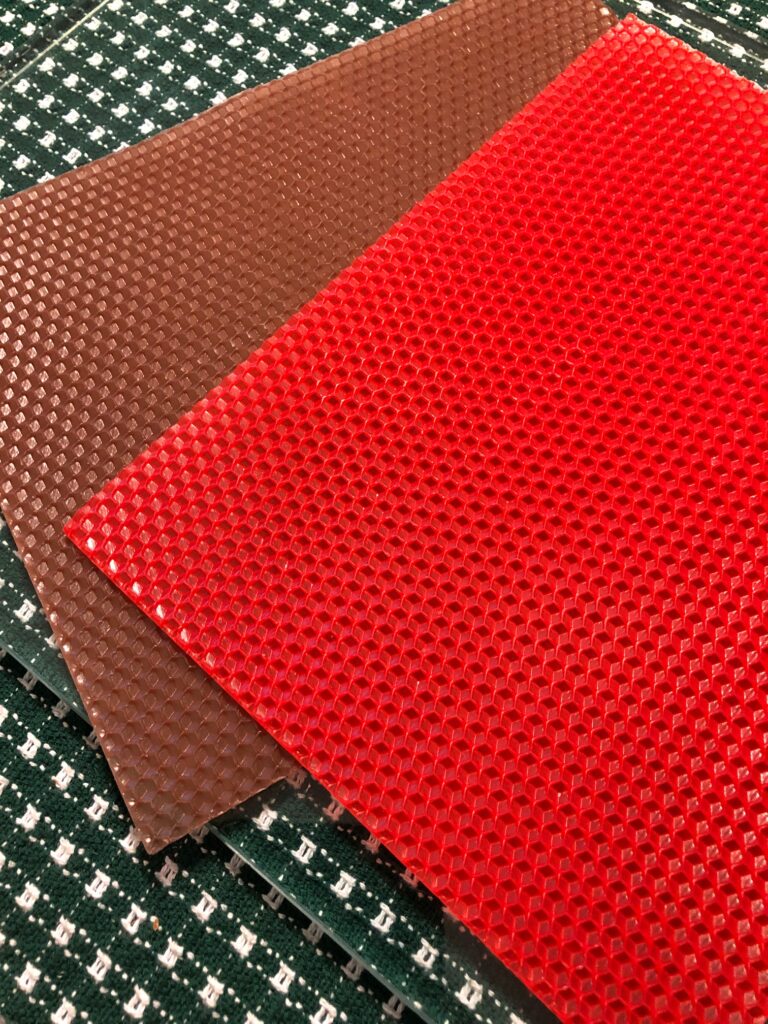
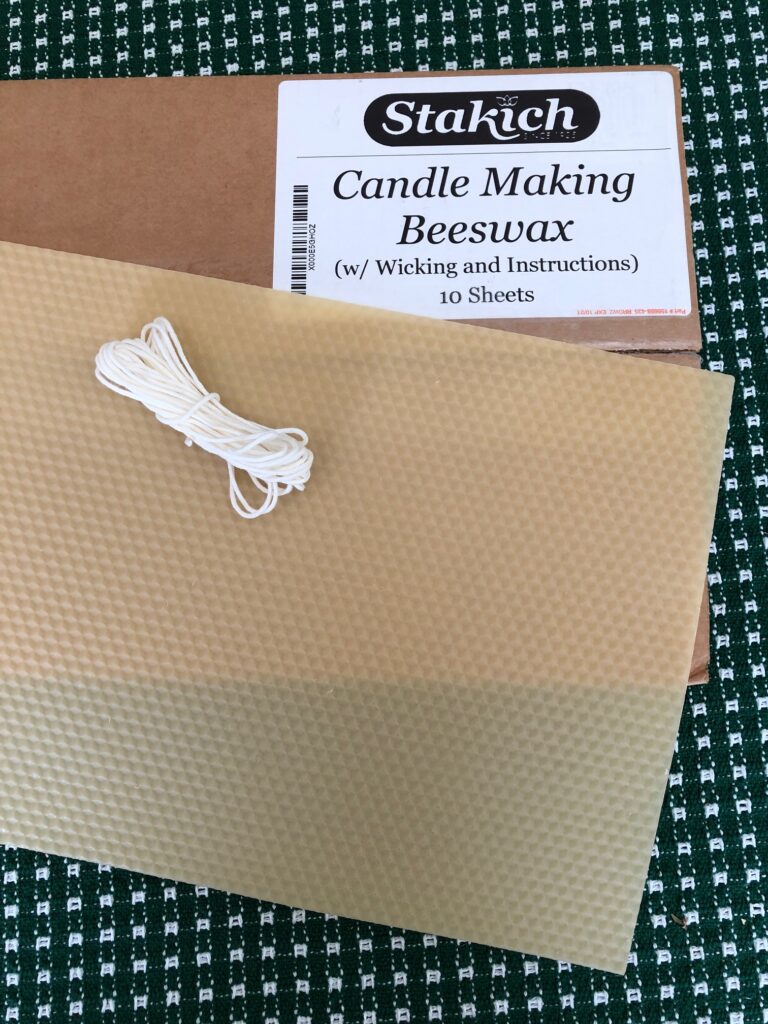
First, I ordered a set of multicolor sheets of beeswax from Amazon (about $25.00). The sheets are 8″ x 10″ and come in many colors. It says it’s beeswax, but it does not have the smell of natural beeswax. The coloring might affect the smell. However, this package was not as expensive as natural beeswax and the colors might be fun to work with.
I also ordered a set of natural color sheets of beeswax from Amazon (about $35.00). Based on the smell alone, I know they are natural beeswax. Of course, this package was more expensive than the multicolor pack.
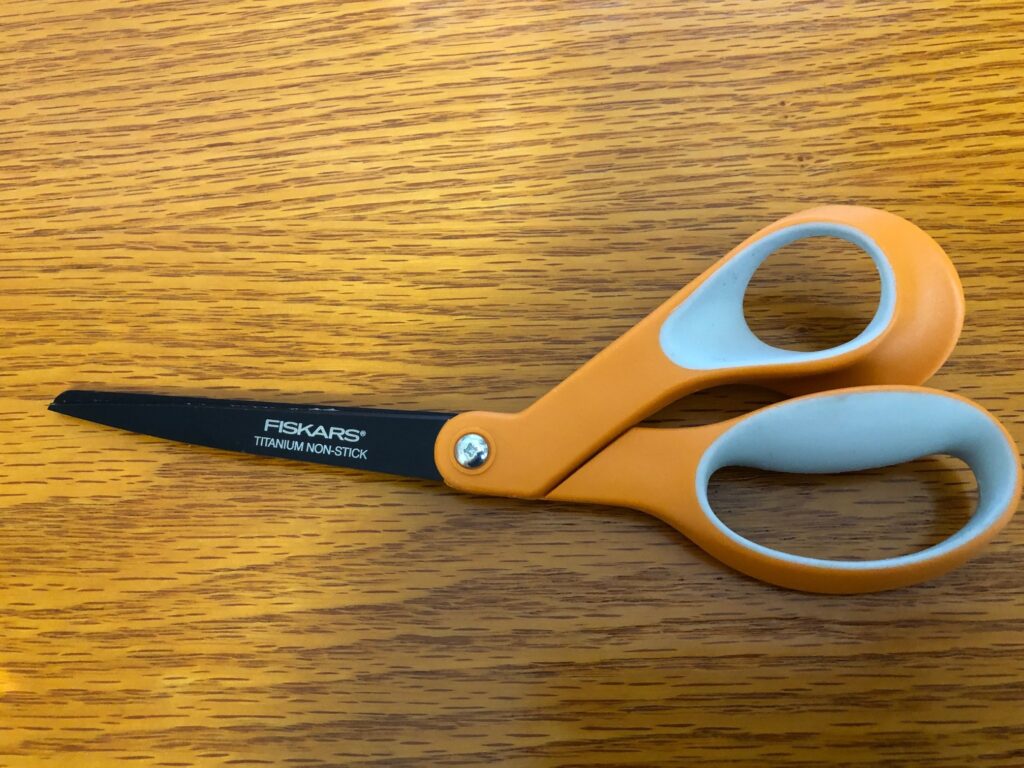
At the same time, I ordered a pair of Teflon-coated scissors to cut the wax sheets. These were recommended by several online sources because the beeswax sheets are quite “sticky” and I didn’t want to ruin my good fabric scissors.
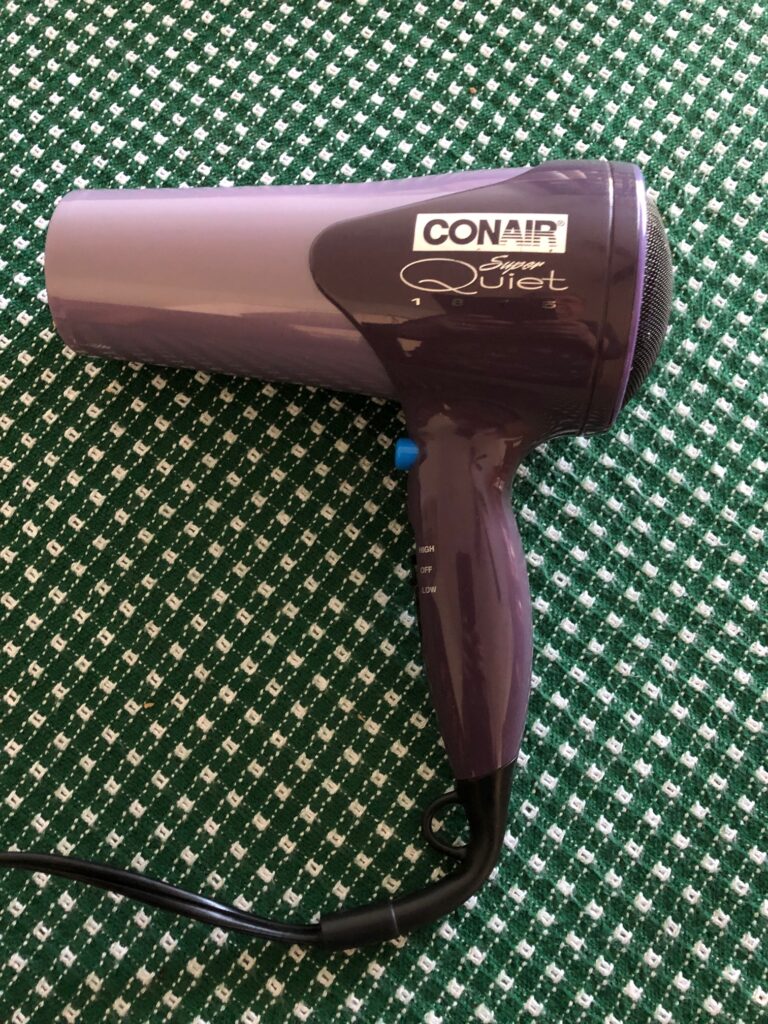
And of course, you’ll need a hair dryer with a low heat choice. I’ve had short hair for so long I wasn’t sure I still had one!
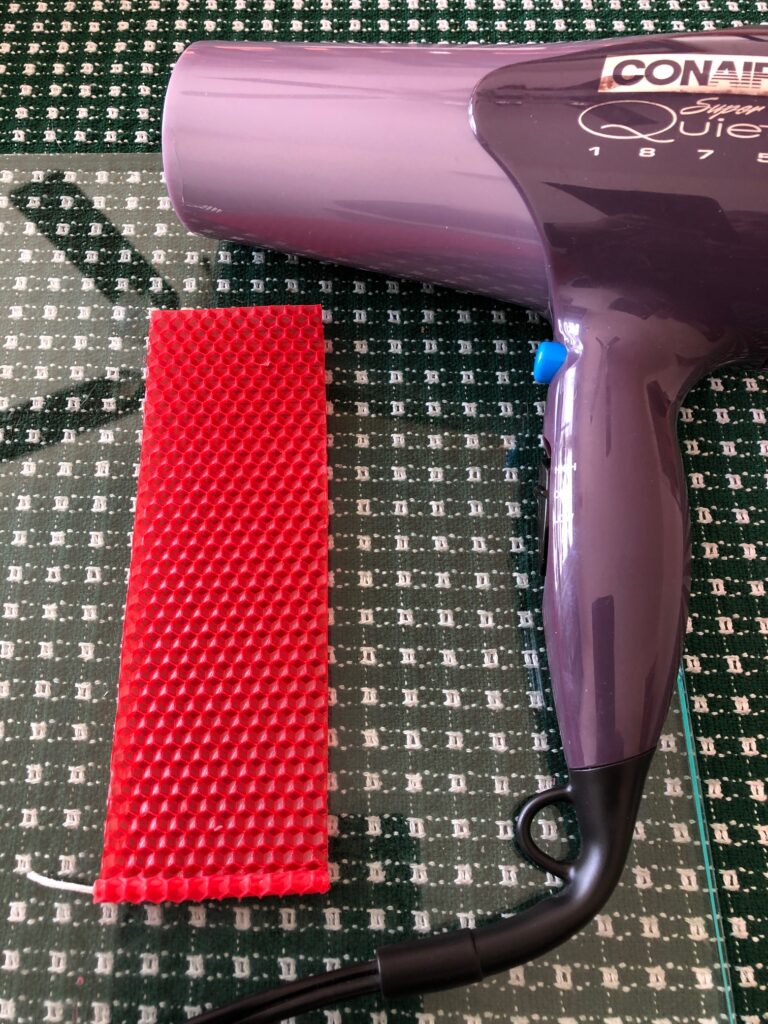
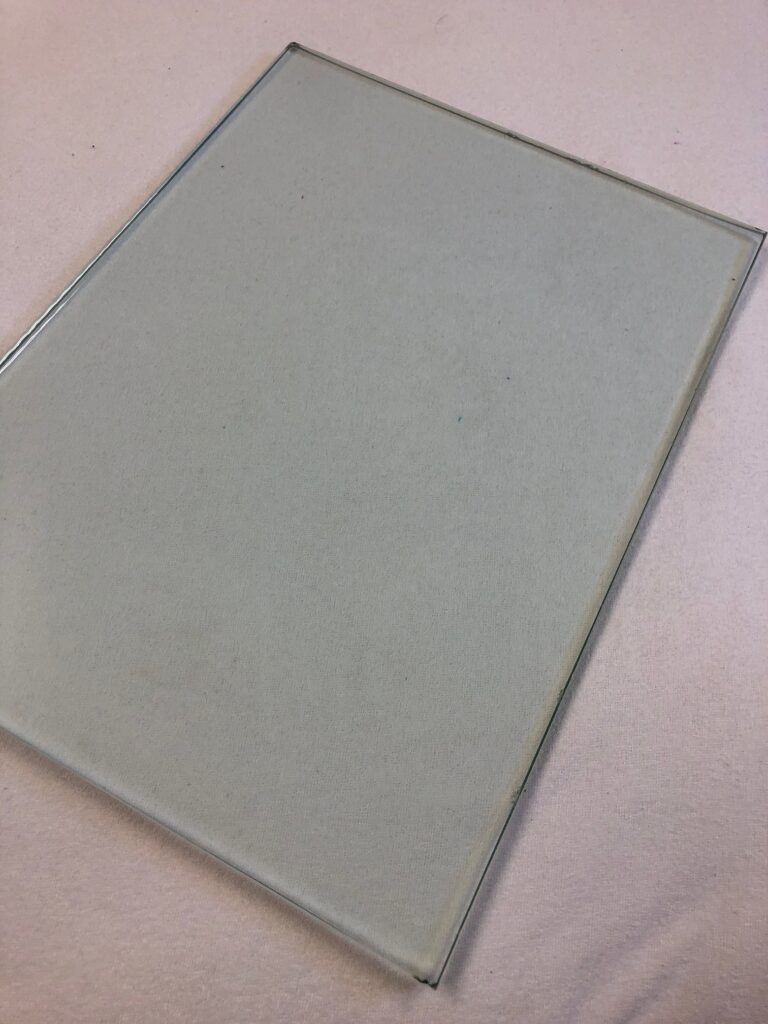
And finally, my work surface was the same piece of heavy glass that I used to work with the air dry clay. It sits on top of my table cloth so it looks like I’m working directly on cloth…but the glass is there! Use any smooth surface that the wax won’t damage.
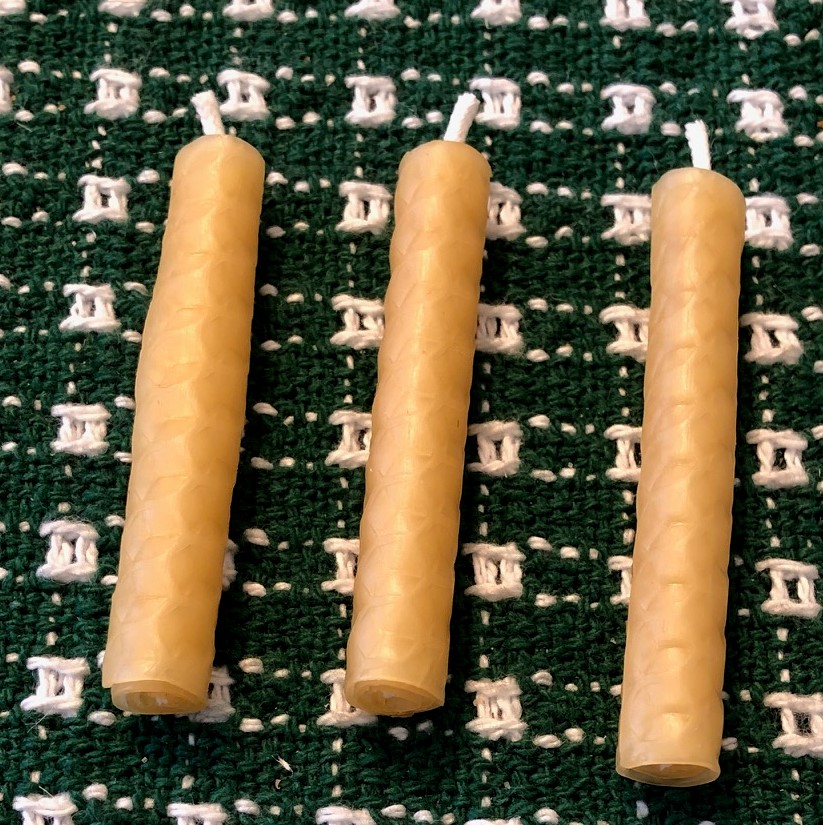
Making a Rolled Beeswax Birthday Candle
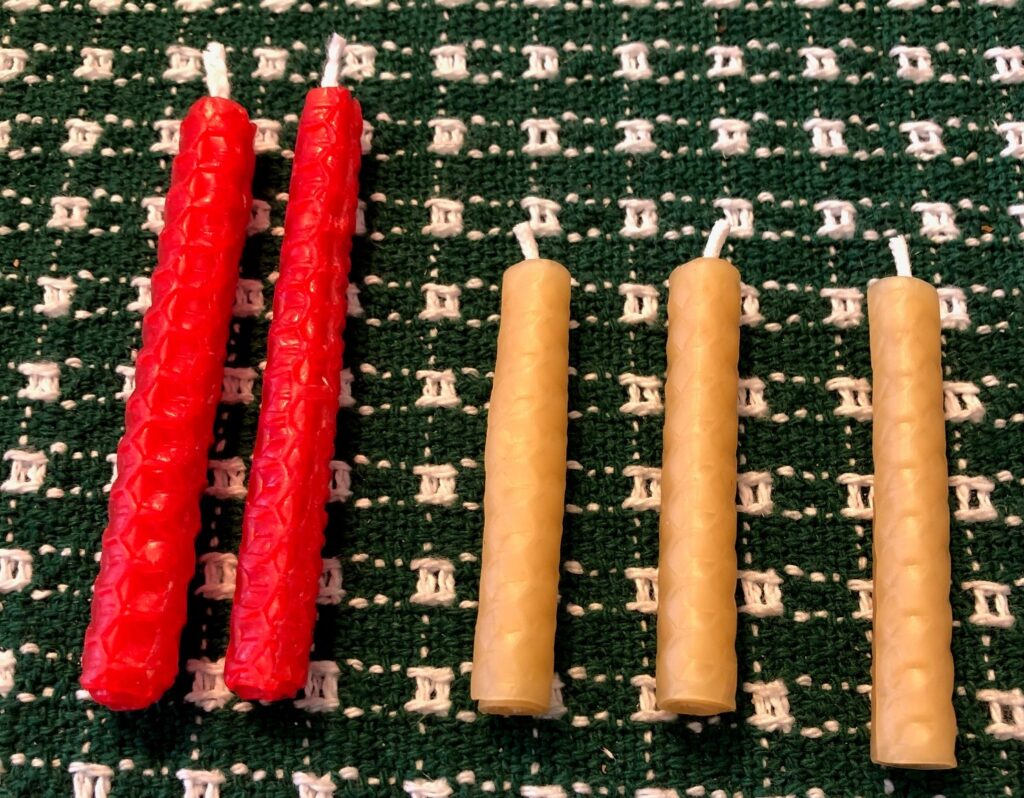
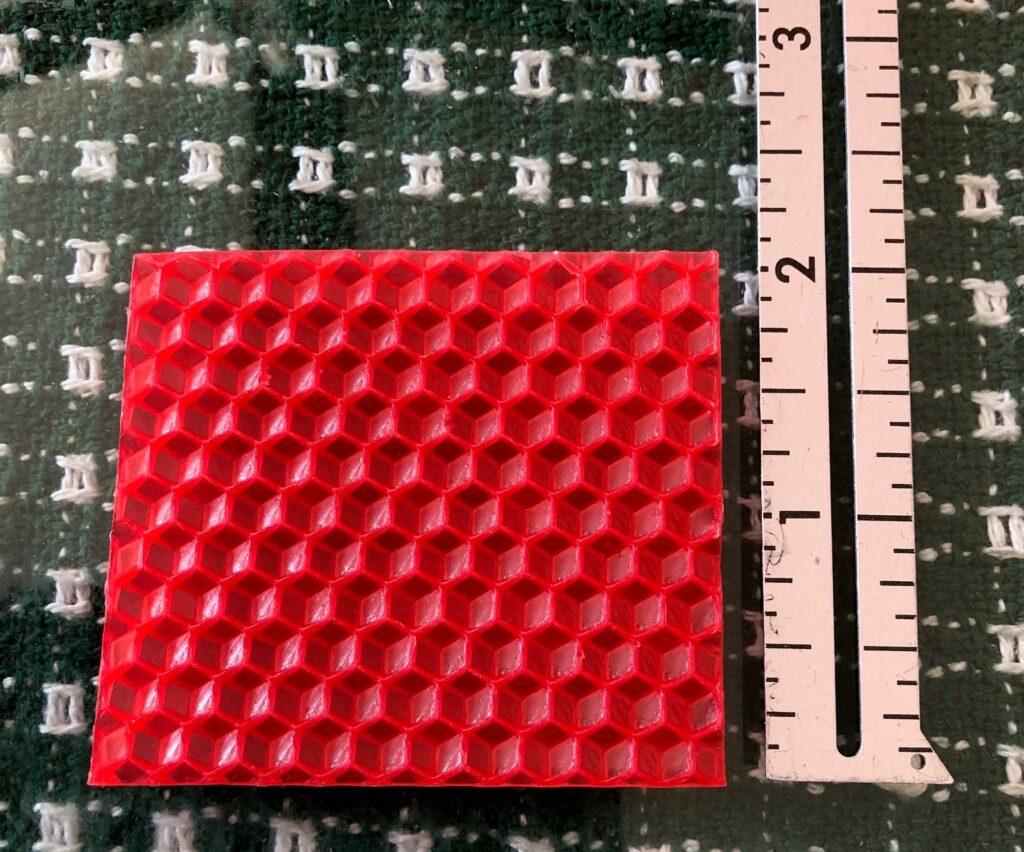
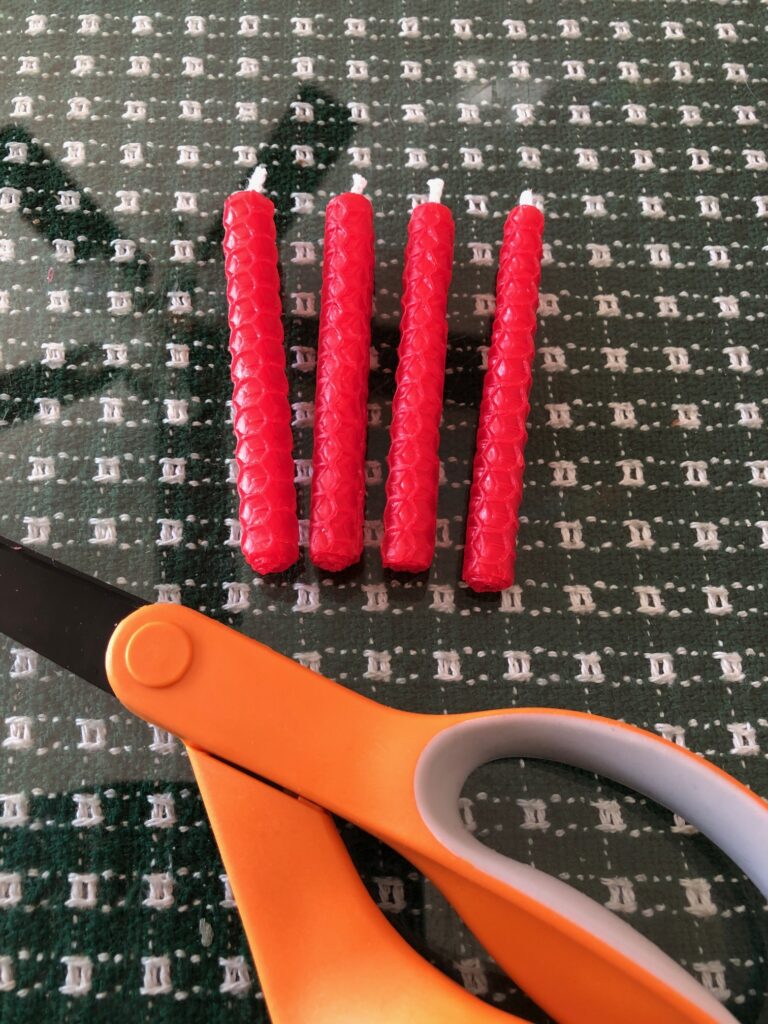
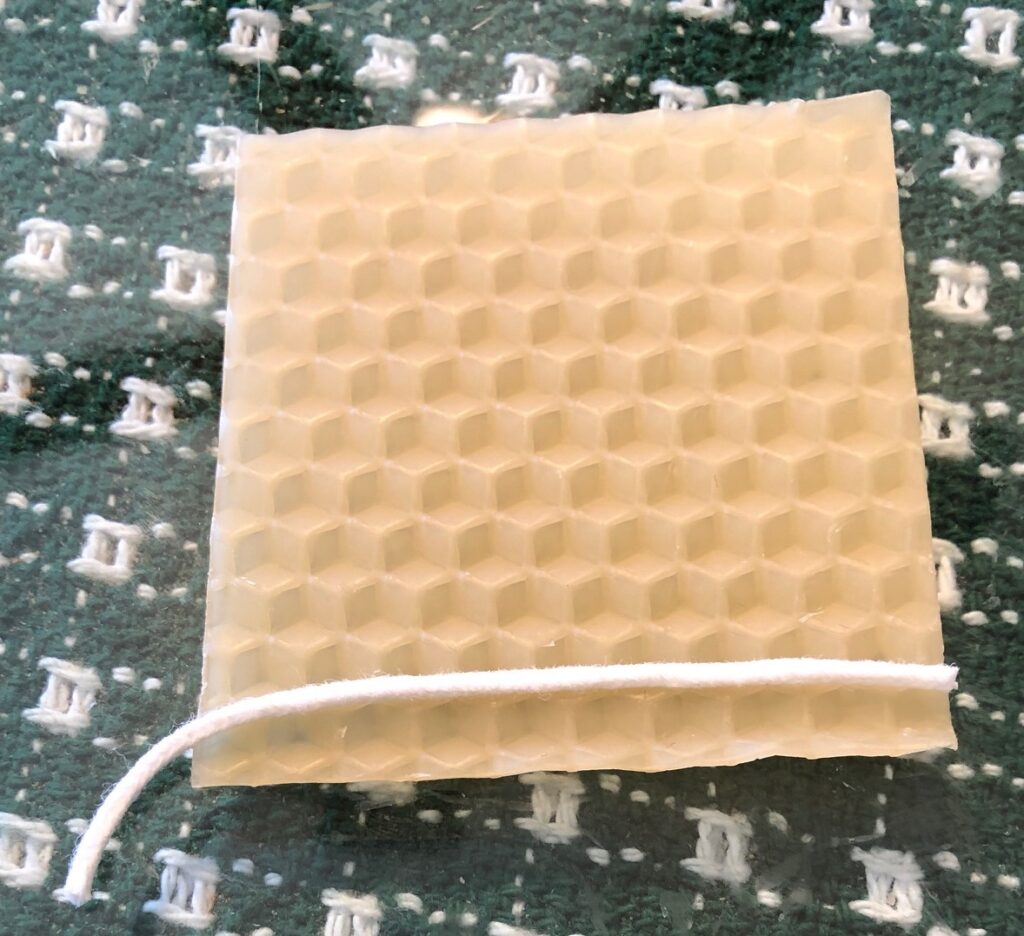
For my first attempt at a rolled candle, I decided to try small birthday candles. Using the red beeswax sheet, I cut the sheet into four 2 1/2″ strips.
I cut a piece of wick string about 3″ long. On the first wax strip, I positioned the wick across the end. Using the hair dryer on low, I warmed the end of the strip (about 5 seconds). I could then gently fold the edge over the wick. Warming the next section of wax, I rolled the wax about 2-3 times and decided to stop. It looked big enough. I cut off the extra portion of the strip and pressed it to the candle.
I cut the rest of the strip into 2 1/2″ pieces and made a few more candles. By the fourth candle, I trimmed the piece to just 2″ so it made a skinnier candle.
2″ was about right to make one candle.My candles got skinnier by the time I got to #4!
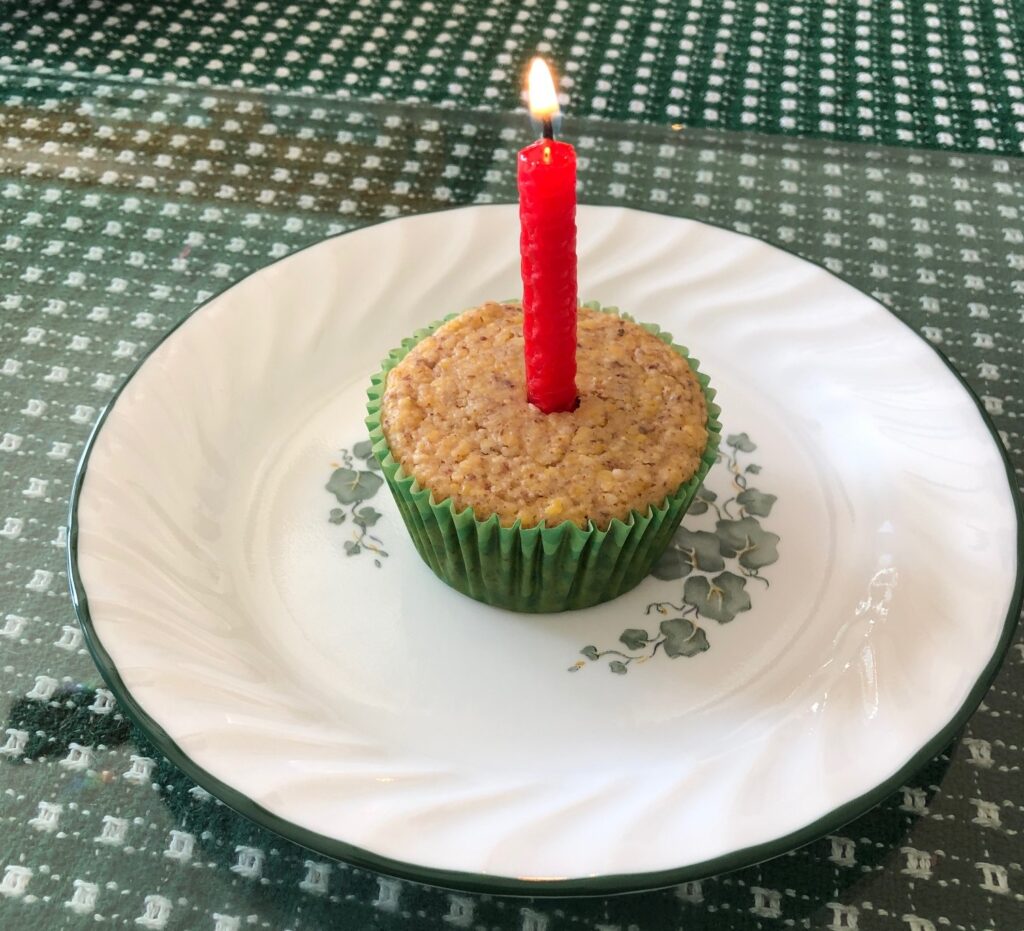
Of course, I had to see if it would work as a birthday candle in a corn muffin (since I didn’t have any cupcakes handy!) Not too shabby!
Still pretty fat for a birthday candle!
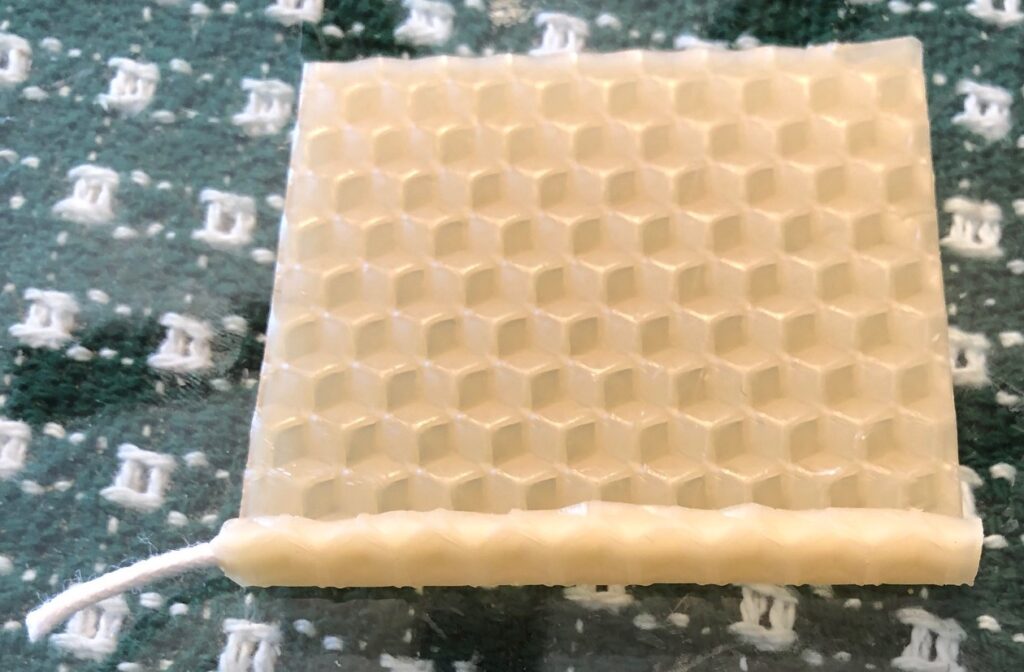
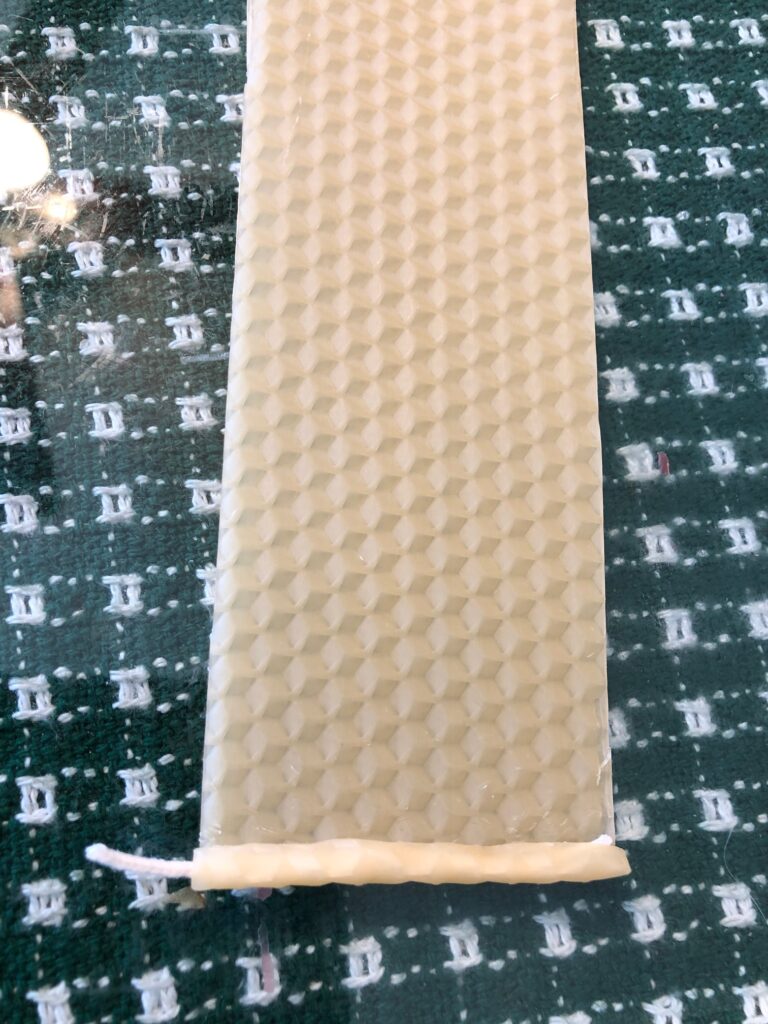
For my next attempt for a birthday candle I used a piece of the natural beeswax and tried again. This sheet was thinner, more pliable and rolled up nicely when warmed.
Here’s a comparison of the two types of beeswax sheets. The colors are nice, but the natural beeswax sheet made a more compact candle.
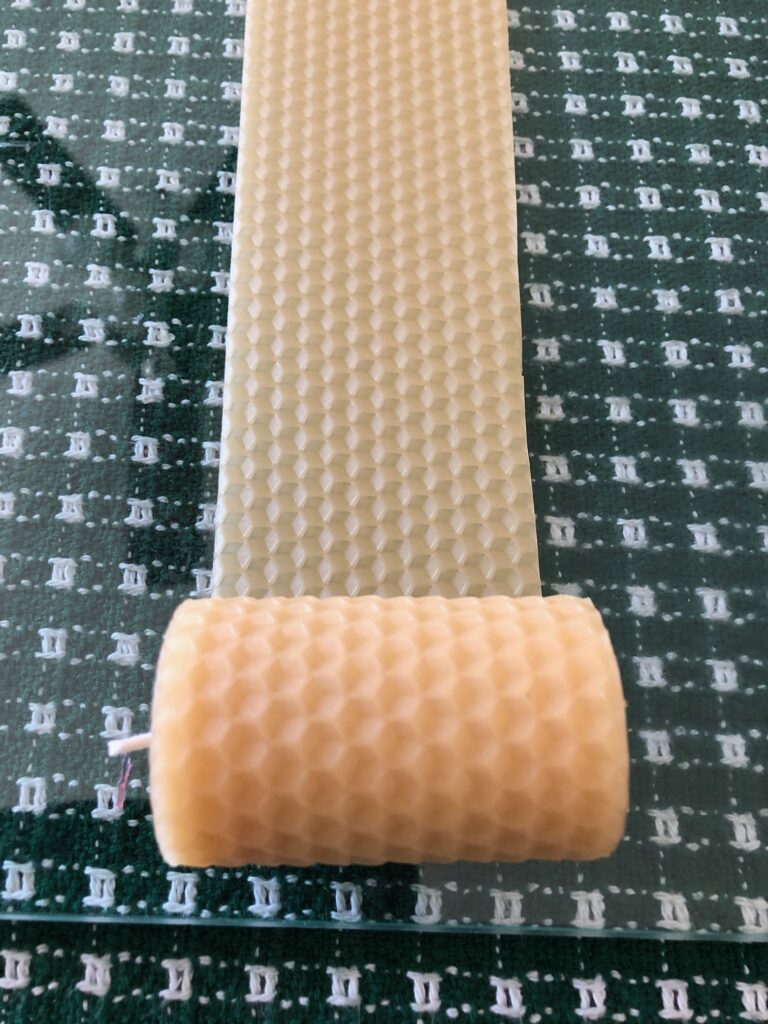
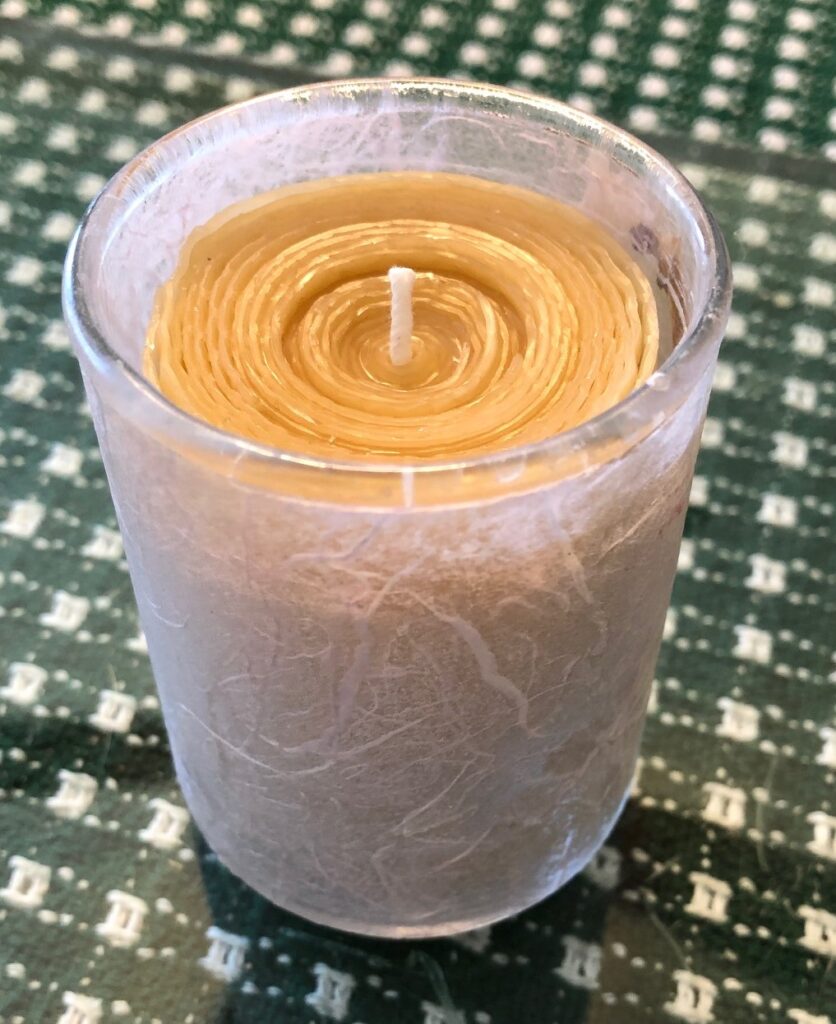
Making a Rolled Beeswax Votive Candle
I now had the rest of the sheet of natural beeswax to work with so I thought I’d try a votive candle.
I measured the votive candle holder and made sure my strips would make a candle the right height.
Following the same procedures, I just started rolling around the wick until it was the right size to fit into the votive holder. Use the hair dryer every few inches to warm the wax so it bends and doesn’t crack. Join the strips of the wax sheet by smoothing the ends together and continue rolling until the size is right.
I feel encouraged to make more candles. They should make great Christmas gifts! Give it a try!
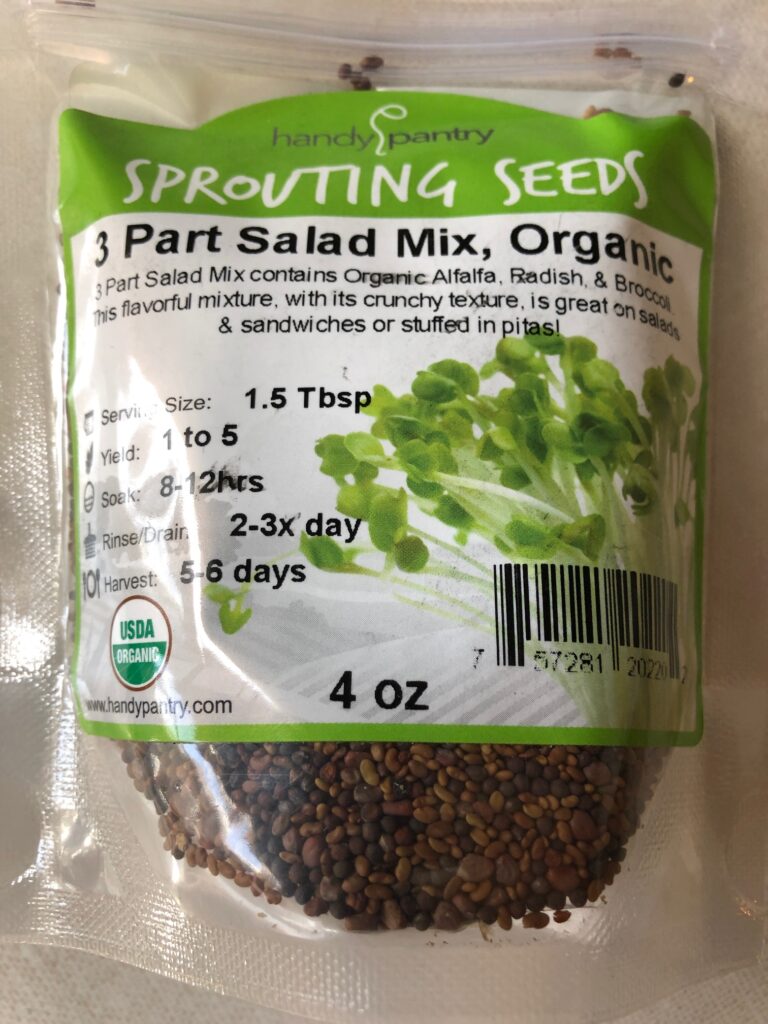
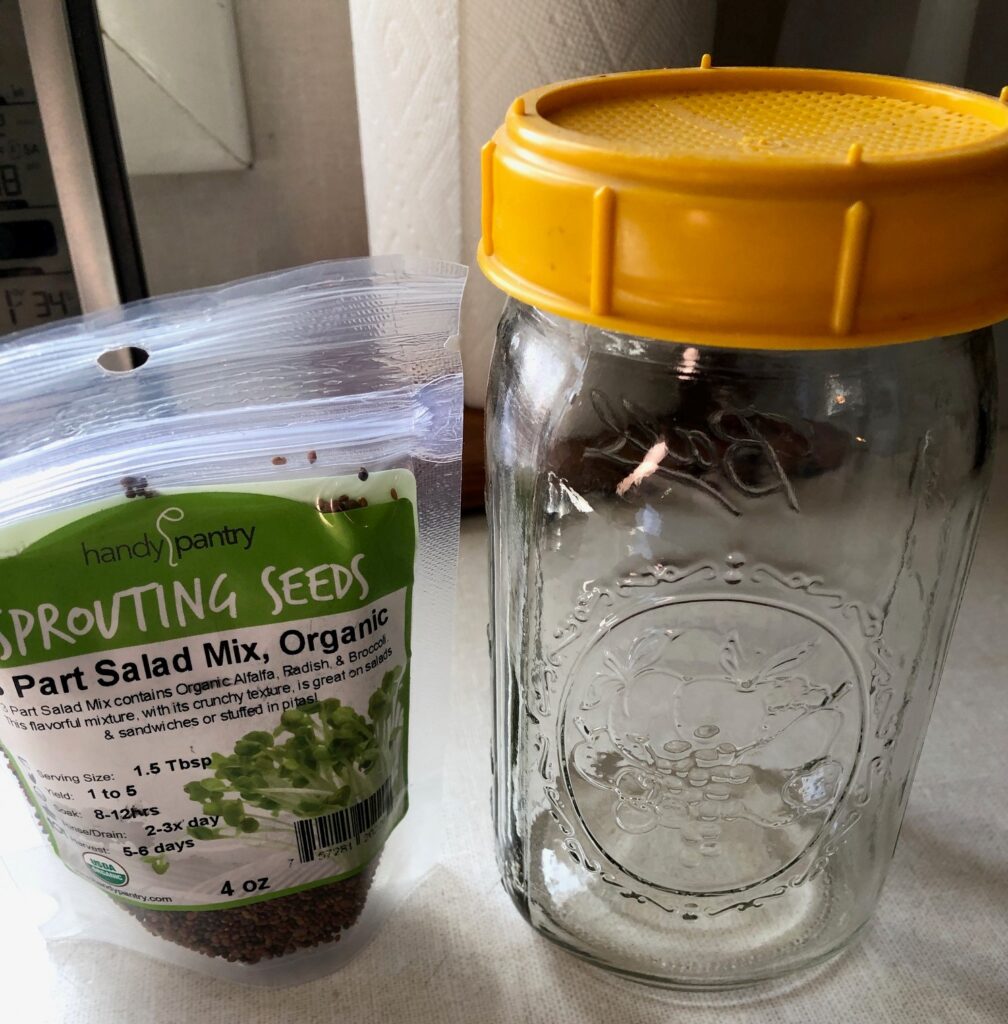
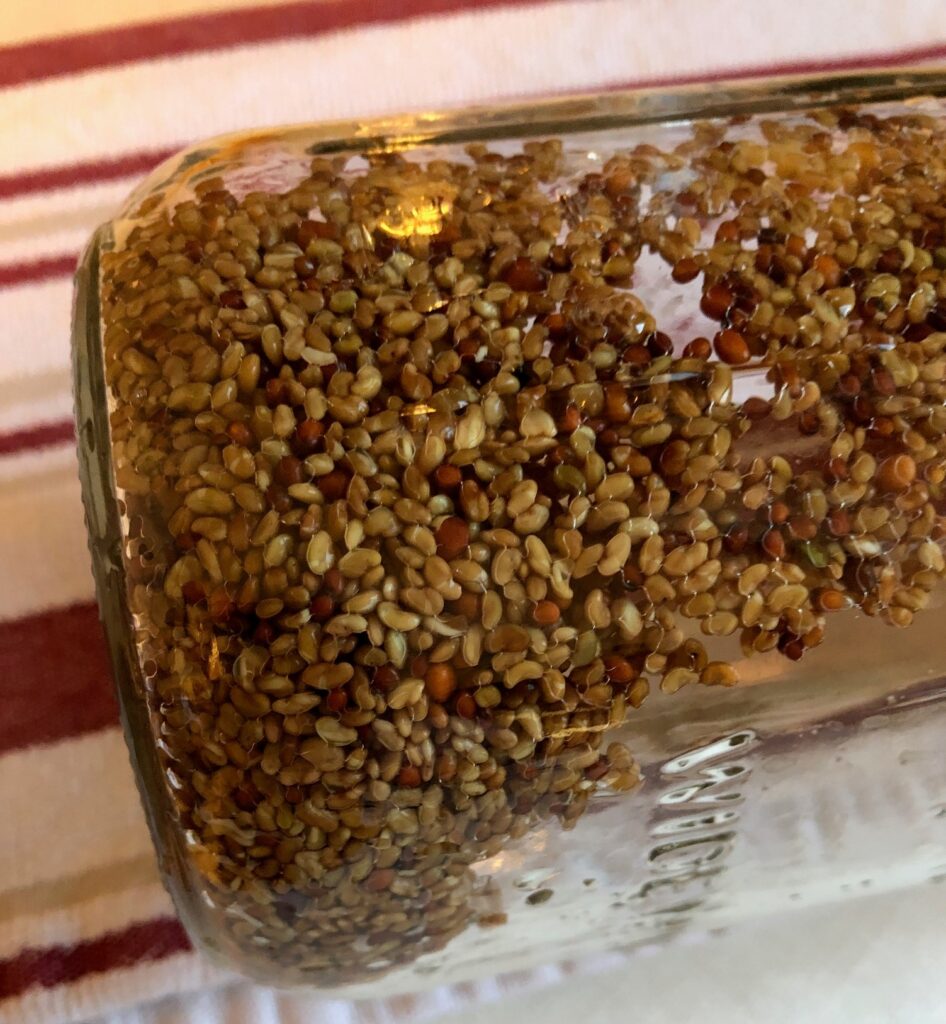
I was craving some fresh greens in a salad over the weekend and decided to start some sprouts. While I like sprouts, I really wanted microgreens, which are just the tops of small plants without the roots. I was trying to avoid setting up the grow light and the proper trays…which forces me to rearrange my shelving by the patio windows. Soooo, I thought I’d start with the seeds I use to sprout to get them started.
Then I found my quart jar with the strainer lid that I use to start the seeds.
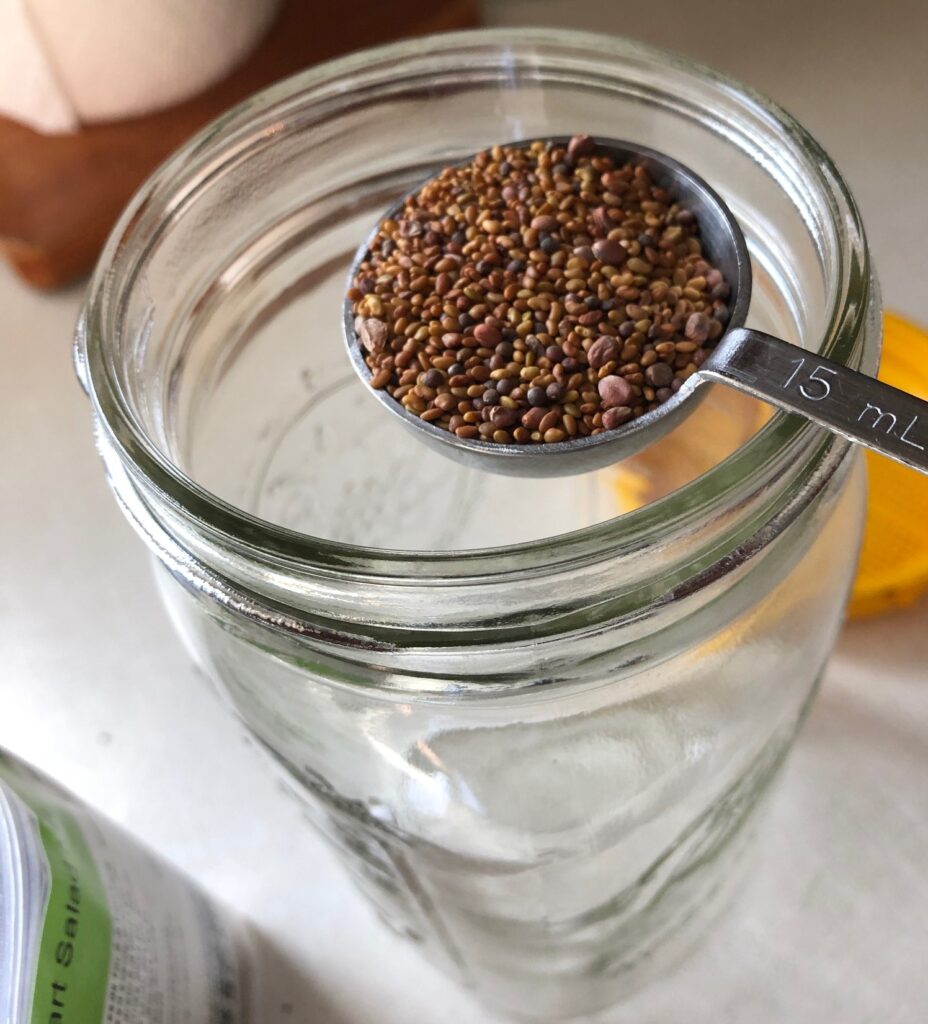
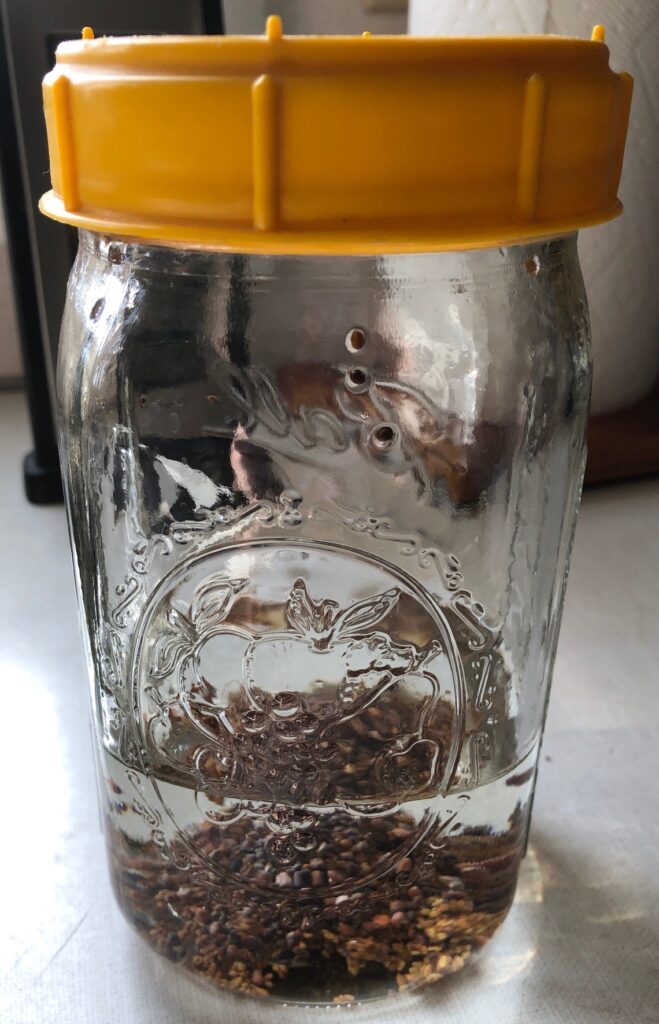
First, I measured out 1 1/2 tablespoons of seeds and put them in the jar. I added filtered water and let them soak overnight.
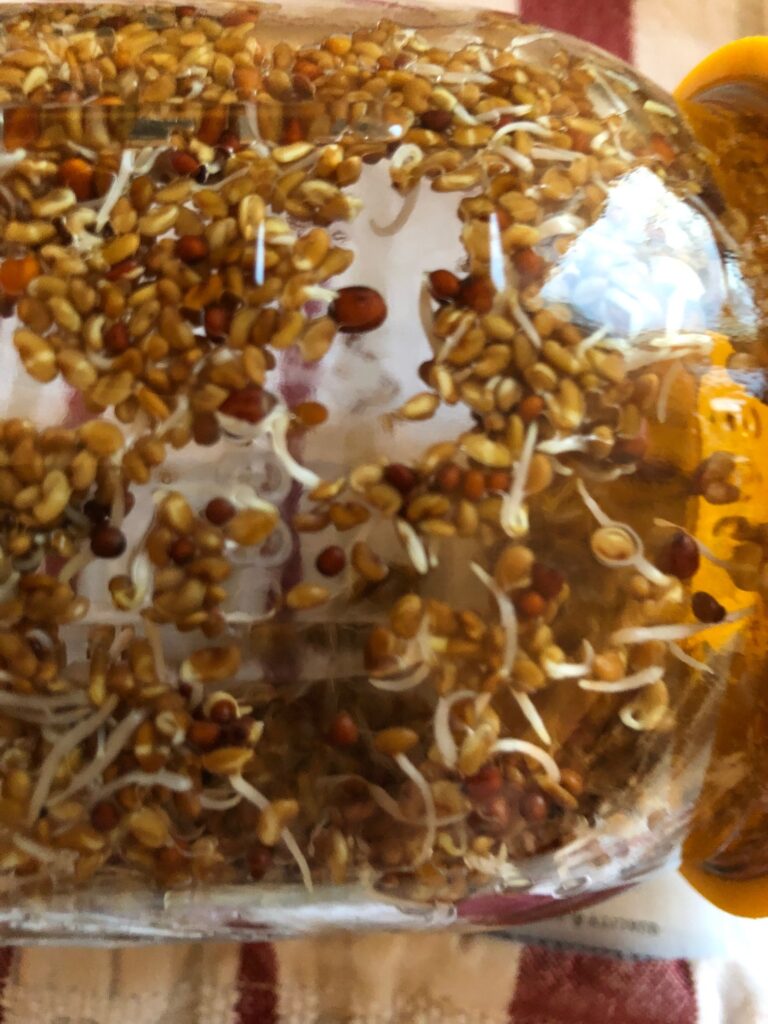
By morning the seeds were about twice their dried size.
I rolled the jar up in a tea towel and left it by the kitchen sink.
Each evening and morning I filled the jar with water about half way and swished the seeds around. Then I drained out the water, wrapping it up again with the tea towel. By the second morning the seeds had started to sprout.
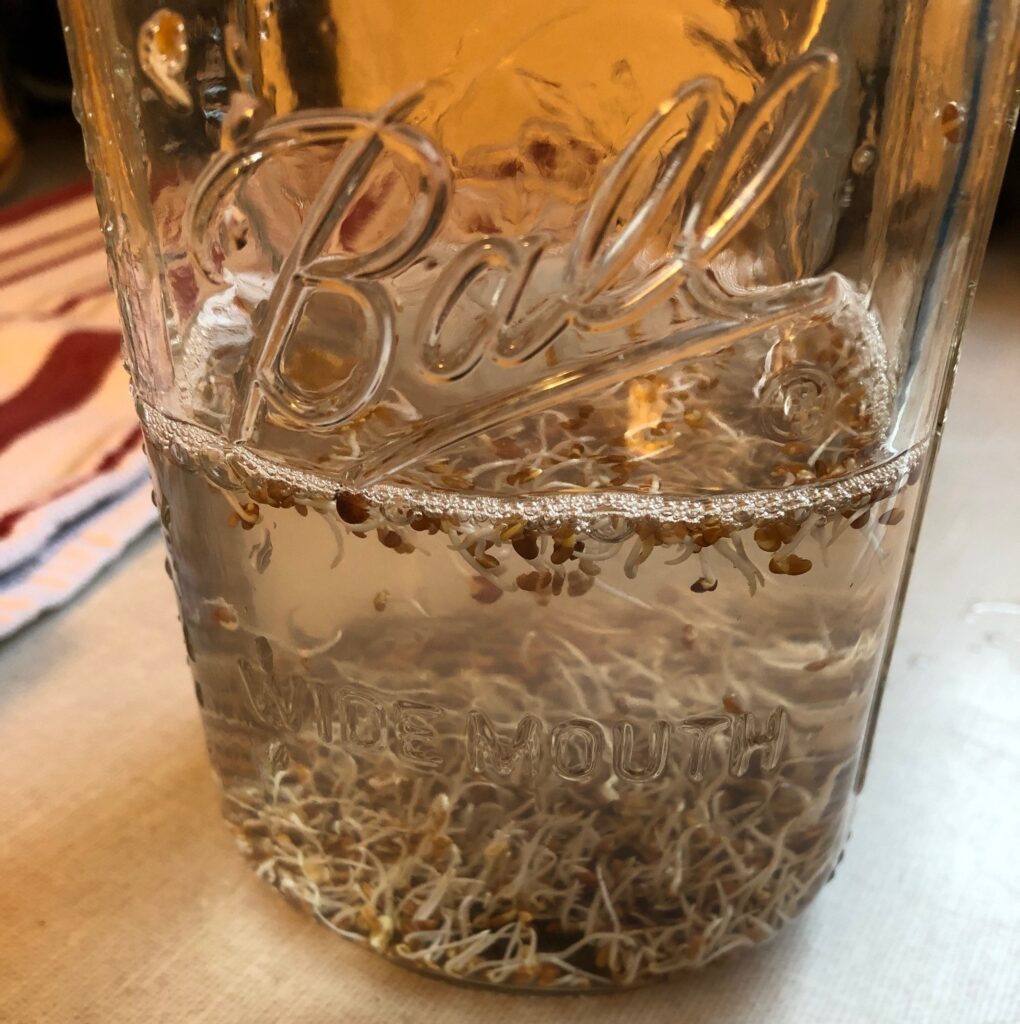
By Day 3 the seeds were doing well. More swishing and draining.
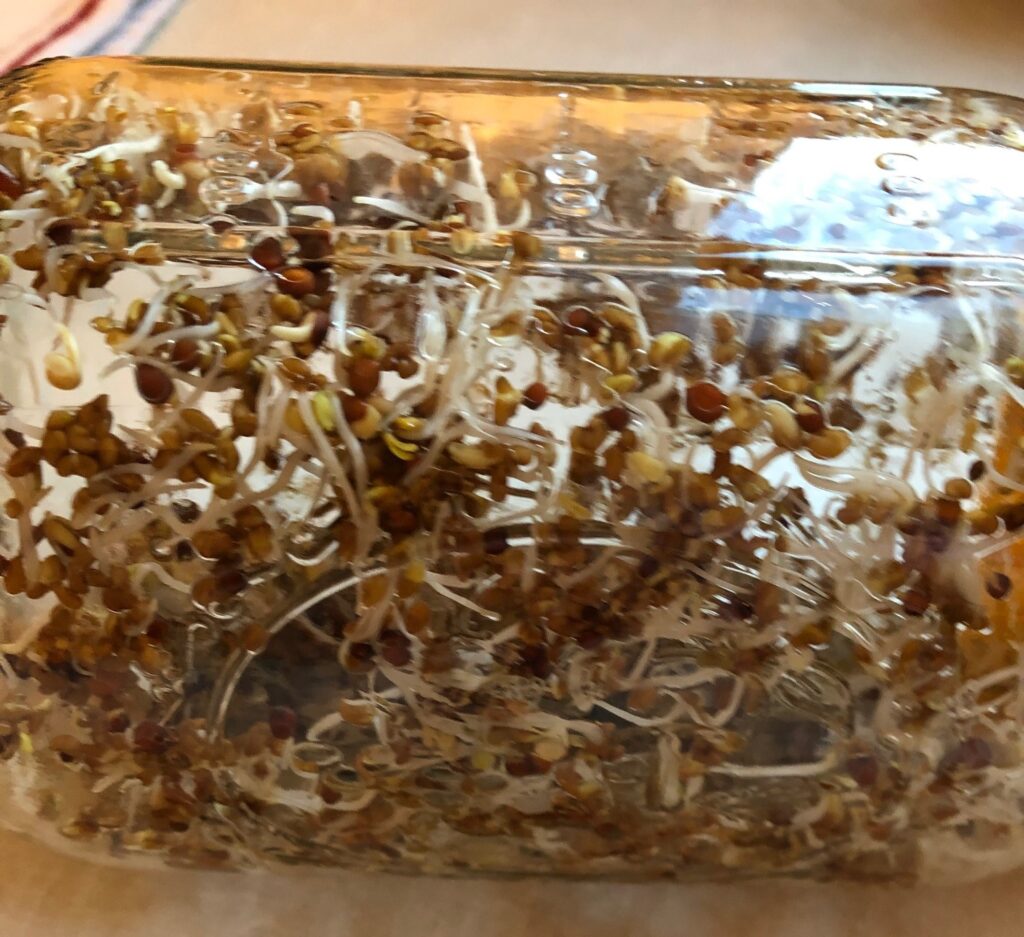
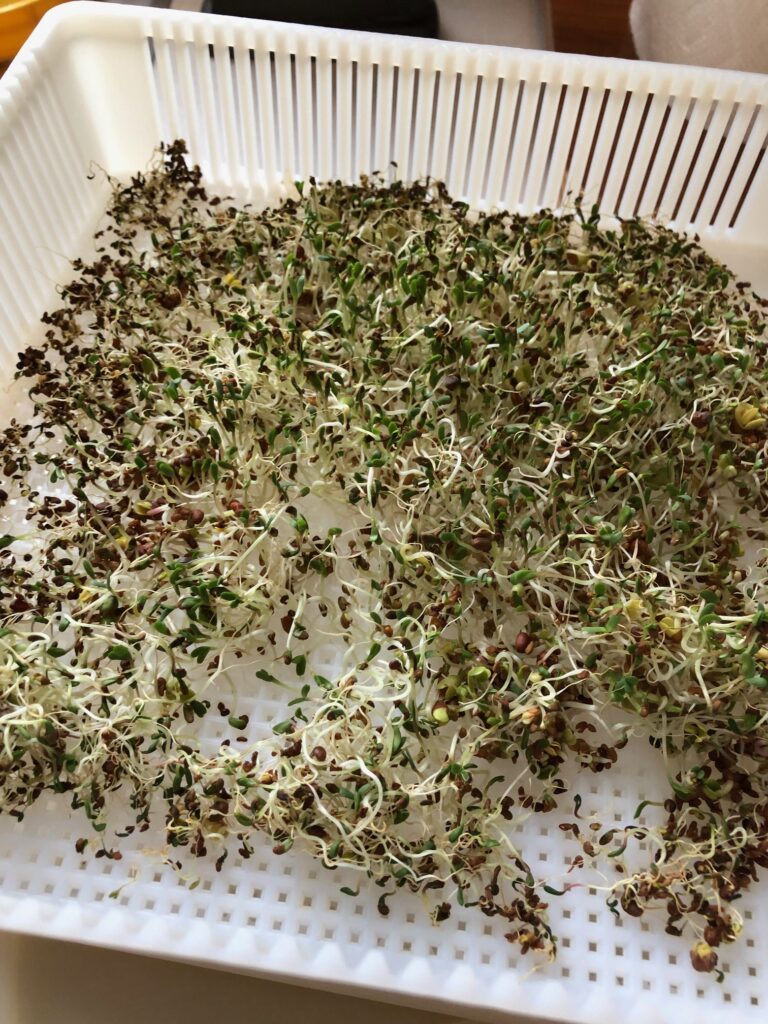
By Day 4 it was time to green up the sprouts. I could have just set the jar in the light and by the Day 5 I would have green sprouts to eat. Since I wanted microgreens, I gently spooned the sprouts into a flat sprouting box. I thought the roots would attach to the mesh and the plants would grow up toward the light. I was planning to spritz the sprouts with water as they grew. It sounded like a great idea!
However, by Day 5 the sprouts were struggling to do what I had in mind. The plants did not anchor well and because of the holes in the sprouting box, they also did not maintain the right moisture.
With microgreens, they should be watered from the bottom, not sprayed on the top. Now, I had a pretty sickly (and slimy) batch of sprouts/microgreens. YUK!
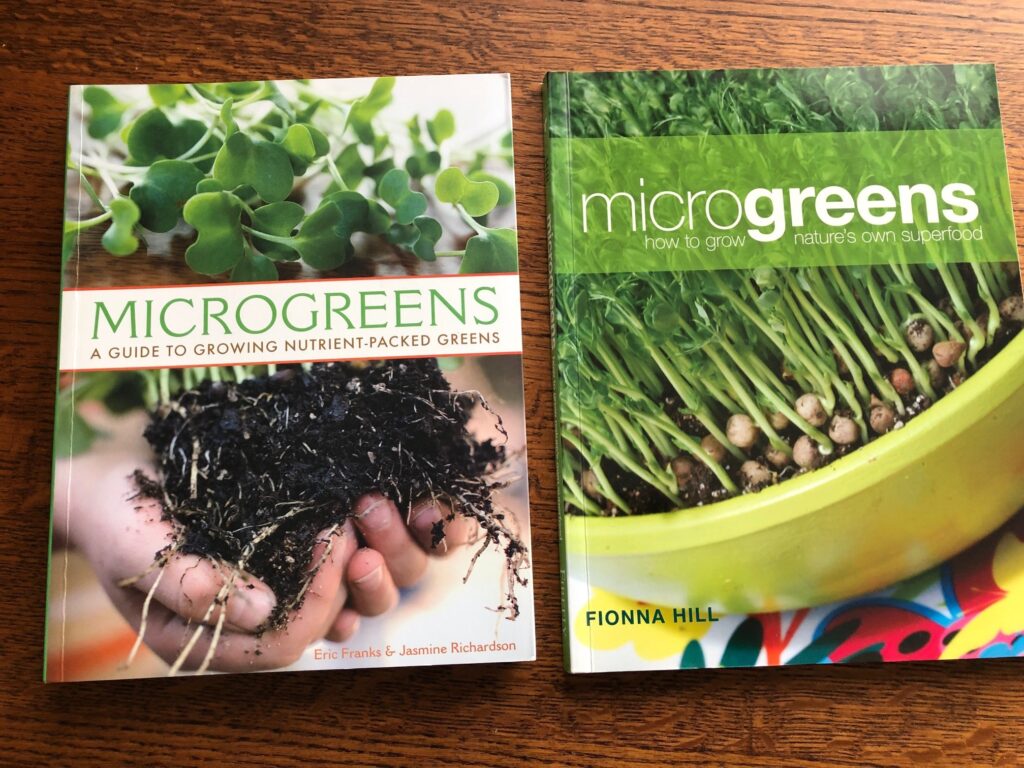
So, I guess I’ll do it the right way. First, I need to find my books about microgreens and unpack the grow light.
More on that in another post…soon!
Be willing to take a risk and try something new! All I lost was 1 1/2 tablespoonful of seeds and 5 days. Oh well, they will add to the compost pile just fine!
As always, feel free to leave a comment or email me at marykisner@comcast.net. Take a risk!
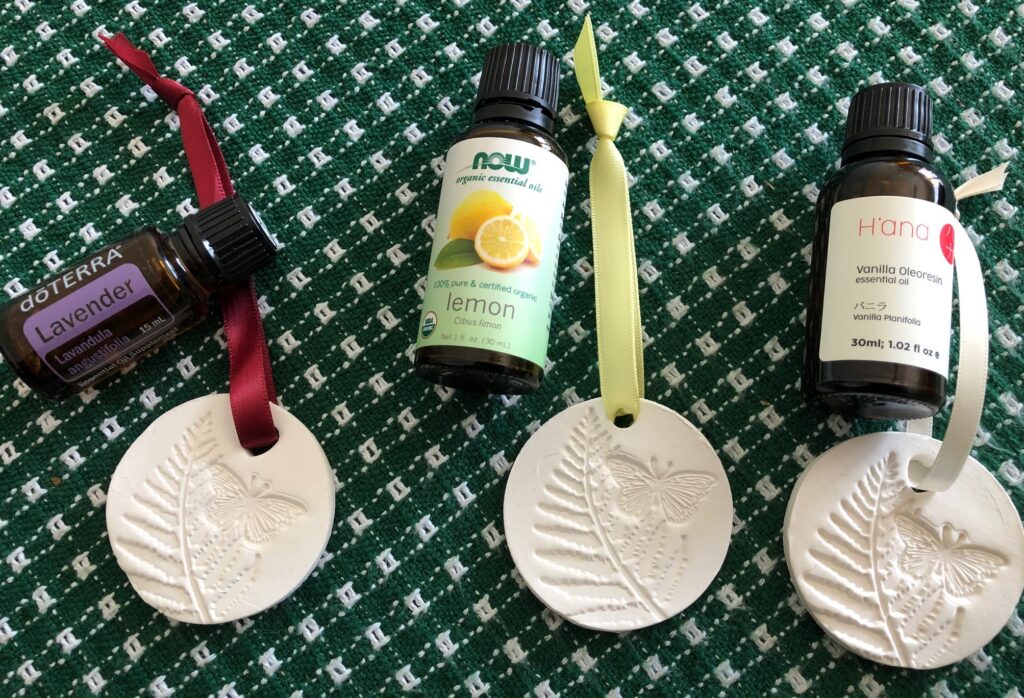
I have spent a lot of money trying to find an air freshener for a small room like a bathroom or closet that I like. Sprays sometimes leave a residue on surfaces. I don’t want that on the bathroom floor or my clothes. Some fresheners need to be plugged in, which ties up a plug. I know I like the essential oil fragrances like lavender, vanilla and lemon. There are many others to choose from. However, which fragrance will last the longest? Here is a quick project using air dry clay that has solved my problem. Give it a try! This would make a great project for kids and grandkids too.
Let the ribbon color remind which oil you used on which freshener!
First, some basic supplies:
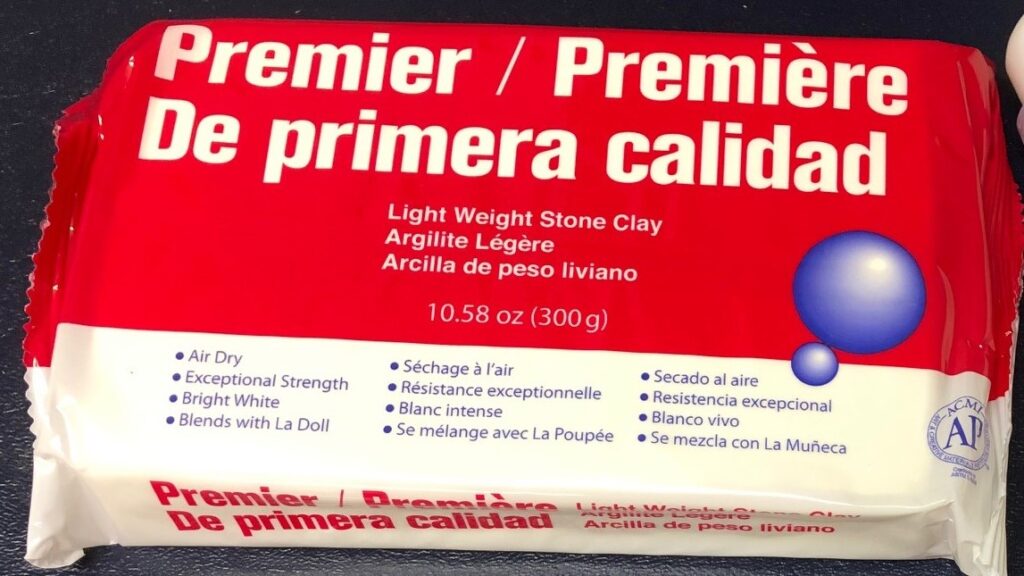
Air dry clay: This can be found at craft stores, Walmart or Amazon. It comes in multiple colors. I prefer white, however kids might enjoy making other things besides air fresheners! (How about an animal with lavender essential oil sitting by the bed…could help them sleep!)
Work surface: I’m using a piece of heavy glass (3/8″ thick) that is about 10″ by 12″. Bert found it at a glass contractor’s supply business. Glass out of a picture frame works, just put some masking tape around the edges. A vinyl tablecloth works too!
More supplies:
More supplies described below.
A clay rolling pin or large dowel rod.
Razor cutting tool. Perfect for getting the clay off the work surface. The one in the picture next to the rolling pin has a guard that serves as a handle. Then it can be removed and slid over the razor when not in use.
Disposable straw to make the holes to hang the item.
Cookie cutter (thin metal works best in cutting out shapes from this clay.)
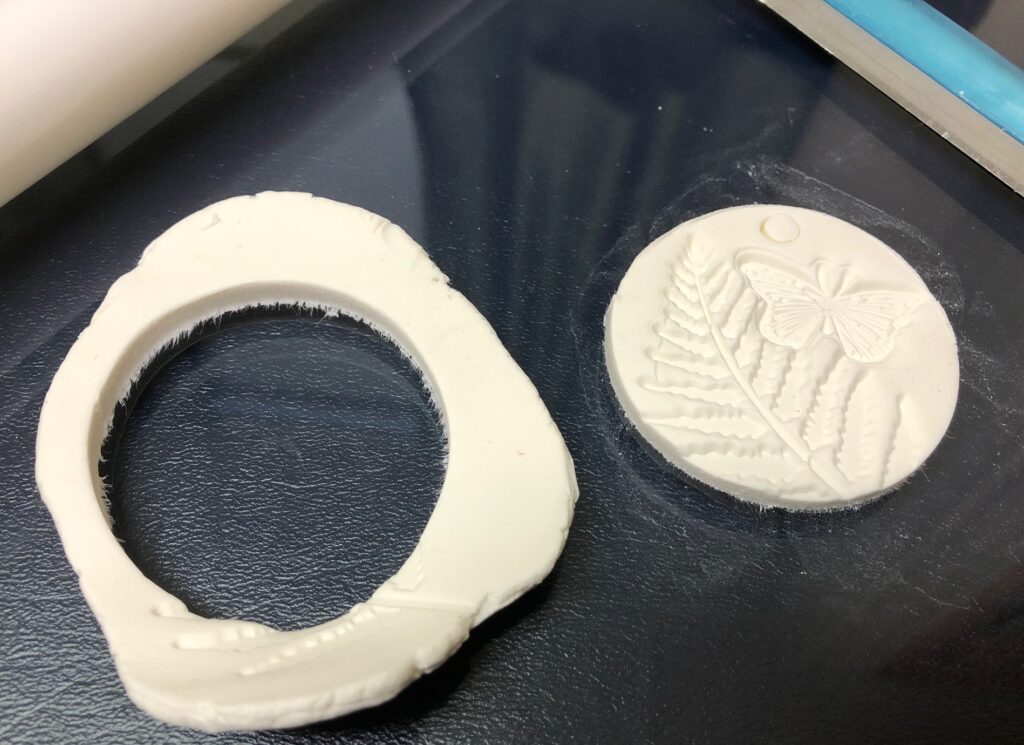
Anything to make impressions in the clay. This could be as simple as your thumb. Leaves make interesting impressions. Some rubber stamps (usually used with ink) make great impressions. I am using clear flat rubbery shapes that stick to a hard plastic base. They make an impression but don’t go too deep.
Wax paper or paper towels to put the finished pieces on to dry.
Wet wipes. Air clay leaves a chalky residue on your hands and tools. These make clean up much easier.
Essential oil or fragrance oil of your choice.
Here are the steps to make this air dry clay freshener:
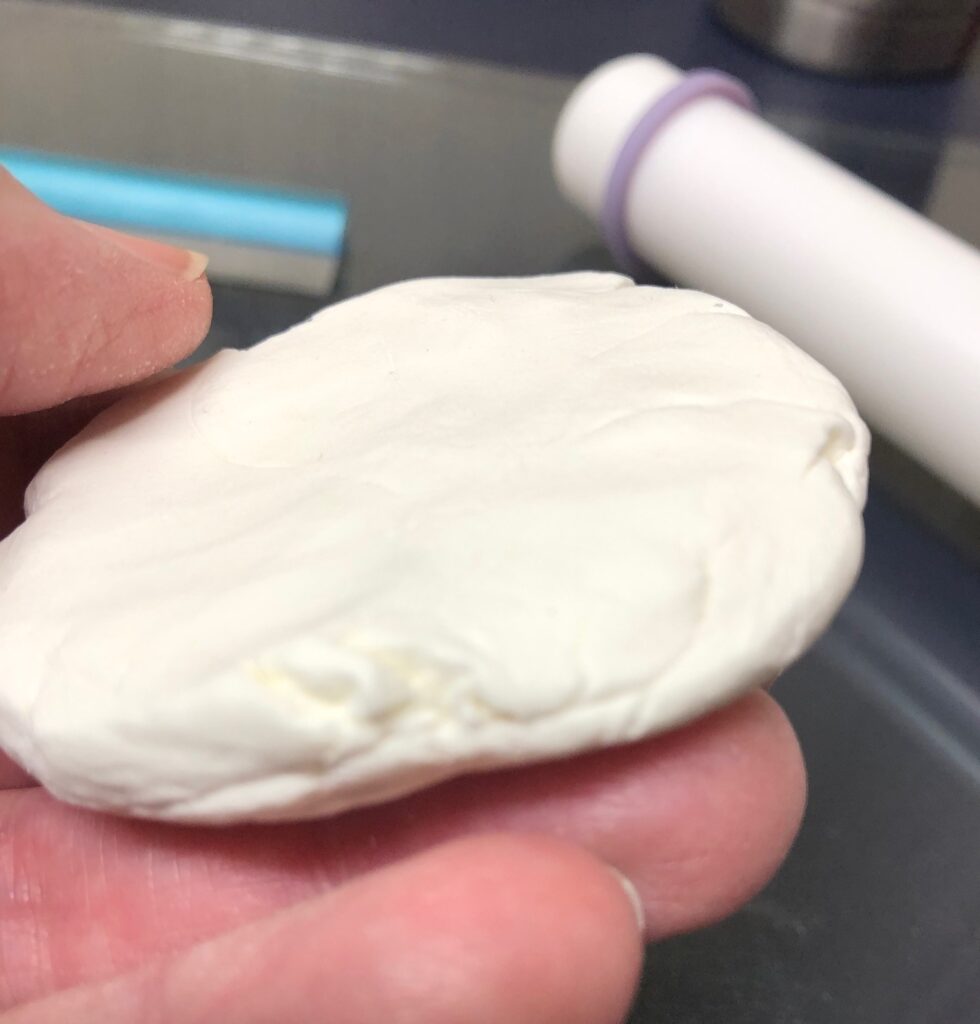
Step 1: Take a piece of clay and work it into a ball. Flatten the ball with your fingers.
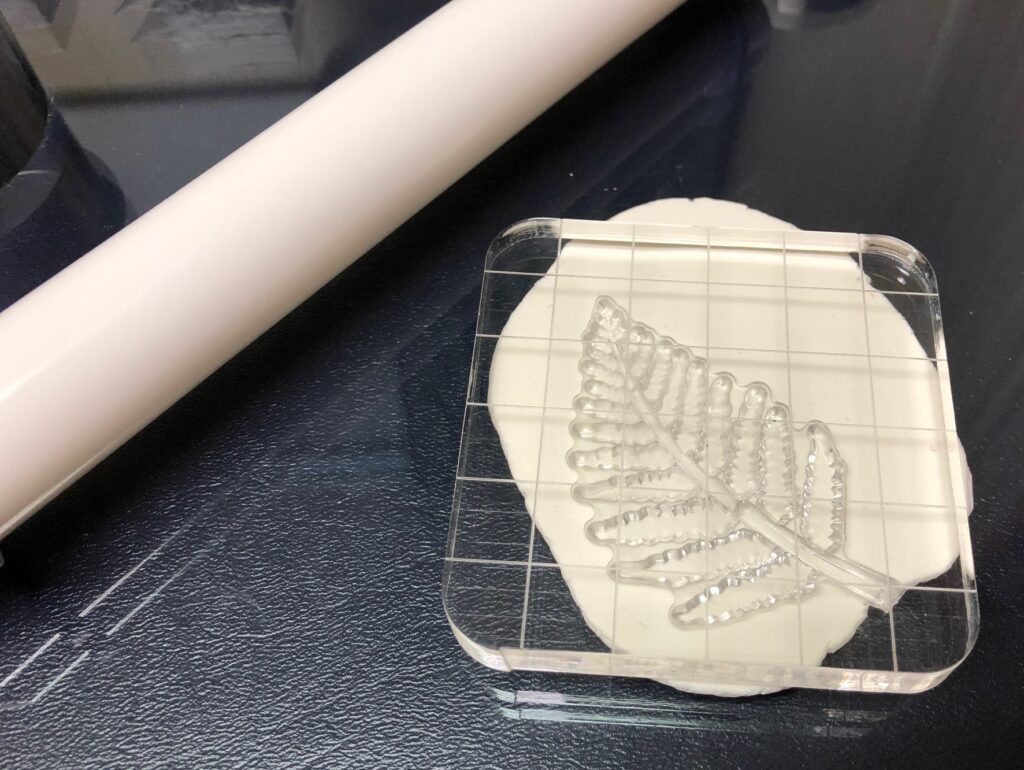
Step 2: Roll the clay flat with the rolling pin or dowel rod to about 3/8″ thick. The edges will tend to crack a little, don’t worry about that!
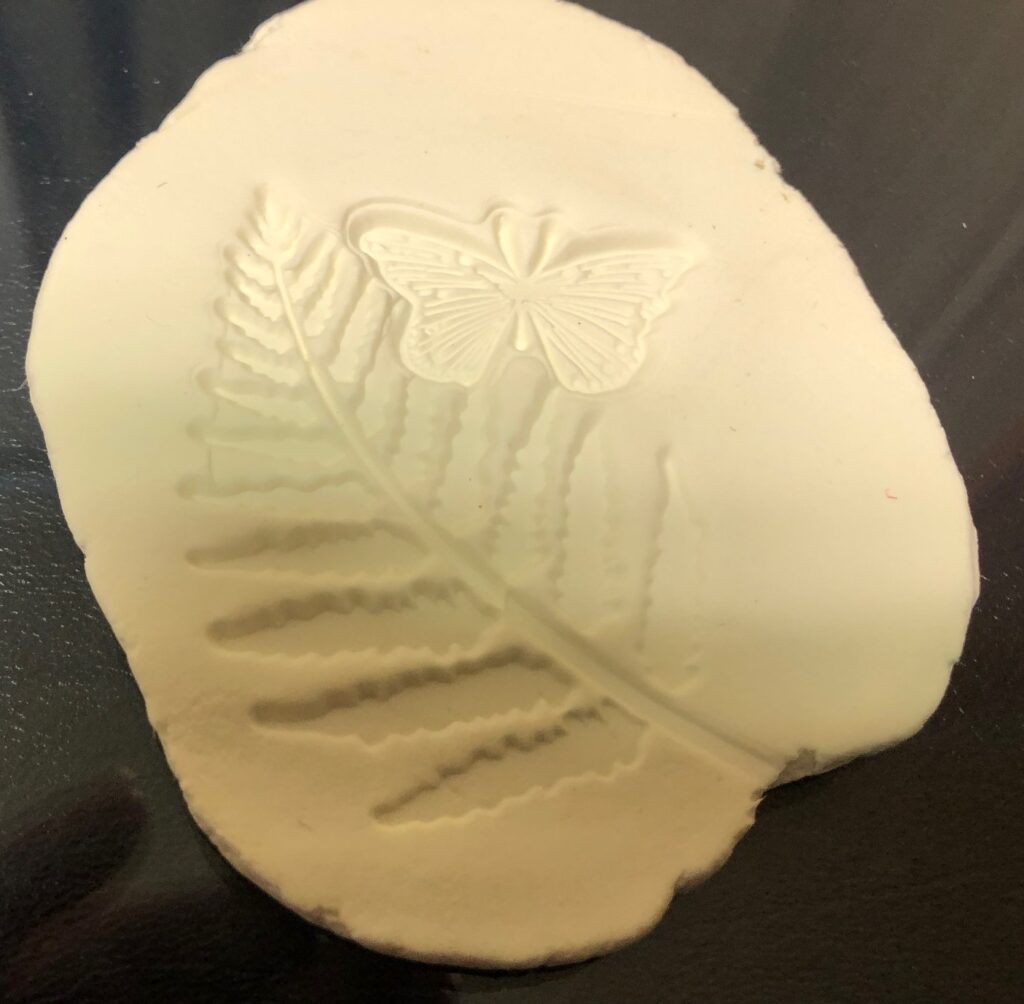
Step 3: Make impressions in the clay.
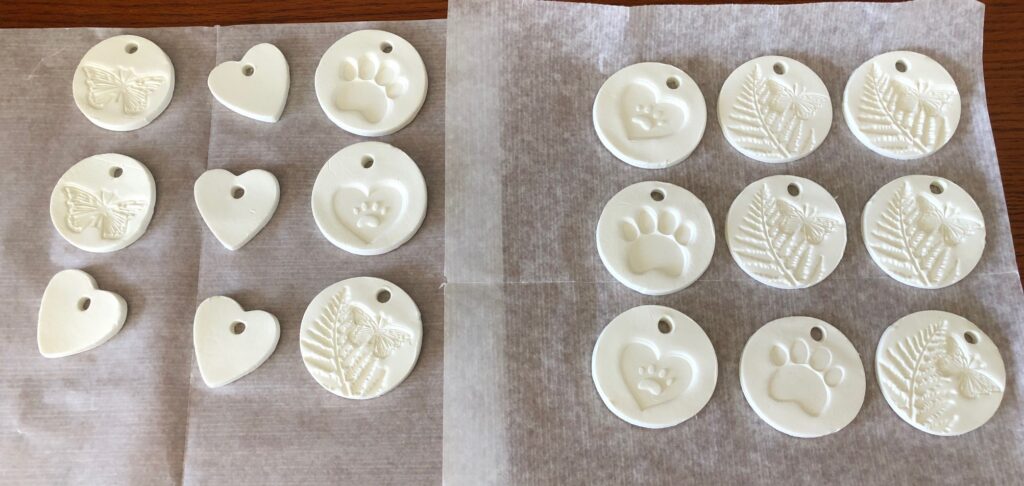
Step 4: Use the cookie cutter to cut out your shape. Small Christmas trees or stars at Christmas time make good ornaments and gifts!
Step 5: Make a hole with the straw and twist it a little to loosen it.
Step 6: Use the razor to gently lift the edge of the clay. Peel the outside clay off the item. Save this extra clay and work it into the next item.
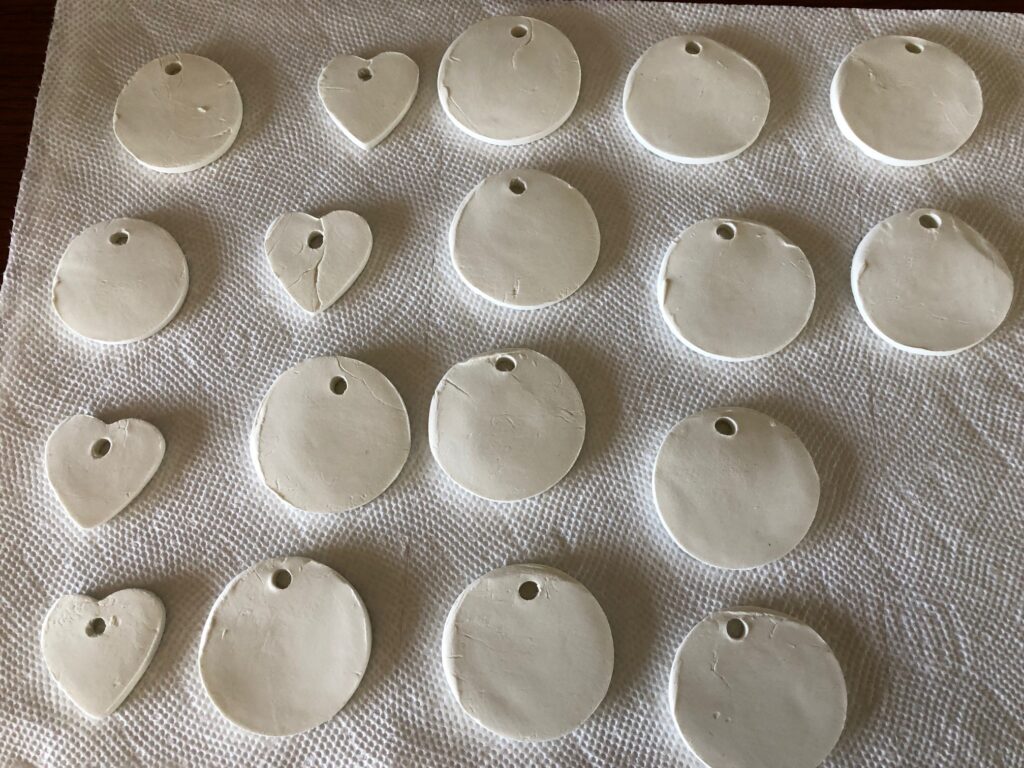
Step 7: When you lift the item off your work surface with the razor, you can gently smooth the cut edge with your finger. Place the cut items on wax paper or paper towel to dry.
Step 8: As this clay dries, it will often dry faster on the top. For the first few hours after making them, I watch when they curl and turn them over several times until they stay flat.
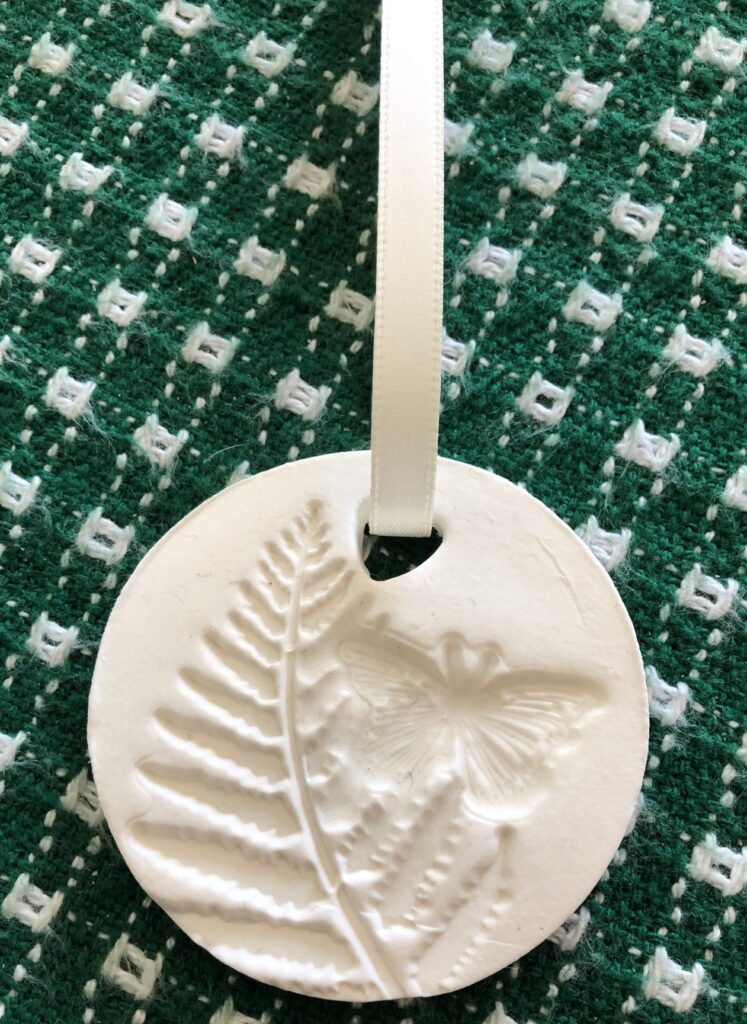
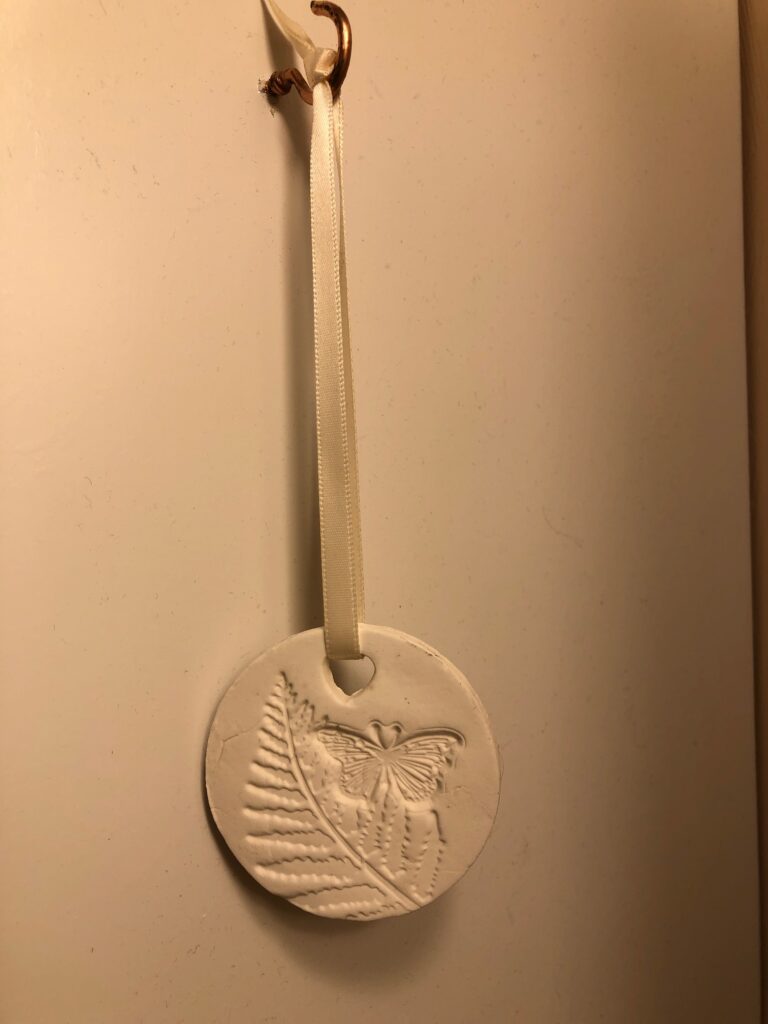
Step 9: Thread ribbon or string through the hole.
Step 10: Add essential oil. About 4-5 drops of oil is enough to start. Lay the item flat. Place the oil into the pressed design so it doesn’t run off the surface. Let the oil soak in. Use only one scent at a time. Add more essential oil one a week or as needed.
I made three items with different color ribbons. I will use lavender on the item with the burgundy ribbon; lemon on the one with the yellow ribbon; vanilla on the one with the white ribbon. I’m testing (one at a time) to see which scent I like best and which lasts the longest.
When dry, hang your freshener. Bert put hooks on the side of the bathroom cabinet for me. It looks pretty and smells great!
Enjoy! I hope you can have fun with this project! Please comment or send me an email at marykisner@comcast.net.
You will find, after seeing a few of my recipes, that there are no eggs or dairy products in them. I have food allergies to both and have been egg- and dairy-free for several years. As annoying as it is to have to do without them, I feel so much better that it’s worth it!
This is the latest product I’ve fallen in love with!
Luckily, the Food Allergen Labeling Consumer Protection Act (FALCPA) requires that foods are labeled to identify the eight major food allergens. These are: milk, egg, fish, crustacean shell fish, tree nuts, wheat, peanuts and soybeans. These 8 major food allergens identified by FALCPA account for over 90 percent of all documented food allergies in the U.S. If you look carefully on most packaged food, right after the list of ingredients you’ll see the list of allergens. When it says, “milk” that could mean they seasoned the food with Parmesan cheese or cooked it with butter. It may also say, “Made in a facility that uses those products.” Cross-contamination matters if you are deathly allergic to any airborne components, like wheat flour or particles of nuts.
I do not need to avoid wheat, soy, fish, shell fish, peanuts or tree nuts. And my allergy does not lead to a life-threatening result. However, I may experience a sudden bout of diarrhea if I ignore my allergy, so if I’m eating away from home, I’m pretty careful. I also can eat meat so if I ask how things are cooked, I can usually find something to eat. I’m certainly not starving to death!
One of the first things I missed the most was mayonnaise (and of course butter, ice cream and cheese!). I have found Smart Balance a good substitute for butter on toast and in cooking. There is coconut ice cream if I must have ice cream. I have not found a good substitute for cheese, so my days of a good toasted cheese sandwich and pizza are behind me. I have tried to order a pizza without cheese…just not the same!
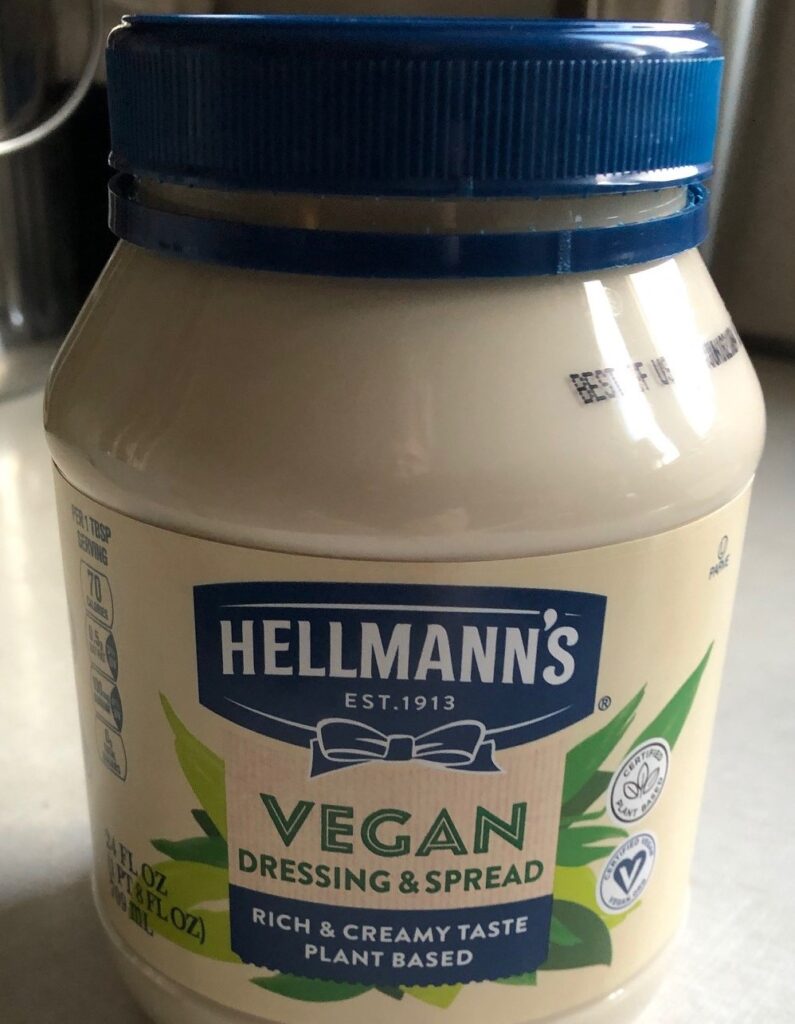
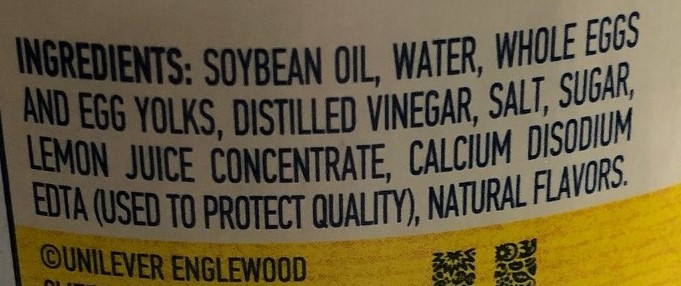
According to the Federal Government, to be called mayonnaise the product must include EGGS. Therefore, the item I’m talking about today has to be called “Vegan Dressing and Spread.” However, it is found on the shelf right next to Hellmann’s Mayonnaise.
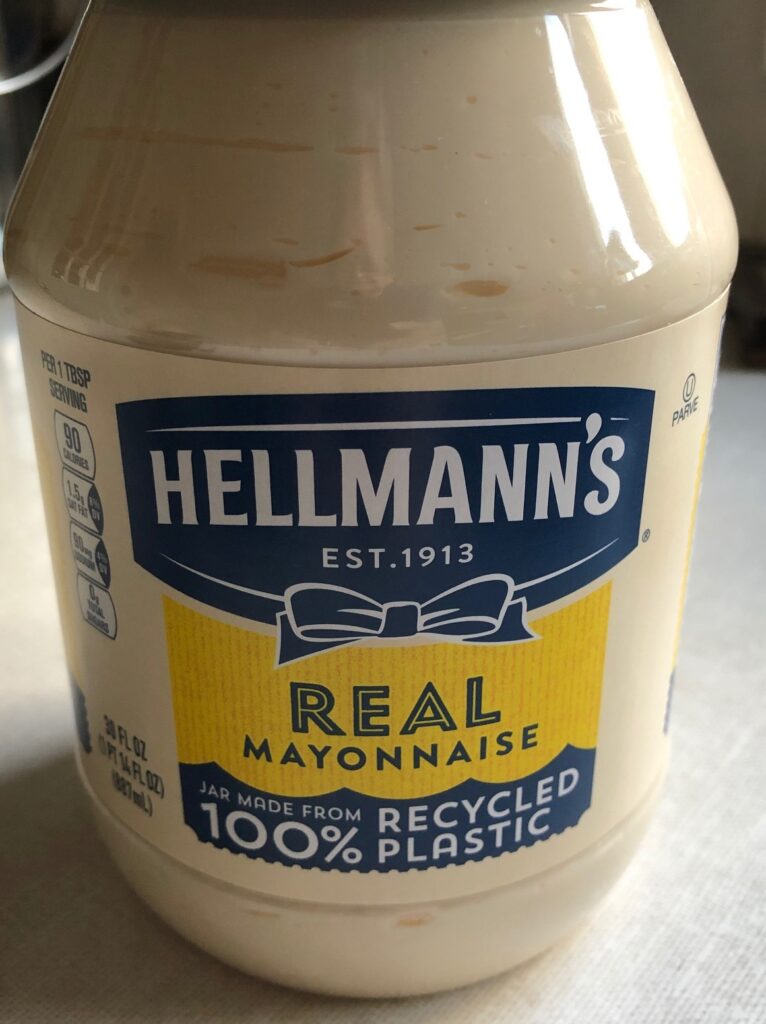
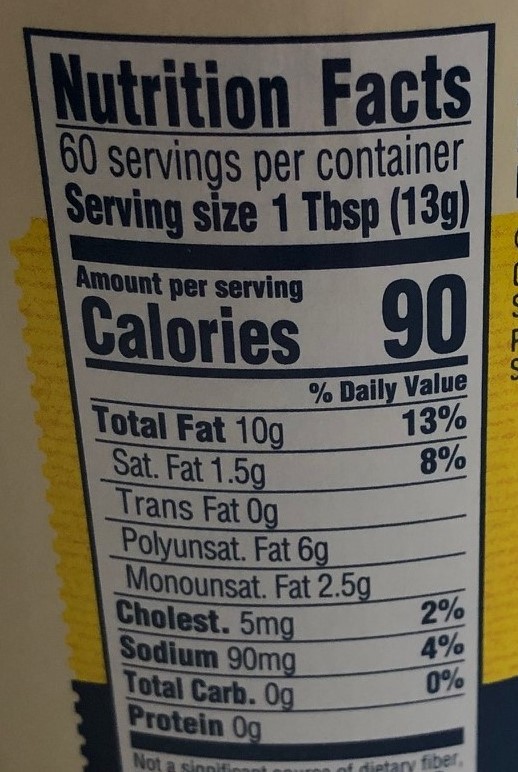
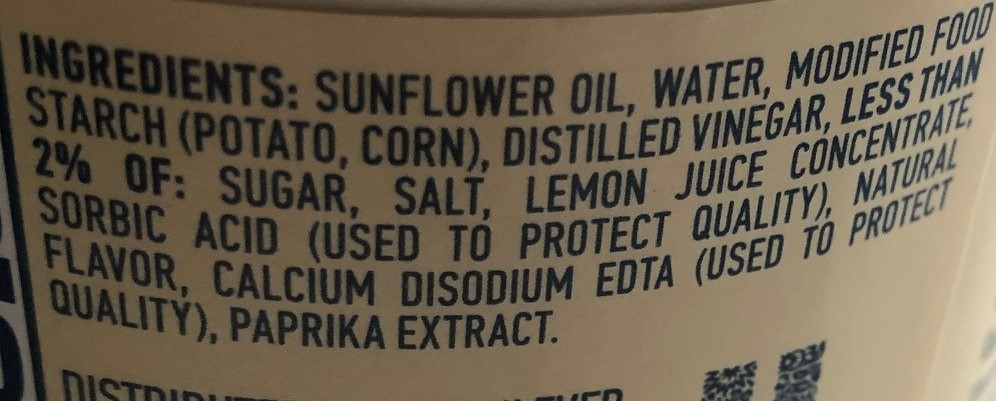
Here are some details on the jar of regular mayonnaise:
Notice Hellmann’s Mayonnaise has whole eggs and egg yolks. It can legitimately be called Mayonnaise.
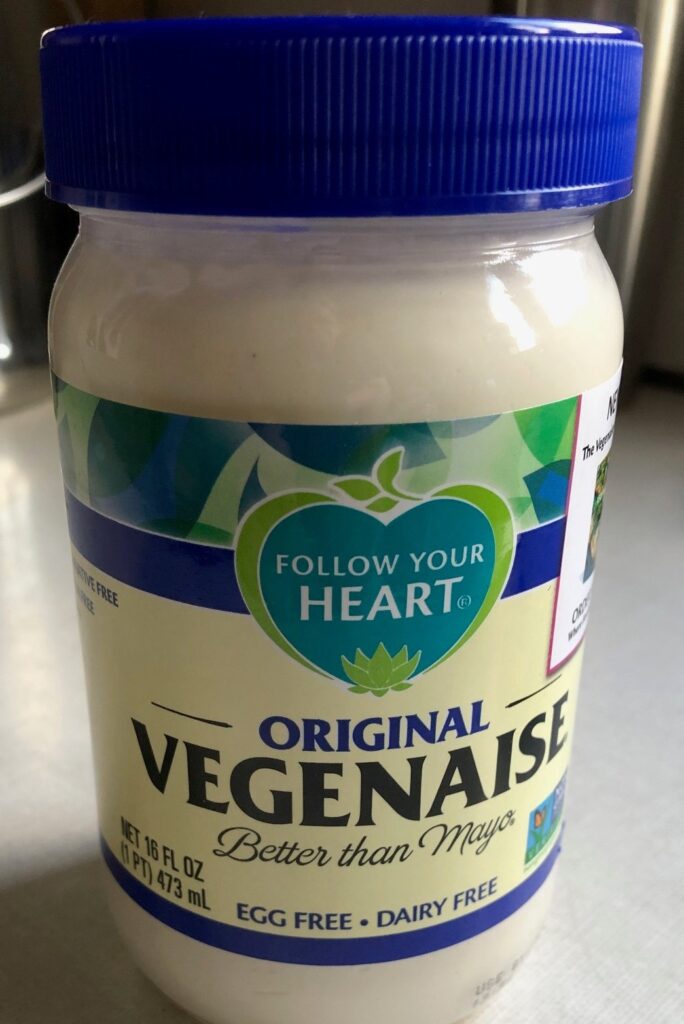
My salad dressing of choice was always Thousand Island dressing and I had been making my own for several years using regular mayonnaise. Once I found I could not have mayonnaise, I found Vegenaise.
This does not say it is Mayonnaise…it is “Better than Mayo.”
This was in the Organic refrigerated aisle at the grocery store. It worked, tasted fine but tended to separate. I would make chicken salad and the next day I had to drain off some watery liquid and mix it up again.
By surprise when I was buying regular mayonnaise for Bert, right there next to the Hellmann’s Mayonnaise was Hellmann’s Vegan Dressing & Spread!
This turned out to be just what I’d been looking for. It tasted great, was creamy, mixed well with salads and DID NOT SEPARATE! Yea! It did not need to be refrigerated until being opened.
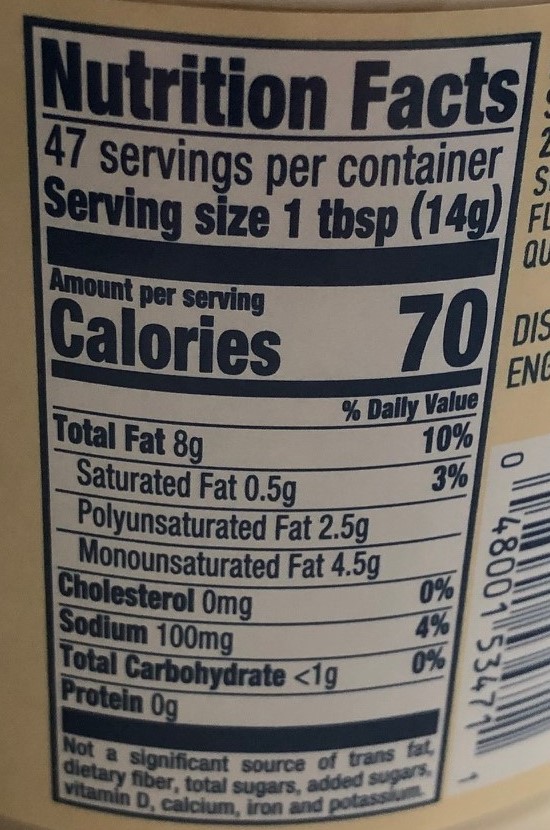
Hellmann’s Vegan Dressing & Spread had fewer calories than regular mayonnaise and was even lower in Total Fat. It tasted just fine!
Here are more details about this product:
Hellmann’s Vegan Dressing & Spread has no eggs!
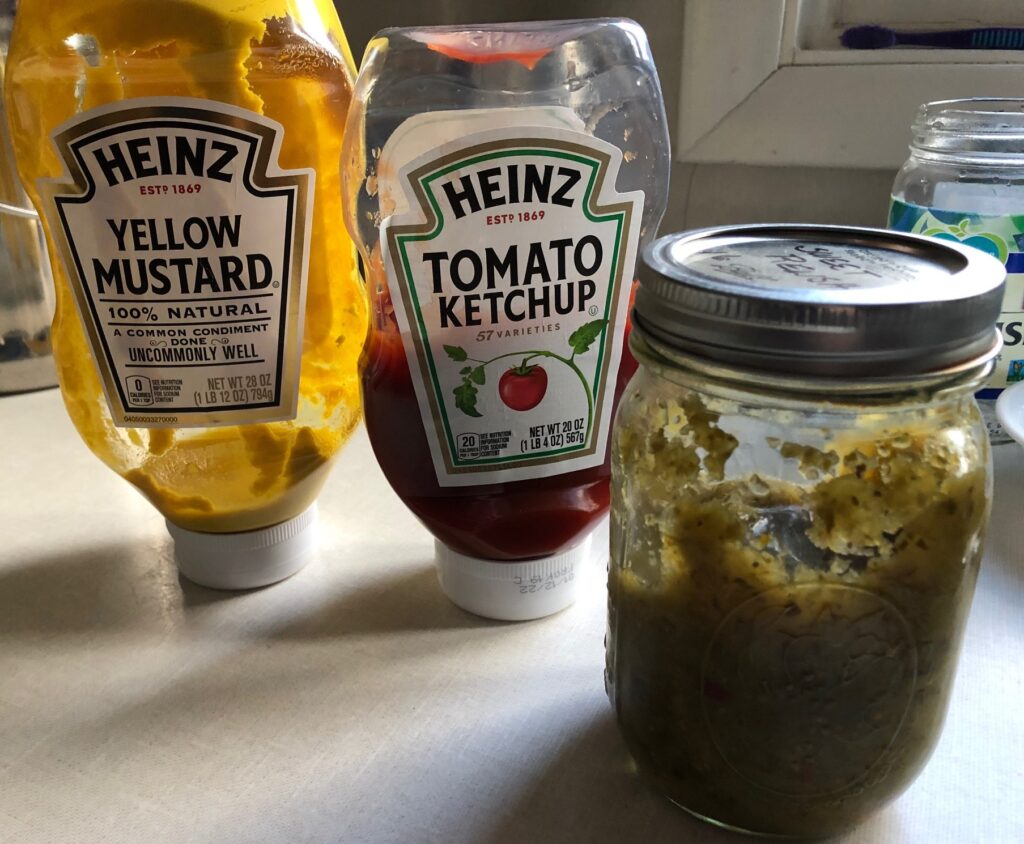
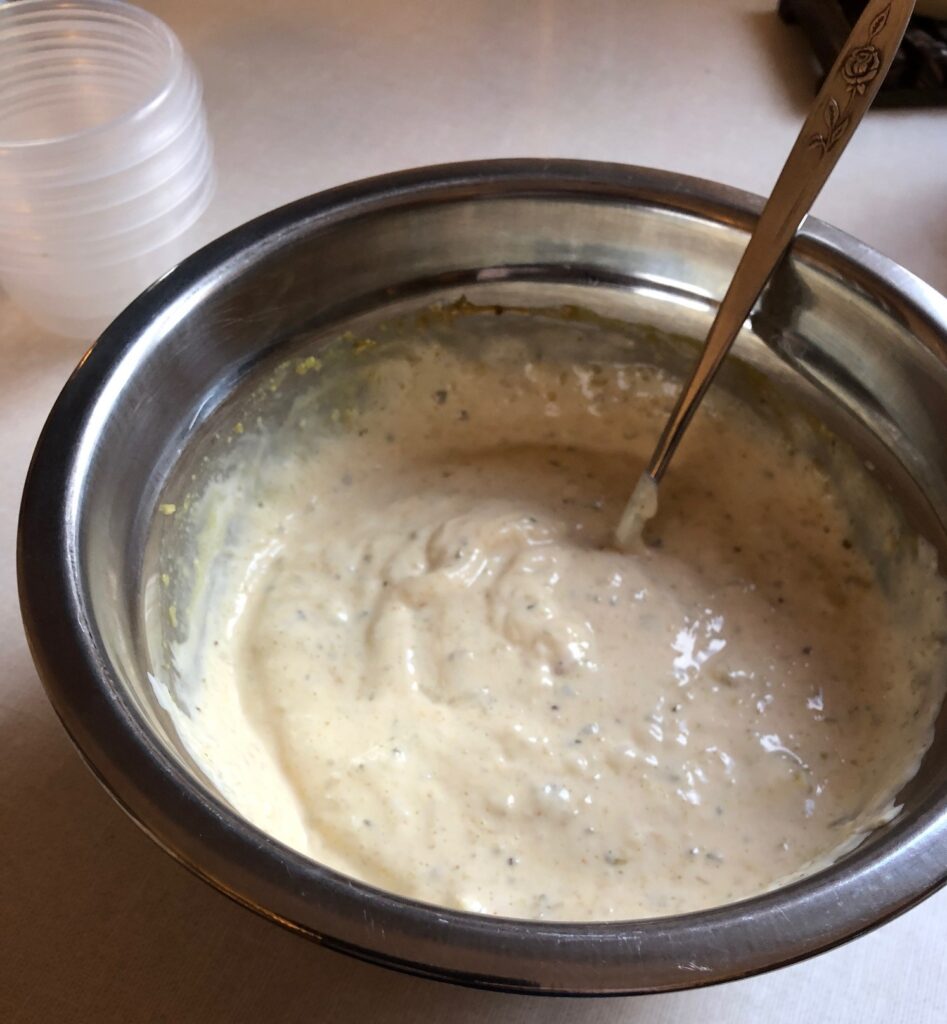
Now, to make my version of Thousand Island dressing, I use a cup or so of this Vegan Dressing and add a tablespoon of my home canned sweet pickle relish, a squirt of mustard and a squirt of ketchup (real exact measurements! HaHa!)
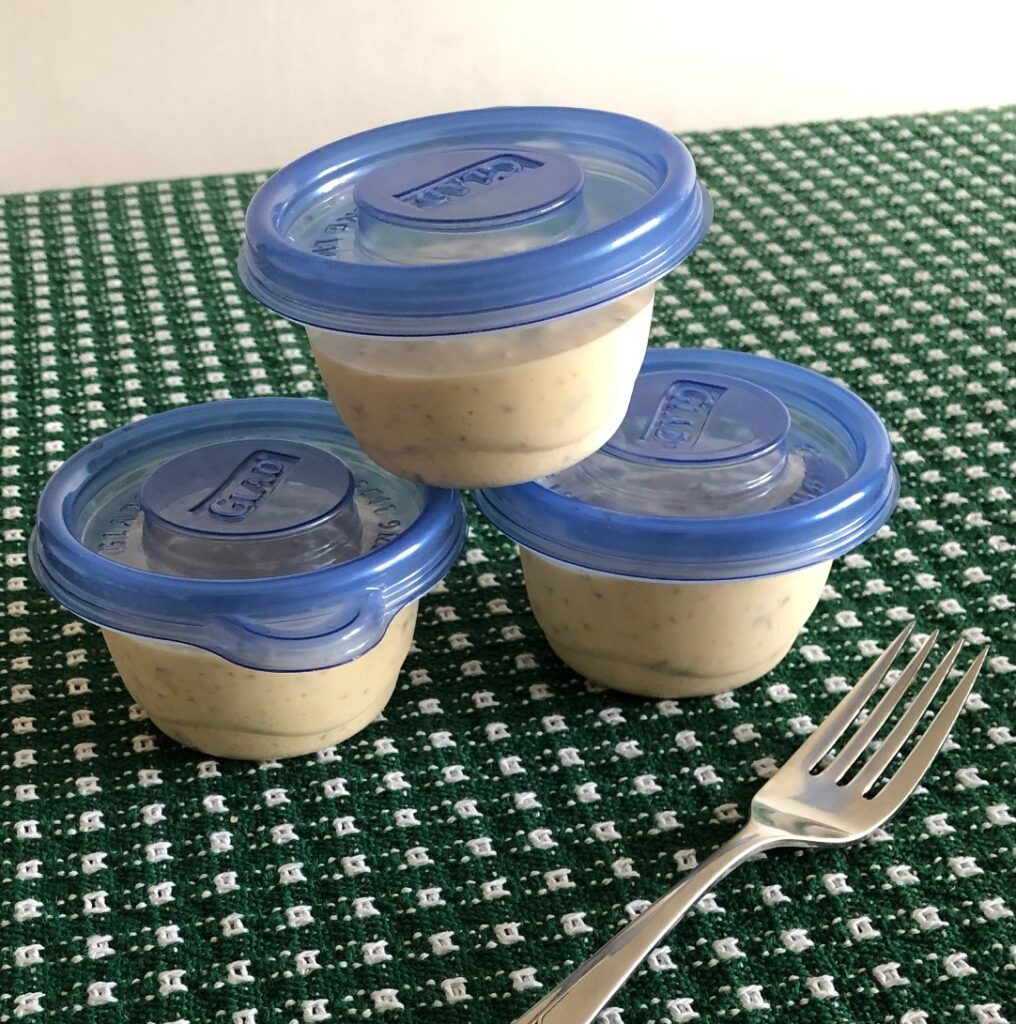
Sweet pickle relish, mustard and ketchup adds flavor and color.Homemade Thousand Island dressing that is safe for my egg- and dairy-free diet!These small disposable cups hold about 1/2 cup of dressing…just right to take to a restaurant.
Finding this substitute for mayonnaise makes me not feel too bad when I have to restrict my other choices so much!